Making a Textured Punch
I’ve been swamped at work, and laid out with a nasty cold so I’ve had very little time in the shop which makes me a sad panda. However, I did get a little time tonight to work on a side project while working on a commission for a repeat customer of my pens. While some of the glue was drying, I managed to put together a textured punch for use in the 16th-17th century reproduction work I’ve been playing with. Specifically for the background texturing as so ably displayed on Peter Follansbee’s blog. I linked the post where he shows some close up shots of his tools and his punches.
I made a texture punch to go with my nail punch I’ve already got for making marks. I want to carve a Cross shaped stamp as well, and I’m thinking of making a Fleur de Lys punch because my wife loves the French historical stuff so I thought I’d make her a carved box as well.
I snapped a picture of it finished, with some test punches on some pine board that I had lying around. I quite like the look of it, and I can’t wait to get some time to work on some new carved panels and add this element.
It was pretty simple to make, and took me about 15-20 minute tops.
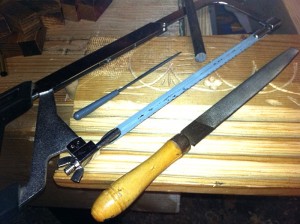
I took a piece of cold rolled steel rod I got at a hardware store a while back, and cut a small length of it off with the hacksaw.
The I flattened the end with metal file with the small section clamped in my metal vise.
Once I got it flat, I took the hacksaw again and cut some parallel lines as evenly as I could. I just eye balled it really, and I think it came out OK. I did 5 lines in one direction and 5 in the other. I kept going over each line slowly to make it deeper, and carefully to make sure the blade didn’t jump out of the track. I turned it 90 degrees and did the other side, and back again until I was happy with the depth on all the lines.
Then I took a small triangular file I had picked up at the cheap tools store, and refined the lines into triangular troughs, to create the pyramid pointed shapes on the end of the punch. I kept eye balling the filing until they were all even (ish) and a good shape. It really helps to have good light for this, and maybe even a magnifying glass.
A final clean up around the edge to remove some of the burrs, and it was done. I tried some test stamps, and cleaned up a couple lines after looking at the resulting impression, but it didn’t take hardly any time at all.
EDIT: After posting this, I re-read Peter’s original post and went back down to the garage and played with nails and the needle file set. I managed to make a passable small cross punch, but I think I need better nails to start with. I’m going to make a run to the hardware store to get some bigger nails to play with making punches. I think they’re a fun easy way to add life to the carving work, and really make it more period. I’ve stared at many pictures of 17th century stuff in Chinnery and online and you can see the use of them pretty frequently to fill spaces.
Badger


Wouldn’t you know I just made a set of textured punches and a cross punch this last week. I was beginning to work through the outline of a quick post when I got distracted by my neglected blog reader and all the posts I haven’t caught up on. Low and Behold, I have found someone else making textured punches and playing with Peter Follansbee’s techniques. Great minds think alike.
Keep up the good work!
Oldwolf
Yeah, I’ve been having fun with the 17th century carving stuff of late.
I made a couple punches, and they’ve been a great addition to my toolkit, as well as surprisingly easy to make. A couple six penny nails, a hack saw, and some files and voila! Textured punches!
I’ve been following your blog as well, and I’ve admired some of your work. It’s fun to see others learning along similar pathways as I’ve been going.
Enjoy!