Table saw Crosscut Sled
Last night I made a cross cut sled for my table saw to help in cutting Pen Blanks. I’m setting up to do a bunch of them, so I needed a nice safe way to cut lots of blanks.
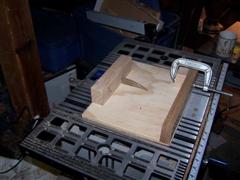
The sled features oak runners, plywood base, and oak and pine fences. I added a block clamped to the front fence so I can quickly measure out the length of the cut and make the same each time. Saved me lots of time!
Steps: I didn’t take any pictures while making it, so I’ll just describe my steps.
1. Cut an oak 3/4 molding strip down to the rough width of the runner slots for my table saw. Adjust gradually on belt sander till it moves easily in the track.
2. Cut the base out of ply wood. I made my sled small since this was going to be only for cutting pen blanks.
3. Drill, and countersink the holds for the back (leading) fence. Attach scrap pine 2×4 cut off I found on the floor to the back edge. No need to worry about it being square, since you don’t use this edge to base your cut with.
4. Drill and counter two holes on the front edge. Screw 1 end into the back fence (I used a piece of oak scrap I had), and leave the other end free. This lets us adjust the back fence to be square after we attach the runners.
5. set the runners in the tracks, and put the base on top of it. Mark the locations very carefully on the edge of the base. I made sure that the base was pretty close to square here so that I didn’t have to adjust the back fence too much.
6. Turn base over, and screw one of the runners to bottom of the sled with two short wood screws. Make sure you counter sink these screws, so that they don’t drag in the track. Also make sure you don’t have pointy bits poking your though. Make sure it fits, and runs OK with just the one runner. Line up the other one in the track, and mark it again, verify your old marks, or make new ones.
7. Turn base over and screw in one screw in the runner. Test fit it. If the runner binds, move the screw a bit, and try again till it runs smooth. Once you get it running smooth, screw in the second screw for the second runner. Test fit again, if it binds now adjust with a file, Dremel, or plane.
8. I removed all the screws to the runners, and added some wood glue, just for kicks.
9. Turn it over, get the back fence roughly square (since you only have one screw it should be able to be adjusted at the moment.) Raise the table saw blade a bit, and run it across, making sure your screws don’t hit the blade. Raise it gradually, and keep making passes until you’ve cut through the bottom of the base, and halfway up the fences on the front and back. (you don’t want to cut all the way through, you’d have two pieces, and you don’t want that.)
10. Park the blade in the middle of the sled, and using a square, square up the back fence with the table saw blade. Mark this spot, and screw in the other screw making sure to maintain that position. Test it out on some scrap wood.
There are probably easier ways to do it, but this is what I used. I didn’t do much gluing, and I suppose you could put the base on the runners with glue while in the table saw to avoid having to adjust it much, but I didn’t want to wait for the glue to dry, and I had tons of screws so I just went for it.
Later I want to add an angled insert so I can cut pen blanks at a specific angle to make cool layered accents of different colored woods, etc. but this works well for now.
More Pictures:
The Bottom:
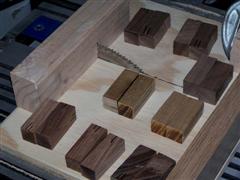
A quick minutes work with the new sled. I cut 2 Myrtle wood blanks, 4 Walnut, and 2 Rosewood pen blanks in under a minute with this jig. And my fingers were never close to the blade (a real plus!) The stop is a real time saver, I measured out where I wanted it, did a test cut on some scrap, and compared it to my tube length, once I was happy with that, I was able to slap the length in there, put it flush against the stop, and make the cut all in one easy motion. Next cut, safe motion. I was even able to mark the blank while it was still in the sled.

— Badger


