Sawbench
I’ve been wanting to build a sawbench for a while now, and today I finally got to it. I think I was going to do something else when I wandered down to the garage, but this is what I worked on. That’s how it is sometimes, it’s almost zen-like at times. I just settle into the garage, and see what wants to be built. Today it was a sawbench.
I built it out of scrap from the lumber pile, the top was some spare 2×8 from I have no idea what project, and the legs are recycled from an old bunk bed that a friend let me scavenge a while ago. It gives the sawbench a bit of a “frankenbench” appearance but it will do. I wish I could build such pretty things as featured in the magazines, but I think I need to do my time with lesser woods until my skills are better.
What I think I liked best about the build was how I came up with the plans. Pretty much on the fly, that’s how, and very little measuring. That might sound odd, especially since “measure twice, cut once” is a tried and true slogan. And I did measure to be sure, but not with a ruler. The only thing I used a ruler for was the height of the bench (17″), and that was to measure my stump I used to use as a sawbench. The rest came from the thickness of the wood, and from the piece being worked on. I took the idea from Roy Underhill when he showed us how to set our gauges to the thickness of the mortise chisel, and work almost everything from that. For a starting point, I looked at this plan by Chris Swartz, used the basic idea to get started, and the rest just flowed.
Here is the top with the notches cut out. As luck would have it there was a hidden knot in one of the forward notches, but I was able to work though it with a few good whacks of the big hammer. I angled everything at 10 degrees, like in the plan, set my sliding bevel gauge to that from a kids plastic protractor I had around. I could have eyeballed it, but the protractor was handy.
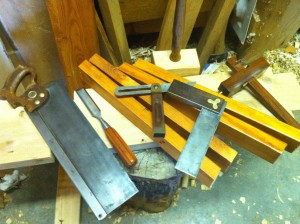
I actually started with the legs, but didn’t take any pretty pictures of them, but I wanted to show off the tools I used for this project (up to this point) so I staged a nice little shot here. I love this saw I found, it’s a Disston and I got it for $12 if I remember right and rehabbed it to its current state. It does need some sharpening though, next time I’ll have to do that, but it cuts fairly well as is. Under it all you can see the beat up old stump I’ve been using (or trying to use) for sawing and other stuff.
Once the top was cut, and the legs all do, I drilled some 1/4″ holes in the legs with my bit and brace. I just eyeballed the level by clamping the legs about 10 degrees angled and drilled away. In a break from “period” I used 2″ drywall screws to attach the legs to the board, mainly because I was in a bit of hurry and I didn’t have any good ideas on how it would have been done. On reflection I probably should have cut a step in the legs and probably doweled things together. Next time.
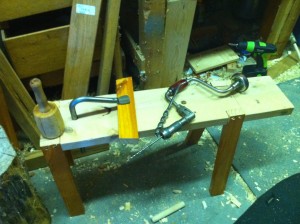
Once the legs were on, it became evident pretty quickly how useful this bench is. I drilled a couple 3/4″ holes in the middle and used a Gramercy Holdfast to hold the cross braces down for drilling and sawing. Iet grabbed nicely in the 1 3/4″ pine top, and held things really well. This makes me very happy. In the background of the picture you can see the one power tool I used. I love that drill, I really do, and it’s very handy to save my wrists (I have Carpal Tunnel in both wrists, hazards of the job I guess.) I actually only used it because I couldn’t find a screwdriver, funny thing.
The I put the notch into the front with a rip saw, and cleaned up a few edges, and called it day. A hot day, we’re in the middle of a heat wave here, so I didn’t spend too much time on the final stages. I do need to level the legs a little but I can see how this will be a big help around the shop already. I need to practice my hand saw technique, and I think this will help put me into the proper position to saw straight cuts.
All in all I felt good, not scrambling for the tools and wondering if I was doing it right. I felt more confident with the hand tools, and they worked well for me.
Badger


Comments are Disabled