My first 17th century carving attempt
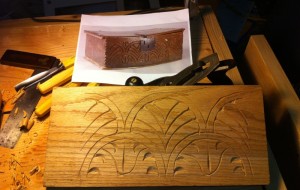
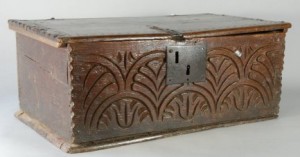
The last month or so has been a whirlwind of stress at work, as well as being very cold in the shop so I haven’t been able to get down there as much as I wanted. But finally I got a little time to work on this carving that I wanted to work on since I got my Peter Follansbee set of carving chisels. I’d been admiring this particular pattern on a 17th century box he’d posted in his blog a few times, and I thought it might be a good place to start working from. The reason I chose it to start was because it was mostly V tool work, and I could visualize almost every step in my head. Plus it looks very cool, which is always a plus. I’m going to be making a bible box in the near future as a present, and this was one thought for the carving I wanted to add to the box. So, I cut up some flatsawn Oak stock and gave it a whirl, and it came out pretty good for my first attempt really even if I can’t get any riven partially green stock like PF uses.
To achieve this carving, I started with a simple grid layout of 3″ squares centered on the front. I did multiple sketches on paper first to work out the details, and this was the easiest way to start the layout process. Once I had the grid lightly marked into the wood, I got out the compass and made a series of arcs along the top and bottom rows, alternating the starting points to get them offset. I made one big mistake here, and didn’t count out the grid exactly right and as such, my design was short one set of arcs/grid squares, but it works out because the design looks good on any number of repeats.
Once I had my first set of arcs down (I penciled them in above to make them clearer in the photo) I eyeballed a good looking distance and carved another set of arcs inside the first set of arcs.  This could have been a little bigger I think, but overall it didn’t look too bad to my eye.
And that was the extent of the actual layout for this design.  I did most of the rest of the design freehand with what looked good, trying to follow with traditional carving techniques as I’ve learned of then in PF’s blog. He shows numerous examples of symmetry being off for our modern eyes and numerous things we would call “mistakes”. Once you look at it as a whole though, it all looks good. The major mistakes I made doing this were the bottom U shaped cuts, I need to actually lay those out next time, as going from either side was difficult to reproduce, and my half moons in the lower arc were chipping out a lot which could be wood, or technique issues.
But overall, for a first practice piece I felt pretty good about it, and it was good to finally get to practice what I’d been reading about on PF’s Blog, and watching his DVD.
Badger


Very Cool….
I also am working on a carving, Just like you… had to stop the carving to make the texture tools. I was using some Ole Flat sawn oak that I had laying around to use as my 1st carvings, but I think it was a mistake as the chisels will ride with the grain very fast insted of following your layout lines. Lesson here is not to use flat sawn stock on your 1st attempt at carving…till you have your chisel control down. lol
Thank you for the PF chisel match up from his blog… Have you had a chance to match up his chisels from his DVD yet…?
The only thing that I’m wondering about is, his V-Tool has been modified on the cutting edge, and I cant bring myself to do that yet on my stock OUT-OF-BOX Pfeil 12/8 yet. I’ve also noticed from blog Pic’s, he uses a 15/6 V-Tool….
Away… keep up the good work…. and posting’s of this project…!!!
OBTW… more pic’s…. 🙂
[…] chronicled in the following posts one, two, three, I’ve been working on a carved box in the style of a 17th century pattern. […]