The “Anarchists” Saw Bench Box
Apologies to Mr. Schwarz for tagging onto his book title, but I felt it was appropriate. I’m a good way through a project that I’ve drawn the inspiration from his fun essay on tools as well my own personal research into historical forms.  It’s also very fashionably “on trend” with the use of nails, bonus! For the record, I started this project before Adam’s nail seminar at WIA, so I get credit for being ahead of the curve, right?
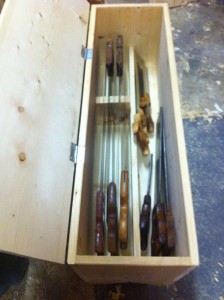
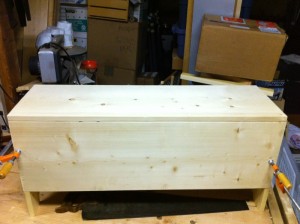
The basic concept of this project is Saw bench + Saw Storage + Historical Recreation = Saw Bench Box?
Since moving my tools into my rolling tool box, the only things that didn’t have a real distinct home were the Saws, and the Molding planes. I cast about for different ideas for storage, including possibly a saw till based on some of the designs that were all the rage for a while with the bloggers. (Any one noticed that these projects come and go in waves? Kind of interesting if you ask me.) However, I don’t have a lot of free wall space for hanging anything due to the nature of my shop. I was cruising the Marhamchurch Antiques site for carving inspiration when I was given a jolt of another kind of inspiration. The old style of chest, storage box known as the “Six Board Chest” would actually be a great way to store the saws I have. It could replace my existing rickety saw bench (I rushed the construction, and paid for it in a sloppy piece of work) It could store my saws, and as an added bonus I get to do a recreation of historical forms of boxes, always a plus for me. I studies a lot of pictures, settled on a design, and went for it.
Key elements of this project that I wanted to work on:
- Deliberate and steady pace of work
- Clean cuts, and extra care in getting the fit right
- Only hand tools would be used
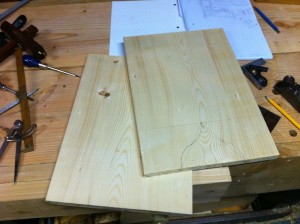
I found a few boards of relatively flat, and somewhat knot-free Spruce in the 1 x 12 size range, and started mapping out my cuts. I had to get 4 boards of 6 foot boards because all the 8 – 10 foot boards I found were simply AWFUL looking.  I’ve seen better boards in the garbage than what I was finding at all the hardware stores in my area. Unfortunately, the lumber yards are all closed on the weekends here, which makes it difficult to get wood sometimes.
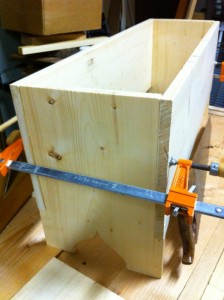
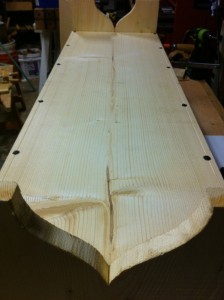
First step was laying out the end boards, as the rest of the boards were simple rectangles. These boards really needed precision to make the rest of the box come together flawlessly. For the height, I measured the height of my current saw bench which fit my knee just about perfectly. The width is the width of the lumber stock for the base + top. There is an inset on the sides that is sized to the side boards width, and height. The cut out is a simple Ogee shape, scribed with compass to be pleasing to the eye.
This was where I made my only major mistake of this project. Somehow I measured (twice) the width of the board for the cut out, and proceeded to make it too long anyway. I had to glue a couple blocks back in to make up the difference, but it came out just fine after that and I haven’t made any serious flub’s since. Luckily I had only cut one end board before testing it, so I was able to fix my measurements for the second end board. Ooops.
The length of the sides of the box are determined by the length of the saws, plus little bit for getting my hand down in there. Also, it helped to pick a length that was pretty close to half the length of the boards I had been able to find in clear(ish) pine.
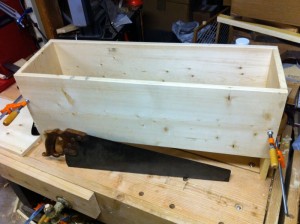
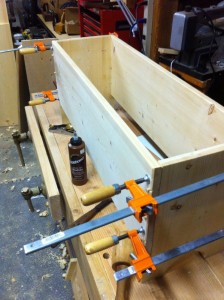
I spent a lot of time juggling the sides in and out of the clamps, making sure every thing was square and fit perfectly. I could have just slapped it together, but I wanted to spend the extra time to make sure all surfaces co-planer, and smoothly planed even the end grain. I’m glad I did this, as it really made a difference in the fit and finish of the final box.
The lid was sized to the box length, and made to fit exactly as I could, so that there was no overhang that I could saw into easily. I wanted to make this as close fitting as I could.
One area that I wish I had maybe done a little different was joining the sides. After I finished the case with doweled glued joints, I had a thought that it would have been much easier to rabbet the side rails for a better fit (it would hold it self square much easier, and the pegs were a pain to put together. I could and should have just nailed the thing together. I really over thought this part, and after I was done, and looking at doing the same with the bottom, I figured it out. Live and learn I guess.
The bottom was much easier to simply nail down, after I had that revelation. Ordinarily I would have used my cordless drill here, but I opted instead to use a reconditioned eggbeater drill with a twist drill bit.  It worked so well, I was able to finally cut the cord (pun intended) on my use of the power tool. A quick hammer job, and voila! Bottom done. I think there is more than enough holding power in the nails to stand up to the test of time. If not, it’s easily replaced.
For the inside of the box, I’m making a set of dividers (I had made two last night, but one snapped in half on me at a weak point) to keep the saws in place. I test fit the single one, and it works well enough that I’m thinking of just using one in the middle. I’ll put a couple small risers to keep the bottom from getting chewed up, probably just a couple oak strips tacked in for easy replacement later.
Next step is to put a sliding tool tray in the top for additional storage. And apply a couple coats of Amber Shellac for some protection and color.
A couple questions you might be asking yourself right now…
You said something about molding planes? And perhaps, how is this anything to do with the word “anarchist”?
To the former, I had intended to put the molding planes on edge along the other side of the bottom, like in Chris’s tool chest, but they took up too much space. Also, I had more saws than I thought I had originally. Plus it would have interfered with the tool tray.
As for the “Anarchist” question…Â I looked the the book as a “call to arms’ as it were to think differently, to think past the standard knowledge of today, and apply a different perspective while keeping with some of the ideals of our theoretical craftsman fore bearers.
This box is not a new idea, but it’s a different application of an old idea. It’s a standard design six board chest, but it’s also built to store saws as well as be a saw bench for those saws. It combines several sound ideas into something that fits well in my shop. Is everything that Mr. Schwarz puts forth in his tome to be treated as Gospel? I highly doubt that is what he intended. I feel that he’s trying to get us to think past the dogma (flat backs on chisels anyone?) and apply some reasoning to the things we do. The book is really just his opinion, well reasoned, and well put forth, but from his world view.
— Badger
As a side note, the box makes a very comfortable seat as I sit and ponder the right way to tackle a problem. I had barely built the thing, and I was already sitting on it, holding a tool in my hand and thinking out some problem.
12 Comments
Comments are Disabled


That is a really good idea, Badger.
I need a second sawbench and some storage for handsaws. So I can see one like yours on my drawing board!
[…] Check out Badger’s post on how he built the chest, along with step photos at Badger Woodworks. […]
My 2 saw benches are different styles but both have shelves on the bottom. I do find that they just gather loose items from around the shop.
A bench like yours, even if it’s not used for saws (I have the “used to be” fashionable saw till which I still like), would be a great way to make storage more purposeful.
Great idea!
Great post on a saw till box. Like your thinking outside the box. No pun intended.
Badger, you left me a great comment on The Anarchist’s Tool Chest Index and I am returning the compliment. The “saw bench-saw till-thinking platform” is a good example of identifying what you need then adapting different bench/chest ideas to come up with a piece that fits your needs and your shop. Good work and a good post explaining your process!
Suzanne (The Indexer)
@Glenn – I am actually considering a couple different variations on this conecept for tool storage. I have a decent selection of molding planes that are looking for a place to live. Also, a small portable box at a good sitting height might make a good portable tool chest for taking to job sites (I am a volunteer handyman for my sons school.)
@Jeremy and @Ken, thanks guys!
@ Suzanne – Thanks for the visit, and returning the favor!
Badger, great post! And a great idea I’m glad to see I’m not the only one who’s is over thinking the simple things. I’m really enjoying the blog. Keep up the great work.
@Tim – Thanks! Glad you liked it. I’m really working on slowing down and doing the simple work, and focusing on doing it right.
Badger, I love combining saw storage with a saw bench. Well done, concept-wise, with the execution and the storytelling.
Very well designed and executed. Cheers.
Thanks for writing this up… I’ve just found the need for both a second sawbench and some portable storage; this should fit the bill quite nicely!
Glad to help. It’s been great in my small shop!