A modern build of a medieval spring pole lathe
Introduction
I study medieval woodworking a lot, and I’ve always wanted to try out the medieval style lathe. The major difference between this type, and the modern lathe is that the motion is reciprocal, rather than continuous circular motion. That, and the fact that it is totally human powered. The back and forth motion of a “spring pole” type lathe has been used well past the 1600’s era that I study, and in many places is still in use today.
The whole idea behind a Spring Pole lathe is that you would pinch a piece of wood between two points, wrap a cord around the wood, and pump down on a treadle while putting your cutting tool to the wood. On release, the springy pole attached to the top of the rope would pull up, spinning the wood backwards, and making it ready to be pushed down again and cut.
Here is my build process was originally posted on my old woodworking blog: wood.box23.net, but I have since taken the site down.
— Badger
Beginning the project
It’s begun! Something I’ve been wanting to work on for a while now. I want to build a spring pole lathe, modeled after the medieval reciprocating lathe design that was used for hundreds of years to do lathe turning.
The pictured chunks of wood are the two uprights, that will hold two lengths of 2×4 Pine (might upgrade that later, but I have some in the shop right now) I’ve had these 4×4 posts sitting around for a long time, always waiting for a project. I finally decided to get started. At first I had visions of making a flywheel lathe, but it’s a lot more complicated, so I decided to start out with a more period design anyway. I’m hoping to make it portable enough to take to events and do demos with. We shall see.
I cut the notched by hand, instead of using a bunch of power tools. Somehow it just seems fitting.
Steps so far:
- Cut the posts to 44″ lengths. This should give me 38″-39″ of leg room underneath to power the lathe.
- Marked the depth of the cuts with my Rosewood Cutting Gauge that I got at Woodcraft a while back. It’s a thing of beauty. I measured it so that I would be able to fit a width of 2×4 down between the two cross bars. I’ll be using 2×4 to construct the “poppets”, sort of a free floating head and tail stock.
- Marked the width, and clamped it in my vise. (I want a bench vise. Reallllly badly.)
- Using my Japanese pull saw, I cut the notch sides, and the two more parallel cuts down to the marked lines. This makes chiseling out the waste easier.
- Using a 1″ bench chisel I cut out the waste with taps of a hammer
- Cleaned up a little it with a wood rasp, but for the most part the chisel did the heavy lifting.
Notes: Easier than I thought it would be. I thought it’d be lots of work, but it was pretty easy. I got the technique from watching the Woodwright’s Shop. Best show on TV for woodworking. Bar none.
I did crimp and break my Japanese pull saw blade though, this makes me sad. I went in a little crooked, and it bent. Ugh. I love this saw, it’s probably been the best tool in my shop for a while. It makes nice thin cuts, easier and cleaner than a standard American style “push” saw. Fortunately, I can buy replacement blades. It’s the one marked B in the photo below.
I think that saw has partially changed the way I do wood working, I kid you not. Time to get my butt down to Woodcraft to get a couple more blades. Going to buy a backup, just in case.
Next step, the cross bars, drilling holes and mounting lag bolts, and building the head/tail stock “poppets”. Then all it needs is tool rest, and some kind of “spring pole” to power it. I’m thinking bungee cord. Not very period, but it allows me to adjust it to find the right amount of “spring” and find a springy pole these days is a bit harder than wandering out in the back woods and cutting one. Not so much on the back woods these days. Pity.
Lathe details – Uprights
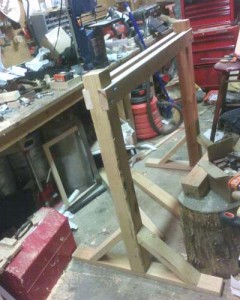 Over the next few steps, I’ll be detailing the rest of the build out of the “spring pole” lathe I built last weekend. I was able to complete it fairly quickly, and I snapped some cell phone pictures along the way.
This step will feature the build out of the uprights, and attaching the crossbeams.
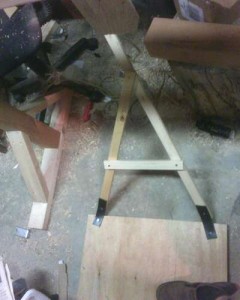
As you can see in the above picture, the uprights are attached to a sort of “A” frame to hold them up. This design came about for two reasons. One, it’s based on a period (1583) drawing of a lathe I found. Two, it’s a practical and easy to build method of holding the beam up. I grabbed some 2×4, and just started cutting what felt right in terms of lengths based on what I had on hand. I want to be able to break it down and travel with it, so each upright needed to be able to stand up independently and be self contained. The angled pieces are cut with a 45 degree angle on the table saw, and screwed into place with long wood screws. The beam upright rests on the horizontal 2×4 which extends a little bit out from the base for stability, but not getting in the way.
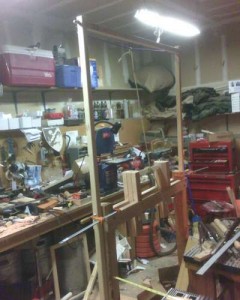
The cross beams are Douglas Fir 2×4. I took a standard 8′ one, and cut it in half to create a 4′ bed for the lathe. Subtract a little bit for the head and tail stock, and you have about 3.5′ feet of workable area. To attach them to the uprights I fit the 2×4 into the notches, and clamped it down. I then drilled a couple of holes through the 2×4 and upright for the bolts I was going to use. I drilled it pretty close to the size of the bolts for a tight fit, which turned out to be too tight. So I had to drill it out a bit bigger to allow a little wiggle room to get the bolts through. Once the crossbeams are bolted on, the whole frame is quite rigid, and very sturdy.
That’s it for this step, next step will cover the head/tail stock, making the centers, and more.
Lathe details – Head and Tail Stock
This step will cover the creation of the head and tail stock for the “spring pole” lathe project.
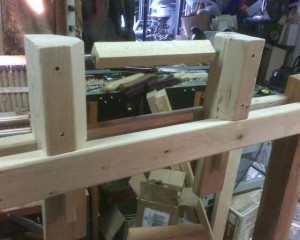
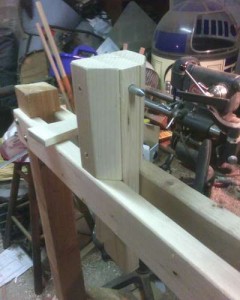
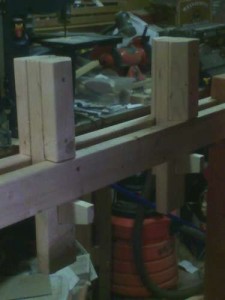
To make the stocks themselves, I just bolted together chunks of 2×4 to create a solid head stock. To make access to the piece of turning easier I cut the two side pieces with a 45 degree cut to give it a diagonal access to the area.
The length of the middle piece was determined by measuring above the crossbeams about 8″ (the height of what I thought might make a good turning area. (close to 16″ diameter turning area seemed more than enough.) The bottom part I picked a sizable tail to it, so I could cut a mortise into it for clamping to the cross bars, and left some below that to give it some strength (I will draw up plans later with exact measurements.) The size and depth of the notches in the uprights gives me a gap between the crossbars that a 2×4 fits into. The two short pieces (8″) screwed to the side of the middle, longer piece rest on the crossbars. when I fit a wedge into the mortise in the tail of the headstock, it locks the stock to the crossbars and is quite immobile.
To put the mortise hole in I used Forster bits a bit wider than the width of the wedge I am using. I used a piece of Maple I had sitting around because I figured it would hold up better being pounded in and out all the time. I made the hole go above the bottom of the crossbars so that the wedge would lock against the underside, and not top out against the stock. I also angled the bottom of the mortise with a chisel to approximately fit the angle of the wedge. My wedges ended up being different sizes but they both work quite well.
To make the centers I used a 1/2″ bolts I found at the hardware store. 1/2″ steel rod was expensive, but 1/2″ zinc plated steel bolts were about 70 cents for a 4″ bolt. The threading didn’t go all the way up the shaft, so a quick hacksaw job later, and I had cheap steel 1/2″ rod in the 2″ length I needed!! I rough ground one end of each center to a vague 45″ cone on my 6″ grinder, and then chucked the piece into my drill press, and held a metal file to the end to make a pointed shape. It turned out pretty nicely. I got this method of shaping the point from the Woodwright’s shop Television program on PBS.
Drilling a 1/2″ hole in my head stock, and just pushed the center in. I can remove it later if I need to build a new headstock. Locking the head stock in place with a few taps of a wooden hammer to the wedge, I lined up the tail-stock right up against the pointy end of the center in the headstock. I locked the tail stock down too, so they were in the exact turning positions they would be in at this point. Then a hard rap to the tail-stock drove the face into the headstock center point just enough to make a mark. This gives me a pretty much true lined up centers in both stocks, which is important in turning. Drilled that hole, mounted the tail center and voila!
Lathe details – building the spring pole
At this point the “spring pole” lathe is almost built. The reason for all the quotes around “spring pole” will be evident in a moment. At this point, we have uprights mounted on A frame supports, parallel crossbeams, holding up a movable head and tail stock with steel centers. Now we need a power source to rotate the object that will be held between the centers.
In olden times, and I do mean OLD, the power source was a springy pole, that would pull the rope wrapped around your workpiece back after you’d pushed down on the treadle to rotate it. This would create a reciprocal or back and forth motion of the workpiece. You’d apply your tool on the down stroke, and ease off on the up stroke. This is the wood turning was done for hundreds of years.
Since I could not walk out to the woods and find a springy pole, and more to the point, I had no room in my garage for one, I decided to use a “bungee cord” instead. This would give me spring back enough to do the job, and could take up much less space, while still recreating the motion of the springy pole.
For my lathe I took a couple of lengths of 2×2 and drilled holes about 1 inch down from the top, on one side. I did this for both side pieces. They were about 8′ long, straight out of the hardware store. I trimmed about 6 inches from the ends to get rid of bad wood. I then cut a 4′ chunk, and drilled the ends to accept a 6″ piece of doweling on each end. It stick out about 4″ after sinking it into the ends. These dowels go through the holes in the tops of the side pieces. No need to attach it any better, since the next step is to hook the end of the bungee (mine was purple, very festive) around the 2″ of doweling sticking out of the side piece, and stretching it over to the other side to hook it over the other doweling end. This pulls the two side pieces up against the ends of the 2×2 middle piece, and it’s all good.
All I had to do was tie a rope around my bungie in the middle, and wrap it around the piece of wood pinched between centers, and voila a “spring pole”!
The last step was to create a treadle from some 1×2 scrap, a piece of leather for a hinge, and a piece of scrap ply wood to stand on. The 1×2 should extend past the end of the crossbeams. I notched the ends and made a sort of A shape out of the 1×2 pieces with two hinges attached to the plywood I stand on. The crossbar of the “A” was placed so my foot had a comfortable place to rest. It works quiet well, and is less work than I expected!
I’m still working on a design for a tool rest. For now I just clamp a 2×2 scrap to the head and tail stock, but that doesn’t work very well.


[…] just ordered a set of Traditional style hook tools from Hilton Handcraft. For use on my Pole Lathe. I had been considering these a while ago, then I lost this site. I am going to bust out the […]
Just curious. But what if you used a longer lag bolt that actually went through the headstock, then attatched it to wooden pully, say four to six inches in diameter. Then you wrap your rope around the pully. I know its not traditional. But it should operate smoother and make for quicker work. Must’ve sure to grease the hole somehow, or the friction from the bolt might cause burning.
– Badger
I have been working along the same lines as your lathe.
I have metal lathe & wood lathe, so I have some experience with wood turning.
For a tool rest, I mounted posts on puppets, with tops 1 1/3″ below center of centers. I use a2x2″with dadoes in the ends to set the rest @ centerline, 1/8″ above & below by cutting shallower dadoes around the 2×2. Other heights as needed.
Paul
“Make chips not sparks”
Nice article and pictures.I am in the middle of making a spring pole lathe (using the diagram in the Woodwright’s guide by Roy Underhill) I am a little confused. Should the bolts be secure or should the bolts be able to turn? If I make a slightly undersize hole they will screw in tight. Or should I make the exact 1/2 inch hole and let them rotate ? Never used a lathe before.
@josephhurban
I know that you CAN have it solid and tight. Wood allows that a solid-state metal point be used to keep it upright and be used as a bearing without the need to rotate. However, I have seen many variations while looking up plans online, and none of them state one way or another, except the one that stated that second line in this post.
I do know that on some there does seem to be a seperate part that can come off, that is wood but it fits in the poppit and then nails into the base of a bowl or something. It seems to spin freely in the poppit and the rope wraps around it so that way you have no fear of getting the tools too close to the drive-rope of the lathe. It’s a feature I plan on making into mine.