Posts in Category: Tools
Peter’s Carving Tools interpreted…
I follow a fantastic blog by a fellow who goes by the name Peter Follansbee. He works as a joiner at the Plimoth Plantation and has done some incredible research into period techniques for carving and joinery. Just browse through his blog, you’ll be blown away. A bit ago he posted pictures of his basic carving set of tools that he uses. You can check out the post here. I had a bit of money on a gift card from Christmas so I went to Woodcraft to see if I could build the same basic set based on the picture of his tools (many of which are antiques or unmarked as to sizes etc.)
Here is what I’m calling my “Peter Follansbee Carving Kit” and what sizes I got to match his. I came pretty close I think.
Here are the sizes I think come close to what he pictured:
- Pfeil “Swiss made” Carving Gouge #9 Sweep 10 mm (Woodcraft #05G07)
- Pfeil “Swiss made” Carving Gouge #6 Sweep 20 mm (Woodcraft #05B04)
- Pfeil “Swiss made” Carving Gouge #8 Sweep 13 mm (Woodcraft#05F05)
- Pfeil “Swiss made” Carving Gouge #8 Sweep 20 mm (Woodcraft#05E14)
- Pfeil “Swiss made” Carving Gouge #5 Sweep 12 mm (Woodcraft #05D05)
- Pfeil “Swiss made” V-Parting Tool #12 Sweep 8mm (Woodcraft #05T85)
For reference here is his original posted picture.
I’m working on a box right now that I hope to be able to try some of this style carving on using these tools. I would also highly recommend picking up his DVD on the subject of 17th Century Carving. It’s what me inspired to try out the style of carving he shows on the disc. Once I watched it I started looking at period carving in a whole new way. Like I could actually do some of that stuff, just maybe. I am going to try my hand at it soon, wish me luck!
Badger
P.S. I am not affiliated with Peter Follansbee, Woodcraft, Pfeil or Lie Nielson Toolworks in anyway. I’m just a fan of all four. 🙂
P.S.S. I also am not advocating the Pfeil brand over any other brand, I just had a gift card to the store and they are local to me. The quality is decent from what I can tell, but I will bet you can find similar or better quality tools in other stores.
A Wooden C Clamp
Today the family and I went out to check out an antique mall we’d heard about down south. Very little in the way of tools, but I did pick up this one item for $20 because it intrigued me. I’d seen a wood C clamp in an old painting a while back, and was curious as to what kind of joint could be used for that. Well, now I know what one joint might be used.
I have no idea how old this is, there wasn’t anything I could to date it. The only marking is “HERRBURGER SCHWANDER” stamped in a couple places on the side. Probably an owners stamp. I would guess in the last 50-100 years for this.
Any help in identifying it?
Here is a picture of the old painting depicting a wooden C clamp in use:
Merry Christmas and Happy Dovetailing!
I started this blog with little goal other than to chronicle my aimless pursuit of woodworking. It’s still exactly that, but I do feel like it’s seen its fair share of cool things. I’ve grown my skills substantially, and expanded my knowledge base quite a bit.
I’m looking forward to the year of 2011 and the Year of the Hand Tool (or if I’m at work, it’s the Year of the Escalation, but that is a whole different affair, and I’ll just leave that at work thank you very much.)
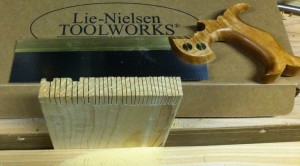
To aid in that quest of Hand Tool zen, my lovely and talented wife got me a Lie-Nielson dovetail saw for Christmas. This is quite possibly the best tool I’ve owned. It’s my first LN tool, and I’m impressed, this is a definite improvement over what I’ve been using. It’s a joy to use, it cuts well and straight and clean. I’m off to the in-laws for some heaping portions of Christmas Ham, but I see some dove tail in my future. I have a board of Poplar that might just turn into a box. I need another box to hold some of my tools since my son absconded with my pinned wooden box for his giant pile of wooden railway train tracks.
Oh darn, more shop time.
badger
A mystery solved
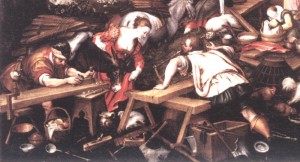
A while back I posted about a odd looking plane I’d found in an old painting by Jacopo from 1574. Recently I posted about a painting of building the Ark by Kaspar Memberger the Elder that had some great shots of workmen and tools. Yesterday I found another painting by Jacopo that I hadn’t seen before that showed nearly the same exact scene that Kaspar had painted, but with different tools. One of the paintings is a copy of the other for sure, but I wasn’t able to find much on the painting itself. The newly discovered Jacopo painting looks like it had been damaged either by cutting or folding, which might explain why it’s much less popular than the other ark painting he did.
The really cool thing about this new painting though, is that it shows one of the workmen clearly demonstrating how that strange looking plane with the roman style handle in front of the blade, rather than behind, is used. The fellow is clearly pulling the plane! And there are a couple other planes in the foreground as well.
It’s a little mystery solved, phew! It’s odd though, most European planes were designed to be pushed. The roman style handles are very rarely found due to ravages of time, but there are few examples still around due to volcanic action (Pompeii has a few). The cut out style was seen in the known examples as both ends of the plane, or behind the iron as seen below in these scans from Goodmans book on History of Woodworking Tools.
Interesting stuff. One of these days I’d love to make a reconstruction of these planes to see how they work, but I think I have a few more challenges to get through first.
Badger
More tools in paintings, 1588
I’ve been sifting through old paintings looking for tools from pre-1600 and I found another good one. I use this site, the Web Gallery of Art, to find all these paintings by the way, if you’re looking for a way to burn a few hours on the internet, this place is great. I had an idea to search on Noah’s Ark pictures, since they frequently depict the building of the Ark using tools of the day. This one is a great example.
The original image can be found here: I pulled the section with the tools, zoomed it a little, and lightened it up to get more details on the tools. This painting is by
Painting Details:
Painter: Kaspar Memberger the Elder (1555-1618)
Title of Painting: Noah’s Ark Cycle: 1. Building of the Ark
Date: 1588
There are a couple of really interesting things in this one that I liked.
First the tools:
- Adze
- Wood bodied planes. The handled ones look like the Melancholia plane in Albrecht Dürer’s famous print.
- T handled augers
- Two axes
- Workbench, and Saw Bench
- Pair of Compasses
- Bow Saw
- Chisels
- Screw clamp
That last one is the most intriguing to me, as I’ve not seen a screw clamp in a pre-1600 context before. I haven’t really gone out of my way to look for it either, but it’s interesting nonetheless. I wonder what kind of joint they used to make the C on that. I’m assuming that it’s a jointed clamp, because otherwise it would just snap along the grain I would imagine. After the holidays I’m going to be ordering a couple screw box sets from Highland Woodworking and I might try making a couple of these just for kicks.
It’s also a great scene of “job site woodworking” where they have a couple benches and box of tools and getting down to work. The benches look pretty similar to the sawbench idea that floats around the internet, and you can clearly make construction details on one of them. There are three different styles of bench shown here. On the left it looks like the legs are either set into mortices or bored holes. The middle one is a much nicer bench with what looks like Gothic styling, and some decorative carving. The one one the right has the legs set into the side of the top, with cross braces much like the sawbench I build a while back based on a Chris Schwarz design.
Fun stuff.
A 1510 Joiners Tool Set
Details on Painting:
Artist: Jean Bourdichon b. 1457, d. 1521 Tours, France
Title: The Four Social Conditions- Work
Date of painting: 1510 (from “The history of woodworking tools” by W. L Goodman)
I ran across this great picture of a painting dated to 1510 of a Joiner in his workshop. I love these old pictures, because you can get a glimpse of the work and tools from a distant past.
A lot of discussion has happened about tools and work from the 17th century, due to a number of excellent books available in reprint these days, but there really isn’t a lot of resources available for pre-1600’s woodworking.
Here is one of the rare instances that I’ve seen that shows things so very clearly. It also shows a snapshot of life back then. The child on the floor collecting shavings for use in the fireplace presumably, the wife working on something, maybe weaving? But for me the really great part is the tools.
You can clearly see the following tools:
- Jointer or Try Plane
- Smoothing Plane
- Chisels of several types
- Mallet
- Square
- Compass
- Small axe
- Bowsaw
- Piercer or Brace
That’s a pretty solid set of tools. In the foreground you can see a linenfold carved chest, and the background you can see a gothic style carved chest. What little research I’ve done on this time period says that this is the transition period between those two styles of carving.
Interesting stuff.
Badger
Trying a little carving
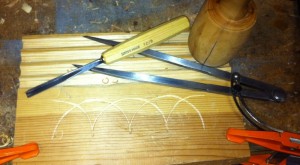
I recently purchased the DVD of Peter Follansbee and his lessons on 17th Century Carving. I’ve been a huge fan of Peter’s blog for a long time, and so this was a no brainer. I also picked up a V-tool to try the first basic lessons. I got a little time last night, and I decided to give it a go. No planning, no good wood, just what the heck, pick up a piece of scrap and go at it. Results pictured above are pretty shaky, but I can see how it works now. It’s putting to practice what I’ve been reading about, and it’s always different when you actually try it. I want to get some better wood (crappy pine board is not going to do me much good really, although I could add some carved decoration to some boxes if I am careful, and use simple designs.
Note on the tools pictured:
- Home made Applewood mallet
- Woodcraft purchased V tool
- Harbor Freight purchased compass
The compass was recently discussed here on Peter’s Blog, and I dug out the couple of dividers I picked up for cheap at Harbor Freight the other day. I never really used them because I didn’t like the pencil holder, it just got in the way. Tonight I clamped the pencil ring into my metal vise and just levered it off. It popped off easily, and there was a little bit of weld residue left, but otherwise it was clean. It became much more useful that way, because I could grab it with both hands and walk it around.
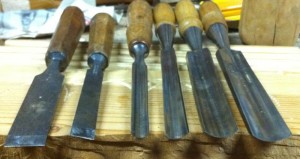
I tried some gouge work but that was more fail than anything else. I’m really not sure what the gouges I’ve got are. Are they carving gouges? or firmer’s gouges? I’m just not sure. I also spent some time learning to sharpen them on my new stones, and that went better than I expected. I got a reasonable (not quite decent edge) despite not having a clue what I was doing. I’ll have to study a little more to learn a little more technique. That’s how I learn. Read. Try it. Read again. Try it again. Eventually I’ll either get it, or give up.
If any one has any knowledge on Chisels, and can help me identify the chisels pictured, that would be most excellent. Can I use these for carving? My results were mixed even after sharpening.
Badger
Sharpening Stones
I went to a tools show and didn’t buy any tools?! What on earth could this be?
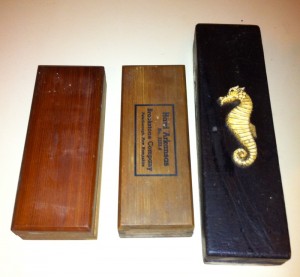
I bid on a couple items, but eventually came home with only three things. A nice collection of sharpening stones from two different sellers.
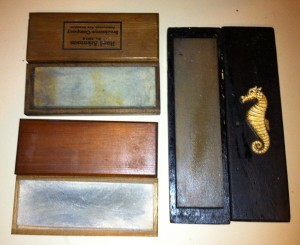
First set was a Soft Arkansas, and a Hard Arkansas stone in box. They are barely used, and look like much higher quality stones than you can buy today.
The other one was billed as a honing stone, and has a little more use on it but it’s still quite flat. The box is what kept me coming back over and over again. The box is user made, and has a carved sea horse with a dragon head on the top of the box. I don’t know if it’s bone like it says it’s supposed to be or a mass produced item glued on, but it’s kind of charming. The stone is a Norton and that’s all I know.
Any information on any of this would be appreciated.
All in all the quality of my sharpening setup just improved a whole bunch. I’ve only tried sandpaper on glass and a cheap stone from wood craft that work on my kitchen knives, but didn’t really ever achieve an edge worth noting on my plane blades. I know I have to learn to sharpen better, but these stones are clearly higher quality than the Pinnacle cheapie I bought. The Pinnacle will migrate upstairs to the kitchen for the kitchen knives.
Badger
New Chisels!
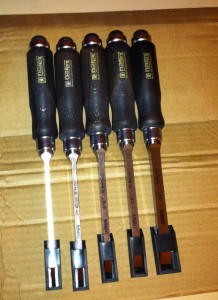
Today was an early Christmas as my new set of Mortise chisels arrived from Lee Valley. I’ve always been curious about the Narex chisels from out the Czech Republic, I’ve always been held up by the fact that there are millimeter standard sizes, rather than our own archaic inch system. I know I could work around that, but it held me up from ordering.
Then I read about this special deal that Lee Valley was doing for Mortise Chisel set for $40 – $50 (I can’t remember exactly how much, but affordable) that was limited time offer, special buy. I’ve managed to scrounge up a total of three mortise chisels so far, all of different sizes and quality, none of it good. All of them needed work to get to user status, and I was never quite happy with them.
These Narex chisels are great, they a well crafted, and look like they will be fantastic additions. Plus at the price I’m never going to find it’s equal. Now to chop some mortises? I’ve gotten some wood for a side table, and I think I know what I’m going to be doing Christmas break!
Badger
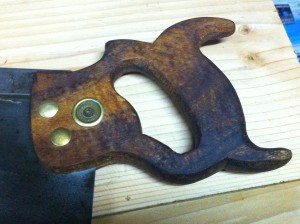
Close up shots of the new Backsaw handle.
So, now that the oil finish had dried, I got a couple good close up shots of the handle from the last post. I realized that none of the shots really showed the wood (blame the lighting in there, terrible for photography).
Still not sure what the wood is, it was old and dusty from a pile that I salvaged. It has some really nice warm tones that Walnut doesn’t typically have, so it might Koa or some other tropical species. It does have some nice color to it though.
badger







You must be logged in to post a comment.