Travelling Hexagon toolbox – Part 2
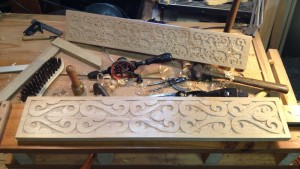
Since I had finished up the previous panel last week, I started on the second panel while taking a break from the family that had invaded our house. Â Invaded is a bit of strong word, since I do enjoy their company but I wanted to make some progress on this project. Â I didn’t spend much time documenting this one, so all you get is my finished photo this time.
You can see the previous panel in the back, and the new S-Scroll panel in the foreground. Â I will be doing a different pattern on each of the six panels for this project just for fun, and showing off. Â Also, to get more practice at each of these styles.
Speaking of practice, all the effort I had spent on previous panels paid off this time. Â I started out with my standard scribe lines and thought I was going to do a different panel, a sort of “arcs and fleurs” pattern. Â However, I realized I had laid it out wrong! Â But I was able to simply switch to another pattern since many of them share a common layout of rectangles. Â The other pattern will be next, and I’ll be a little less cavalier about the layout this time.
The S-Scroll pattern I did here was a simplified version of a pattern I had done before, and was dictated as always by “the point of the tool”. Â I had laid out the rectangles, evenly divided by finding my center lines both vertical and horizontal as well as eyeballing a good margin. Â Then I stepped off from the middle with a pair of dividers till I got something looked about right. Â The ease in which I am able to do this (once I had let go of my ruler) has absolutely convinced me that its what craftsmen of old did. Â It just makes sense and is quite efficient with surprisingly little practice.
After finding the center line of the rectangles I marked some arcs with a divider to mark the end of the S shape. Â Then I picked up chisels till I had one that fit the arc well enough, and struck the half circles in. Â Then I sketched right on the wood to get an idea of how it would look, and then started fitting chisels to the sketch. Â The outside lines are struck in with chisels, and the center of each S is done with the V tool. Â All in all I used about 4-5 chisels of various sizes and curves to set in the outline, Â and two flat gouges small and medium to relieve the background. Â Once I had the background relieved I used my home made texture punches and gave the background some texture. Â Couple swipes of the smoother and voila!
All in all I think I was down there less than two hours, which made me feel good. I was able to recover from my layout mistake and come up with a simple quick pattern and execute it in an afternoon. Â That felt pretty good, I gotta say.
Badger
2 Comments
Comments are Disabled


Great carving! Interesting design for a tool box, too – part box, part tool roll. Will you be keeping your carving tools in it?
Thanks!
I’m sizing this off of my cross cut panel saw, with the idea of using it for a general tool carrier to classes at Port Townsend, or other travelling events.
badger