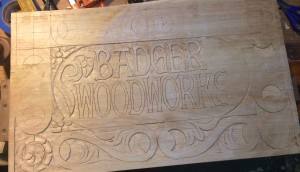
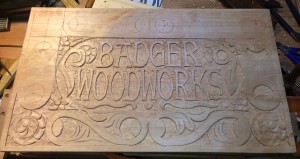
Shop Sign progress part 2
See previous post here: Part 1
Before I talk about the sign, I want to mention that I think there are still a couple open slots in my wood carving class this Saturday April 12, 2014 at Rockler Woodworking Store in Northgate (Seattle, WA). Â Â It’s a two day class, and I start with the basics and work up to more complex stuff.
Tonight I finished outlining the letters, and finished most of the major detail carving for the center area. Â Things I learned… Â Super glue is handy to have on hand, and thin letters in soft-ish wood is not necessarily a good idea. Â And yes those things are related.
The Alder is nice to carve, but it’s a bit soft and the thin legs on the letter had occasional problems when I slipped or pried even slightly off course. Â I had to replace four different chunks, and the S could not totally be repaired. Â Regardless I’m pretty happy with the result, and I’m going to be calling this a “Prototype” anyway.
I just need to finish up two of the round bits, and four S scrolls around the out side. Â A coat of Shellac should make it pop a bit, but over all it’s been a fun experiment. I definitely need to pay more attention to the general widths of the letter parts.
The outline of the letters was actually easier than I anticipated, and I did the bulk of the work with three chisels.
Flat chisel for straight areas.
Small medium curved gouge for the finials and bases on the letters, and some of the tighter inside curves.
Small flat-ish gouge (probably a #3) for outline the gentler curves.
I ended up using a fair number of other chisels because I had them, but I think I could have done almost everything with those three. Â It’s a case of using what you have to fit the outline you want.
I’m actually considering offering a one day class on letters both V-chisel incised Times New Roman, and a bolder font done like my sign above for bigger stuff. Â After I get through the relief carving class, I’ll see what Rockler wants to do in that area.
Badger


Comments are Disabled