
Sawbench
I’ve been wanting to build a sawbench for a while now, and today I finally got to it. I think I was going to do something else when I wandered down to the garage, but this is what I worked on. That’s how it is sometimes, it’s almost zen-like at times. I just settle into the garage, and see what wants to be built. Today it was a sawbench.

Saw Bench complete
I built it out of scrap from the lumber pile, the top was some spare 2×8 from I have no idea what project, and the legs are recycled from an old bunk bed that a friend let me scavenge a while ago. It gives the sawbench a bit of a “frankenbench” appearance but it will do. I wish I could build such pretty things as featured in the magazines, but I think I need to do my time with lesser woods until my skills are better.
What I think I liked best about the build was how I came up with the plans. Pretty much on the fly, that’s how, and very little measuring. That might sound odd, especially since “measure twice, cut once” is a tried and true slogan. And I did measure to be sure, but not with a ruler. The only thing I used a ruler for was the height of the bench (17″), and that was to measure my stump I used to use as a sawbench. The rest came from the thickness of the wood, and from the piece being worked on. I took the idea from Roy Underhill when he showed us how to set our gauges to the thickness of the mortise chisel, and work almost everything from that. For a starting point, I looked at this plan by Chris Swartz, used the basic idea to get started, and the rest just flowed.
Here is the top with the notches cut out. As luck would have it there was a hidden knot in one of the forward notches, but I was able to work though it with a few good whacks of the big hammer. I angled everything at 10 degrees, like in the plan, set my sliding bevel gauge to that from a kids plastic protractor I had around. I could have eyeballed it, but the protractor was handy.

Top board with notches cut
I actually started with the legs, but didn’t take any pretty pictures of them, but I wanted to show off the tools I used for this project (up to this point) so I staged a nice little shot here. I love this saw I found, it’s a Disston and I got it for $12 if I remember right and rehabbed it to its current state. It does need some sharpening though, next time I’ll have to do that, but it cuts fairly well as is. Under it all you can see the beat up old stump I’ve been using (or trying to use) for sawing and other stuff.

Legs cut and some tools used.
Once the top was cut, and the legs all do, I drilled some 1/4″ holes in the legs with my bit and brace. I just eyeballed the level by clamping the legs about 10 degrees angled and drilled away. In a break from “period” I used 2″ drywall screws to attach the legs to the board, mainly because I was in a bit of hurry and I didn’t have any good ideas on how it would have been done. On reflection I probably should have cut a step in the legs and probably doweled things together. Next time.

Nearly finished bench.
Once the legs were on, it became evident pretty quickly how useful this bench is. I drilled a couple 3/4″ holes in the middle and used a Gramercy Holdfast to hold the cross braces down for drilling and sawing. Iet grabbed nicely in the 1 3/4″ pine top, and held things really well. This makes me very happy. In the background of the picture you can see the one power tool I used. I love that drill, I really do, and it’s very handy to save my wrists (I have Carpal Tunnel in both wrists, hazards of the job I guess.) I actually only used it because I couldn’t find a screwdriver, funny thing.
The I put the notch into the front with a rip saw, and cleaned up a few edges, and called it day. A hot day, we’re in the middle of a heat wave here, so I didn’t spend too much time on the final stages. I do need to level the legs a little but I can see how this will be a big help around the shop already. I need to practice my hand saw technique, and I think this will help put me into the proper position to saw straight cuts.
Notch cut in front of bench
All in all I felt good, not scrambling for the tools and wondering if I was doing it right. I felt more confident with the hand tools, and they worked well for me.
Badger
Italian carpenters tools from 1574
Noah’s Sacrifice by BASSANO, Jacopo.
Check the link, it shows a painting by Jacopo Bassano, an Italian painter, depicting a scene of Noah, presumably building an Ark or something I can’t quite tell (and don’t really care, the rest of the scene has my whole attention). In the lower right corner there are a bunch of tools that the workmen are using scattered about, as well as a simple and more elaborate chest.

I see the following:
- Bowsaw
- Plane (in the roman style it looks like)
- Hammer
- Several Adzes
- Axe
- Level (A-Frame style)
- T-handled Auger and Gimlets
- Pick
- Hammer
- Compass/Divider
- Pliers/Pincher of some sort

The planes are of special interest, as they are clearly the style of body found in Pompeii and other Roman finds. Only later than I’m used to seeing. Also it’s interesting because the iron is set so far back in the body.

Very interesting. I found the picture through a reference to dovetails in one of the chests, which I can’t make out in the picture.
UPDATE:
I found another example of this type of plane body in another Italian painting in a similar time frame:

The clip above is a close up of painting by Tintoretto of the Annunciation which has some tools visible. I tried to clean up the dark portion of the painting a little for clarity, but you can clearly see the body and iron set well back in the body. It’s deliberate, as you can see the rounding of the plane body heel in this close up. It makes me wonder how you’d use such a plane? Is it a push or pull? Hrm…
Badger
Dovetailed Box – Practice
So, why on earth do I get those rare moments of shop time during some of the hottest days of the year so far? But, who am I to complain. It wasn’t too hot in the garage, just a bit warm, so I got some more dovetailing done. I managed not to screw up three more corners, and even got something that is starting to resemble a box together!

Well, at least four sides of a box. I had to trim a few pins again, and split one tail a little because because I didn’t trim enough. Man, the compression of pine can really fool you. In a comment on my last post, Jay suggested Poplar. After today, I think he might be on to something, so I might head on down to big box Home Depot and get some.
I made lots and lots of little mistakes, trying to saw off a pin, forgetting that I should use a coping saw when cutting out the pins, don’t force it too much, mark your waste, and actually LOOK for the X’s. I am starting to remember to look for the cabinet maker marks to keep alignment, so that’s progress. And, really, I am a fair amount pleased with the dovetails. Yeah they are ugly, and stand far to proud (better marking with the gauge next time), but it actually came together.
It is gluing up now, and tonight I hope to actually be able to nail a bottom to it to make it a real box. I might even scrounge up some hinges and put a lid on it. I’ve been wanting something to put my carving tools it. Right now I have some small palm carving tools that I use for wood block carving. I’ve been storing them in a plastic tub. This would be so much better I think.
badger
Practice Dovetails
One thing I love about hand tool work is that I can hear, and breathe while do it. Much less dust, much less noise. I can hear my music, and enjoy it while working up a sweat and breathing not clouds of dust, or struggling to breathe in a dust mask. It’s a very nice side benefit, it really is.
Tonight I started a new set of dovetails for a shop box. I got discouraged after my last set where I screwed up which direction I was going, and ruined a perfectly good box. This is intended to be a quick project (I should insert some kind of joke here about time, but let us just move on shall we?) to practice dovetails, and work out some hand tool techniques.

It was very quickly apparent that I hadn’t been down there in a while, as the skills were rusty, but I did manage to not screw up irreversibly tonight, and got one corner done. I had to trim the tails to fit more than I would have liked, and I really really need to learn to pay attention to my face marks. I nearly botched it again with the wrong face out. It would have been an easy fix, but still it’s something I’m not used to looking for.

I did fine tune somewhat the little dovetail saw I picked up. My attempt at sharpening is just that, an attempt, but it doesn’t cut too badly. It was binding a lot, so I think it needs some set added to the teeth, which will be interesting at that size. But, a little bit of beeswax on the sides fixed most of the binding, and I think I need to touch up the teeth with a little more care.
Also, you can see the Vise in action here. I am actually VERY pleased with the vise set up, it is night and day from what I was doing before, and makes quite a difference in how I did tonight. I was able to gang-cut two tails, and cut one set of pins fairly quickly with this MacGyver setup. I wish it was a bit more secure, but I would need a stronger bench top than the 3/4″ MDF top this bench has. But it worked for my purposes. Plus I was able to remove it, use my bench hook, and then put it back on in a matter of minutes.
I need the practice, that much is clear, but I wasn’t totally adrift down there, so that was good. I hope to actually finish this box (fingers crossed) before my big San Diego trip, but I am not going to make any promises I probably can’t keep. We shall see.
Badger
Solving a problem with new thinking…
Check the blog post above. It’s a great example of thinking of a problem in a different light, and solving it differently. I always thought that frame saws usually required pins like these which I actually just purchased recently, or making your own out of bolts with a hack saw.
However, this solution is much more elegant and cheaper for casual use. I could even see mounting these in a handle with a cross pin, or not. For a bang together saw frame it’s just fine.
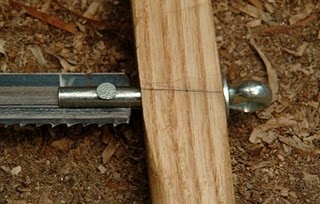
I love to just wander through hardware stores from time to time, just see what’s there. There is always some little thing sitting dusty on a shelf somewhere that is interesting or neat.
Badger
Twin Screw Vise
Did some cleaning and organizing tonight. I got about a half hour to play, but then it was the kiddo’s bed time.
I did get enough time to accomplish a few things.
1. Clean and oil the long jointer plane I picked up last month. Pictures later after I clean up the blade and give it a try.
2. Give myself a nasty sliver, which required major excavation to get most of it. Note to self: go buy better tweezers specifically for splinters. We couldn’t get all of it. Ouchie. The band aid is also making it hard to type. I suffer, I tell you SUFFER!
3. Cleared enough space to try out something I read about on the internet about historical twin screw vises. I snagged a “book press” at a PNTC gathering a month or so back. quick as you like, I have a twin screw vise.

twin screw vise
Thank you Chris Schwarz. You rock.
badger
Jacks Tools
A friend of mine from work recently lost his stepfather after a long ordeal. The family decided on what to get rid of, and one was a box of old tools that my co-worker offered to me at whatever I felt like paying.
Based on pictures he sent I offered up $140, and they took it. All in all, after seeing what I got it was a fair price. I had some of these, but not some of the others.

The smoothing plane was a non-starter missing the iron (but not the chipbreaker oddly enough), and cracked along the side where the wedge pushes out. I was hoping for this since I don’t have a real good wood smoother yet. But maybe I can use it as a pattern (and beef up the wall where it broke).
The ECE Jack plane is a winner though, and in good shape. The rabbet, block, jack are all Stanely and in good shape. The transitional plane is interesting, and I’ll see what it’s got going on. The braces look to be ok, and the miter box is nice and solid. They threw in an old boat slick for free, and I’m considering giving it a try as a turning tool on my spring pole lathe.
All in all, I am going to treat the tools with respect because they came from a friends family. And it gives me options for when I work on my planing, because I can tune them different ways. They were happy to have them go to someone who might use them, so I’m intended to do just that.
Badger
The Essential Woodworker reprinted!

The Essential Woodworker.
This highly recommended book has been finally reprinted by Lost Art Press who also brought us the Joiner and Cabinet Maker book I so enjoyed and have been raving about.
I pre-ordered it and got a PDF copy of the book for free for pre-ordering. Go do it! This book has been hard to find for reasonable prices, and now it’s available in a high quality reprint.
Badger
Meet the Thundergod
My mother is in town, and that means I can sneak down to the shop when my son is asleep. Today I got a rare second day in a row in the shop, and I really wanted to MAKE something. I’ve bought a lot of tools, and even tuned and cleaned/sharpened a few. Today I was set to actually make something, and I did.
Meet the Thundergod.

Thundergod side
I am going to be needing to cut some mortises sometime soon, and I didn’t have a good heavy hammer. I had my Apple wood hammer I made on the lathe, but it’s a bit lightweight for chopping mortise holes. The Thundergod gets his name from the shape of the handle which makes it somewhat Comic book Thor styled. The head is 2 3/4″ Maple wood, and the handle is a bit of Oregon Myrtle I had laying around. The Myrtle had some issues with checking and a big knot hole so I turned it bit more fancy than I was intending on a whim, and get rid of some flaws.
To make it I used mostly hand tools. I even tried to use power tools, and that was a mistake. I cut the head on the band saw and it went all kinds of funny directions. I tried to fix it on the belt sander, but it was too much for it and blew a fuse. I ended up using a block plane on the end grain to fix the band saw screw up, but I gotta tell you that thick of maple is hard to work with any tool.
To cut the handle I tried ripping it with a hand saw, but the only rip saw I have is dull. So I took a deep breath and sharpened it with a saw vise and files from the old toolbox. I worked surprisingly well, and it cuts quick now. Except my technique or sharpening is off, since the cut kept drift away from the line. I ended up just splitting it out after the saw cut drifted too far. Which of course ripped out a big knot hole.
I turned handle on the lathe (powered, but I’m not giving that up totally, it’s too much fun.) I had to cut in a lot near the top to turn away most of the hole left from tearing out the knot. I turned a fancy end for fun, and made it fit my hand. The top shoulder led to a 1″ shaft for the hammer head.

Thundergod Top
I was going to drill out the top on my drill press, but again my 1″ fornster bit is kaput. So I pulled out the auger bits I got in a roll at an antique store ages ago, and tried the 1″ bits. The first one was so dull it did nothing (note to self, must learn to sharpen these bits) but the second one cut quick. Well sort of quick, this is nearly 3″ maple. But I made my way through it, fairly straght and only sweating a bit. (I lie. I sweated a lot.) A little glue, a walnut wedge, and some walnut oil finish, and voila!

Hiro holding the Thundergod.
My son seems to approve.
Badger
shop time groove and paduak
It’s been a little tough to find shop time lately, but today I got a little bit of time and I took full advantage.
I’ve started work on a saw bench out of some reclaimed Yellow Pine, and I’ve got the top and legs cut out. More on that later, I was making good progress but started second guessing my design. I was going to just bodge it together, and not try for mortised legs or anything. I’m not confident with my skills enough to try and angled mortise quite yet. But now I’m redesigning the bench a bit, and we’ll see. For sure I’m going to use it for more than just sawing and will be using my brand new holdfasts as well, so that will be part of the design.
In other news I did some reclaimed lumber shopping at Second Use today. I got a box of Koa wood, and a couple pieces of surprise Paduak wood. Check out the picture, the color is insane! These are bound for pen blanks, so there will be some in the store soon I hope.

Paduak wood for Pens
I also got a chance to play with a previously purchased tool, an old Stanley #48 tongue and groove plane. I bought it ways back, but I never got a chance to break it in. I took some scrap pine, and just checked the blades (looked sharp) and tried it out. It cut in right away, and worked fine just as is. It’s a simple, no-nonsense plane, just does it’s job with now muss for fuss. The tongue and groove fit great, and it’s user with little or no adjusting.

Stanley #48
Very nice.
That was all I got, but it was refreshing. The old Disston 8 point crosscut saw made for easy work, but I still broke a sweat. Gotta get some more shop time more often. But then we had to go to Soccer game, go Sounders!
badger
You must be logged in to post a comment.