Posts in Category: woodwork
New Workbench part 2
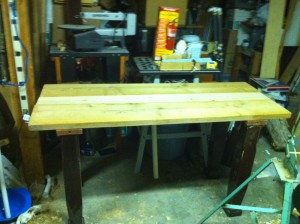
I didn’t get much time to work on it, but I did tack the legs of the new workbench on test out the height, and start working on the top. The legs are nice and solid, and add a nice character to my recycled materials “frankenbench”. When all is said and done it will probably have 3-4 different sources for the wood used in the bench including the bedframe, an old Southern Yellow Pine bunk bed a friend carted up here from the south, and left over build materials from my neighbor.
I wish Yellow Pine was easier to get up here, it’s a great wood and the white pine we get around these parts doesn’t hold a candle to the Southern Yellow Pine that Christopher Schwarz is always advocating for workbench construction. At first I discounted this, I mean, pine is pine right? Then I acquired this bunkbed frame, and realized what it was. I get it now, and that makes me all the more sad. Oh well, we must persevere.
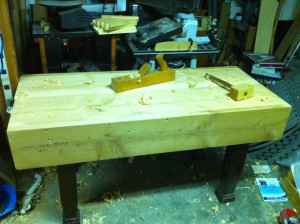
Anyway, here is some shots of the legs being tacked on, and the bench standing up. I used a couple drywall screws to tack to the cross bracing, and it’s remarkably solid for what it is. I also spent a little time planing the top to get it a bit more flat, and discovered some terrible grain direction with awesome tear-out. Sigh. I knew it wasn’t going to be great, but it is annoying.
Steps left to do:
- add stretchers to the leg, and shelf underneath
- carriage bolts for the legs (to make it able to break down)
- reinforce the top with addition thickness (for dog holds and weight)
- attach twin screw vise to the front (using screws from “book press”)
- attach quick release vise to end
- map out dog hole placement (line up with end vise)
- drill dog holes for hold fasts on the top and sides
- put some kind of finish on the top
But, I do like the top height, it’s low (31″) but I’m short, and it feels good with the wood jack plane at least. I might need to add some risers to the legs if it’s too short for metal bodied planes, but I’m going to go with this height to see if I like it or not.
Hopefully some day soon I will be able to MAKE something on my bench. Christmas time is coming, and I need to start planning out the family gifts.
badger
* Man, I need to do something about the lighting down there. Those pictures look TERRIBLE!
New Workbench part 1
OK, after much deliberating and wrangling of hands, I’ve decided to start in on building my new work bench. It’s been a pretty rough time trying to get this point, full of second guessing, changing plans, and lots (too much) research. I’m still quite new to the whole hand tool woodworking world, so I’m not as sure as I’d like to be that I’m going to build something that will work for what I want to do. Because I don’t entirely know what I want to do yet.
My design for the workbench as a couple of inspirations:
- Some left over 2×10 boards from my brothers old wheelchair ramp
- A salvaged teak veneer bed frame with 4×4 posts
- Height and clamping for hand tool work
- Chris Schwarz Workbench Book
- Bob Rozaieski’s Workbench build
I’ve opted to build something similar to the “Nicholson” workbench, an old English style bench that uses a torsion box style rather than a super thick benchtop. I’d love one with a 3″ thick solid maple top, but that is beyond my meager means, and time is a factor. I have some material already, so why not build the easier build first, learn the lessons of what I REALLY need on this bench, and build another one later. Plus, as I’ve learned so far, you need a bench to build a bench.
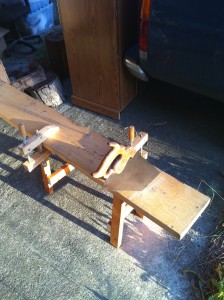
A recent project I completed has come in very handy so far. The sawbench!
Along with a couple wooden clamp, and the Disston crosscut saw I’m working my way through these boards quickly, and accurately. It makes a world of difference in my sawing, a task I used to fear more than anything. Now if I could just do something about the sore shoulder muscles.
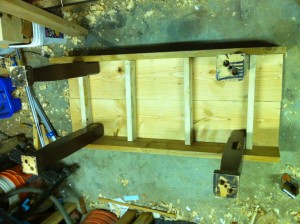
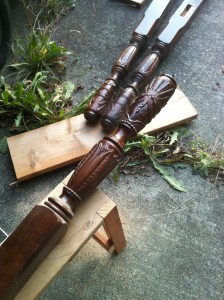
For the legs I’m using these bed posts I got from a salvaged bed frame my friends Jason and Julie gave me after it got damaged during moving. It was all nice teak veneer, over mystery wood (likely “Ramin” hardwood). The posts are solid enough though for my purposes, and add a nice decorative element. Too bad I couldn’t work the carved finials into it some how.
After a hard days sawing, I had this to show for it. It’s just all balanced on top of the legs, to test the height.
You can see the table-saw and router table I used to use all the time pushed to the back. I’ve been going more and more towards the hand tools of late. Much less noisy, and dusty. The only exceptions are my cordless drill, and the lathe.
All in all a good start.
More to come.
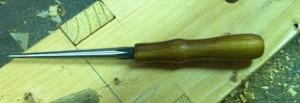
Making a Cheap Draw-bore Pin
Tonight I made a draw-bore pin from the Harbor Freight punch set I picked up a couple weeks ago. I picked up the idea from the Oldwolf blog that I sometimes read. I put a simple handle on it from some scrap Myrtle I had in the scrap bin. Not much to say that won’t be explained by a few pictures. I did put my saw bench to good use though, which you can see in the next picture. It’s becoming quite handy around the shop, especially as I build my workbench (more on that later).
Here is the punch set I picked up. It has at least three that can be used for a variety of sizes for cinching up the mortise, depending on the size of your holes drilled.
I drilled a hole in the Myrtle wood using my #8 auger bit, clamping the piece in a screw clamp, and using the hold-fast in the saw-bench. Worked quick and easy. I did have to ream out the hole some with a #9 auger bit to get it go in partway.
Then I turned the handle on my Lathe (no pictures of that part). The lathe is pretty much the only power tool used in the shop these days, with the possible exception of the cordless drill. I’m enjoying listening to music (Black Sabbath, and Adema for tonight) instead of the table saw, and the lack of dust is a very nice thing.
The hole wasn’t exactly straight, so the handle is a little crooked but it’s not a big deal. And if it really bugs me I can always turn another one. The punch is simply pressure fit into the handle, I widened the 1/2″ whole slightly so it slid in most of the way, and then hammered it in the rest of the way.  In use it doesn’t get a lot of pressure, so this will be fine.
It took probably half an hour to make all told.
Now I just need to start chopping some mortises. :) Here I go again building things to make things instead of actually MAKING things. I guess I just have to build up the tools and techniques before I can get started. Something like learning to crawl before I can walk or something. Which my son did really quickly, and didn’t crawl for long at all. Maybe there is hope?
badger
Sawbench
I’ve been wanting to build a sawbench for a while now, and today I finally got to it. I think I was going to do something else when I wandered down to the garage, but this is what I worked on. That’s how it is sometimes, it’s almost zen-like at times. I just settle into the garage, and see what wants to be built. Today it was a sawbench.
I built it out of scrap from the lumber pile, the top was some spare 2×8 from I have no idea what project, and the legs are recycled from an old bunk bed that a friend let me scavenge a while ago. It gives the sawbench a bit of a “frankenbench” appearance but it will do. I wish I could build such pretty things as featured in the magazines, but I think I need to do my time with lesser woods until my skills are better.
What I think I liked best about the build was how I came up with the plans. Pretty much on the fly, that’s how, and very little measuring. That might sound odd, especially since “measure twice, cut once” is a tried and true slogan. And I did measure to be sure, but not with a ruler. The only thing I used a ruler for was the height of the bench (17″), and that was to measure my stump I used to use as a sawbench. The rest came from the thickness of the wood, and from the piece being worked on. I took the idea from Roy Underhill when he showed us how to set our gauges to the thickness of the mortise chisel, and work almost everything from that. For a starting point, I looked at this plan by Chris Swartz, used the basic idea to get started, and the rest just flowed.
Here is the top with the notches cut out. As luck would have it there was a hidden knot in one of the forward notches, but I was able to work though it with a few good whacks of the big hammer. I angled everything at 10 degrees, like in the plan, set my sliding bevel gauge to that from a kids plastic protractor I had around. I could have eyeballed it, but the protractor was handy.
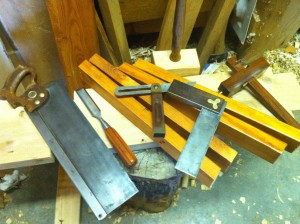
I actually started with the legs, but didn’t take any pretty pictures of them, but I wanted to show off the tools I used for this project (up to this point) so I staged a nice little shot here. I love this saw I found, it’s a Disston and I got it for $12 if I remember right and rehabbed it to its current state. It does need some sharpening though, next time I’ll have to do that, but it cuts fairly well as is. Under it all you can see the beat up old stump I’ve been using (or trying to use) for sawing and other stuff.
Once the top was cut, and the legs all do, I drilled some 1/4″ holes in the legs with my bit and brace. I just eyeballed the level by clamping the legs about 10 degrees angled and drilled away. In a break from “period” I used 2″ drywall screws to attach the legs to the board, mainly because I was in a bit of hurry and I didn’t have any good ideas on how it would have been done. On reflection I probably should have cut a step in the legs and probably doweled things together. Next time.
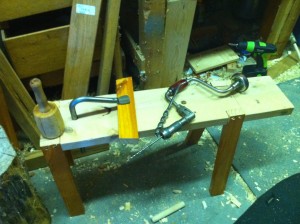
Once the legs were on, it became evident pretty quickly how useful this bench is. I drilled a couple 3/4″ holes in the middle and used a Gramercy Holdfast to hold the cross braces down for drilling and sawing. Iet grabbed nicely in the 1 3/4″ pine top, and held things really well. This makes me very happy. In the background of the picture you can see the one power tool I used. I love that drill, I really do, and it’s very handy to save my wrists (I have Carpal Tunnel in both wrists, hazards of the job I guess.) I actually only used it because I couldn’t find a screwdriver, funny thing.
The I put the notch into the front with a rip saw, and cleaned up a few edges, and called it day. A hot day, we’re in the middle of a heat wave here, so I didn’t spend too much time on the final stages. I do need to level the legs a little but I can see how this will be a big help around the shop already. I need to practice my hand saw technique, and I think this will help put me into the proper position to saw straight cuts.
All in all I felt good, not scrambling for the tools and wondering if I was doing it right. I felt more confident with the hand tools, and they worked well for me.
Badger
Dovetailed Box – Practice
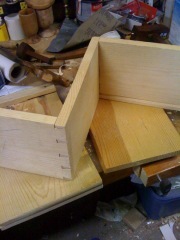
So, why on earth do I get those rare moments of shop time during some of the hottest days of the year so far? But, who am I to complain. It wasn’t too hot in the garage, just a bit warm, so I got some more dovetailing done. I managed not to screw up three more corners, and even got something that is starting to resemble a box together!
Well, at least four sides of a box. I had to trim a few pins again, and split one tail a little because because I didn’t trim enough. Man, the compression of pine can really fool you. In a comment on my last post, Jay suggested Poplar. After today, I think he might be on to something, so I might head on down to big box Home Depot and get some.
I made lots and lots of little mistakes, trying to saw off a pin, forgetting that I should use a coping saw when cutting out the pins, don’t force it too much, mark your waste, and actually LOOK for the X’s. I am starting to remember to look for the cabinet maker marks to keep alignment, so that’s progress. And, really, I am a fair amount pleased with the dovetails. Yeah they are ugly, and stand far to proud (better marking with the gauge next time), but it actually came together.
It is gluing up now, and tonight I hope to actually be able to nail a bottom to it to make it a real box. I might even scrounge up some hinges and put a lid on it. I’ve been wanting something to put my carving tools it. Right now I have some small palm carving tools that I use for wood block carving. I’ve been storing them in a plastic tub. This would be so much better I think.
badger
Practice Dovetails
One thing I love about hand tool work is that I can hear, and breathe while do it. Much less dust, much less noise. I can hear my music, and enjoy it while working up a sweat and breathing not clouds of dust, or struggling to breathe in a dust mask. It’s a very nice side benefit, it really is.
Tonight I started a new set of dovetails for a shop box. I got discouraged after my last set where I screwed up which direction I was going, and ruined a perfectly good box. This is intended to be a quick project (I should insert some kind of joke here about time, but let us just move on shall we?) to practice dovetails, and work out some hand tool techniques.
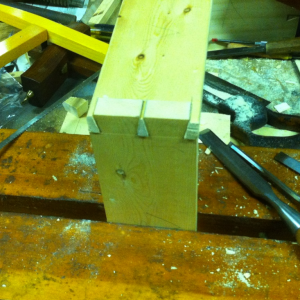
It was very quickly apparent that I hadn’t been down there in a while, as the skills were rusty, but I did manage to not screw up irreversibly tonight, and got one corner done. I had to trim the tails to fit more than I would have liked, and I really really need to learn to pay attention to my face marks. I nearly botched it again with the wrong face out. It would have been an easy fix, but still it’s something I’m not used to looking for.
I did fine tune somewhat the little dovetail saw I picked up. My attempt at sharpening is just that, an attempt, but it doesn’t cut too badly. It was binding a lot, so I think it needs some set added to the teeth, which will be interesting at that size. But, a little bit of beeswax on the sides fixed most of the binding, and I think I need to touch up the teeth with a little more care.
Also, you can see the Vise in action here. I am actually VERY pleased with the vise set up, it is night and day from what I was doing before, and makes quite a difference in how I did tonight. I was able to gang-cut two tails, and cut one set of pins fairly quickly with this MacGyver setup. I wish it was a bit more secure, but I would need a stronger bench top than the 3/4″ MDF top this bench has. But it worked for my purposes. Plus I was able to remove it, use my bench hook, and then put it back on in a matter of minutes.
I need the practice, that much is clear, but I wasn’t totally adrift down there, so that was good. I hope to actually finish this box (fingers crossed) before my big San Diego trip, but I am not going to make any promises I probably can’t keep. We shall see.
Badger
Hook Tools
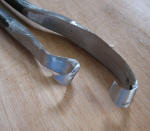
I just ordered a set of Traditional style hook tools from Hilton Handcraft. For use on my Pole Lathe. I had been considering these a while ago, then I lost this site. I am going to bust out the Pole Lathe again and see if I can make a few bowls this summer.
Having the proper tools is a big help.
Pen Assembly in action!
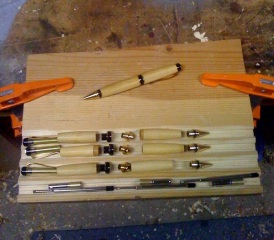
I’m a quarter of the way through my big order, and I snapped a quick shot of my new assembly tray I posted about earlier.  It’s pretty handy, I think I might add some more grooves to it, to add to the capacity of the tray.
You can see 3 “Cigar” Style pens in progress, and one finished. They are all in bamboo as will about half this order of 16 pens. With large orders I like to kind of “assembly line” the production of them which saves time and effort since I can cut all the same size at once, drill all at once, etc. Then I can take my time on the turning which is the fun part anyway.
badger
Making a pen assembly tray
Just a quick update. I have a large order I am working on, and I wanted a way to keep things from rolling around on my desk, and to keep things straight while assembling them. I grabbed my trusty Stanly #45 that had a grooving setup already from a previous project. I cut a straight groove, moved the fence, cut another, etc. I just did this in a piece of scrap pine I had lying around.
I had also been working on my sharpening skills with a oil stone, so I used the chisel I had just been working on to cut the corners off to make it easier to get things out of the troughs. I was pretty impressed, I actually got a decent edge on it, and it worked pretty well.
I snapped a picture to show what I’m talking about.
I also learned what the knob on the fence is for.
Avoiding splinters. Ouch!
Lesson learned, don’t do that again. I was riding my hand along the wood to hold it steady. Actually, to be honest I wasn’t really paying attention where my hand was. I was focused of the cutting, and I was reminded with a nice deep splinter to keep my focus a little more on all aspects.
Anyway, once the kiddo goes to be tonight I’ll be back down there. I’ve got 16 Cigar pens to make in 2-3 weeks. Which is why today was get organized and clean my work space.
— badger
Dovetail Box Progress… and FAIL
So, fresh from the Roy Underhill teachings on dovetails, I wanted to do it myself at home to cement this knowledge into my head. I learn best by doing, and I did a successful dovetail in class, but then went on a week vacation. So today I thought I’d do another corner of the dovetail box I’ve been working on. It’s really just a practice box, since my first attempt was so terrible. I had decided to keep the box going, and cobble the bad section together, maybe with pins or something to remind me where I started.
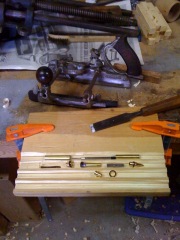
I also put some time into figuring out a groove in the bottom using my Stanley #45, and a rabbeted bottom with my Fillister plane. Both of which were success, and I put a couple grooves in the bottom edge of two boards. I decided to ignore the “stopped groove” idea, and just have gaps in the corners. The #45 was fairly easy to set up, and I was making groovy grooves pretty quickly, despite all that I’ve read about how difficult it was to set up. I took a nice picture of the tools, and grooves in a still life. You can also see the cherry test board I rabbeted as a test fit into the groove.
Next I got my hands dirty on some dove tails. I did the “Roy Underhill” way, setting everything from the width of a chisel blade, and working from there. Very little to no measuring, but accurate reproducible measuring. This is “old school” at it’s finest. I marked, I cut, I chopped and produced a very fine dovetail that fit very tight on my first fit with no extra trimming or shimming. I was pretty pleased with my self, until I realized that I had mixed up my face sides! The pins went the wrong way! Disaster…
Oh well, at least my dovetail joint is pretty sweet. I figured out how to save this box, but I’ll have to trim off the pins and the same amount on the other side to make my square box rectangular and slightly smaller. But at least I don’t have to redo the tails part, just cut new pins. This is how we learn right?
Badger








You must be logged in to post a comment.