Posts Tagged: carving
A study in interlacing.
A combination of work and family life has made visits to the shop a rare thing for a while. Â A combination of exhaustion and boredom made posts to the blog even rarer. Â Such is life.
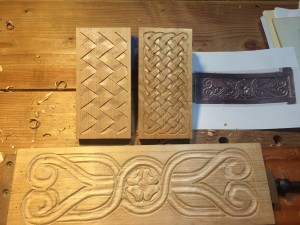
Got a little carving done the last couple of weekends, working on some new stuff to mix it up a bit.  I call the post a “Study in Interlacing” because each of the three panels I am working on is some kind of over-under type pattern.
On a lark I tried your standard “celtic knotwork” pattern, the kind you bang out on graph paper for fun.  It’s a lot of repetition of cuts, and it’s easy to miss one line if you are not methodical about it.  Layout took the most time, and once that was done, I was able to carve it pretty quickly.  The majority of the work is V-tool work, with a small shallow gouge to take care of under cutting. I used one of my background texture punches to finish it out on the “dots”.
After that I looked a different type of “weave” that I have seen  before in a book on Japanese carving.  It looks like a basket weave, and nearly wrecked by brain trying to lay it out.  The secret is that its NOT a square grid layout.  It’s a two x three layout, almost like a herringbone pattern. Once I got that, I was able to lay in the lines, and get to work.  This one is a lot of flat wide chisel work, and a larger shallow chisel to handle the over under work.  I think it looks great in a raking light.
Continuing the theme, I drew inspiration from a “pew end” carving that I spotted at Marhamchurch Antiques, a massively great site for medieval carving enthusiasts.  One of the set of four Pew Ends recently sold there had this great over under theme that I wanted to try.  Layout was fairly straight forward if you’ve done a bunch of S-Scroll carving, so I started with the center circle using a pair of dividers and just eyeballing the width of the ring. I used the same line width all throughout to maintain a consistent look.  The two ends are laid out like half of an S-Scroll pattern with the two circles, and then I just connected all the lines and figured out over-under pattern.
Started with a V-Tool I outlined the whole thing, and started in with medium deep gouge to dish out the center of all the lines. Â This is where is started to go astray unfortunately. Â This is Alder, which fairly soft, and the tight corners chipped out like crazy. Â I did the best I could to clean it up with slightly shallower gouge, but I wasn’t able to totally clean it up. Â I’m not super pleased, but I’m going to finish it up anyway to get the practice.
The top will likely be Pine or Poplar depending on what I have in the shop. Â If I have a big wide poplar piece, I might carve that as well, we shall see.
Badger


You must be logged in to post a comment.