Monthly Archives: December 2010
Peter’s Carving Tools interpreted…
I follow a fantastic blog by a fellow who goes by the name Peter Follansbee. He works as a joiner at the Plimoth Plantation and has done some incredible research into period techniques for carving and joinery. Just browse through his blog, you’ll be blown away. A bit ago he posted pictures of his basic carving set of tools that he uses. You can check out the post here. I had a bit of money on a gift card from Christmas so I went to Woodcraft to see if I could build the same basic set based on the picture of his tools (many of which are antiques or unmarked as to sizes etc.)
Here is what I’m calling my “Peter Follansbee Carving Kit” and what sizes I got to match his. I came pretty close I think.
Here are the sizes I think come close to what he pictured:
- Pfeil “Swiss made” Carving Gouge #9 Sweep 10 mm (Woodcraft #05G07)
- Pfeil “Swiss made” Carving Gouge #6 Sweep 20 mm (Woodcraft #05B04)
- Pfeil “Swiss made” Carving Gouge #8 Sweep 13 mm (Woodcraft#05F05)
- Pfeil “Swiss made” Carving Gouge #8 Sweep 20 mm (Woodcraft#05E14)
- Pfeil “Swiss made” Carving Gouge #5 Sweep 12 mm (Woodcraft #05D05)
- Pfeil “Swiss made” V-Parting Tool #12 Sweep 8mm (Woodcraft #05T85)
For reference here is his original posted picture.
I’m working on a box right now that I hope to be able to try some of this style carving on using these tools. I would also highly recommend picking up his DVD on the subject of 17th Century Carving. It’s what me inspired to try out the style of carving he shows on the disc. Once I watched it I started looking at period carving in a whole new way. Like I could actually do some of that stuff, just maybe. I am going to try my hand at it soon, wish me luck!
Badger
P.S. I am not affiliated with Peter Follansbee, Woodcraft, Pfeil or Lie Nielson Toolworks in anyway. I’m just a fan of all four. 🙂
P.S.S. I also am not advocating the Pfeil brand over any other brand, I just had a gift card to the store and they are local to me. The quality is decent from what I can tell, but I will bet you can find similar or better quality tools in other stores.
A Wooden C Clamp
Today the family and I went out to check out an antique mall we’d heard about down south. Very little in the way of tools, but I did pick up this one item for $20 because it intrigued me. I’d seen a wood C clamp in an old painting a while back, and was curious as to what kind of joint could be used for that. Well, now I know what one joint might be used.
I have no idea how old this is, there wasn’t anything I could to date it. The only marking is “HERRBURGER SCHWANDER” stamped in a couple places on the side. Probably an owners stamp. I would guess in the last 50-100 years for this.
Any help in identifying it?
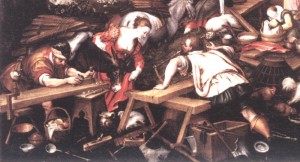
Here is a picture of the old painting depicting a wooden C clamp in use:
Merry Christmas and Happy Dovetailing!
I started this blog with little goal other than to chronicle my aimless pursuit of woodworking. It’s still exactly that, but I do feel like it’s seen its fair share of cool things. I’ve grown my skills substantially, and expanded my knowledge base quite a bit.
I’m looking forward to the year of 2011 and the Year of the Hand Tool (or if I’m at work, it’s the Year of the Escalation, but that is a whole different affair, and I’ll just leave that at work thank you very much.)
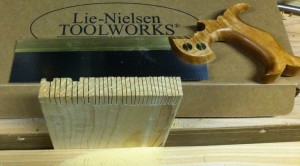
To aid in that quest of Hand Tool zen, my lovely and talented wife got me a Lie-Nielson dovetail saw for Christmas. This is quite possibly the best tool I’ve owned. It’s my first LN tool, and I’m impressed, this is a definite improvement over what I’ve been using. It’s a joy to use, it cuts well and straight and clean. I’m off to the in-laws for some heaping portions of Christmas Ham, but I see some dove tail in my future. I have a board of Poplar that might just turn into a box. I need another box to hold some of my tools since my son absconded with my pinned wooden box for his giant pile of wooden railway train tracks.
Oh darn, more shop time.
badger
Couple of new vices
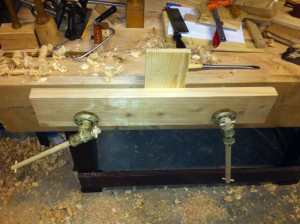
I have a couple of new vices, I mean vises. I finally mounted the quick release metal monster that I got from the local Second Use store ages ago, and the twin screw “book press” to my Frankenbench. Due to the style of my bench, the so-called Nicholson style bench, I had to mount the quick release vise as an end vise. Then I had to buy a new 1 1/4″ fornster bit to make the holes for the screws on the front for the twin screws. I think I drilled the holes too low in the wood for the vise, but we’ll see how it goes for now.
I used them last night in the train rack project and I can honestly say they made an immediate difference in my ability to do work. The end vise works great, and is a dream to use. I kind of wish it was on the front because of the ease of use on the quick release part. The twin screw part is a little clunky to use so far, but it works fine for now.
That’s why you build a bench right, so you know what you want or how to build your NEXT bench. :) But for now, I think this will suffice. At least for a while anyway. I’m going to make some mental notes, and either build or buy a new on eventually.
The best thing though is that I can stop obsessing on this part of the work bench, and actually do some work with them. Work holding is so freaking awesome when you haven’t had anything, it changes the game completely.
A Holiday Project starting
My son loves trains. LOVES trains. Like a lot. He also specifically loves Thomas the Tank Engine, and we’ve spoiled the crap out of him with lots of trains from the Thomas series. His birthday was last weekend, and he got a metric ton of new trains. Which reminded me that I needed to make him a rack for displaying some of his trains (so we can clear some off of the floor or something.)
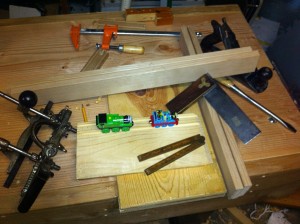
I got a start on it tonight, because Christmas is fast approaching. I’m going to use my Stanley #45 to cut the grooves to keep the trains from falling out, after trying to make a scratch stock that didn’t turn out so well (you can see it in the top of the picture below) but I didn’t expect a lot of it. I knew the #45 would work just fine. So far I’ve cut the sides and top/bottom of the rack, and I’m going to dovetail the case together and then measure out the shelves after I get that done.
Lets just hope I can finish by the 25th. 🙂
It’s got legs!
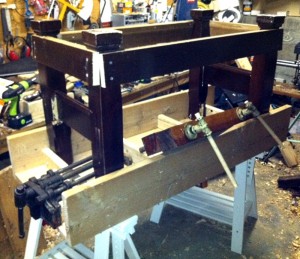
Tonight’s big accomplishment takes me a long ways towards actually working on projects. My “Frankenbench” now has some sturdy legs attached. These are the legs from a bed frame I am salvaging after it got messed up during a friends move. I’d been hanging on to this thing for ages knowing I could do SOMETHING with all this.
I figured out how I was going to do the legs as I went, and I was able to re-use the stretchers from the bed frame to create the bottom portion with pre-built shelf brackets (it used to hold the box spring, should hold my tools just fine). Although I wasn’t able to go with the old brackets, the slots were too high up on the leg to form a useful storage area, which is too bad because that would have been easier to break down.
I’m not going to say this is pretty, no way, no how, but it’s a workbench so I don’t think it has too be pretty, just functional. And speaking of function, the next step is to start attaching the real reason to build a bench… The VISE hardware. Work holding is super important for working wood with hand tools, I have come to realize that. So, this bench has a old sturdy quick release vise in the end vise position, and a salvaged “book press” to serve as the Twin Screw face vise. I’m not sure I’ll be able to use the wood from the press, or just the two beefy screws. I think the top will be too deep to have the chunk of wood that came with the press to line up with the outside of the bench top, so I’ll probably have to put some Douglas Fir 2 x 8 which just might be better.
After I attack the vises, the next step is to thicken up the top by gluing 2 x 4 or 1 x 6 under the top. This should help make it thicker, and help with the holdfasts. I’ll have to drill a bunch of holdfast holes as well, and that’s going to be fun spacing it out to miss the stretchers. This is what happens when I don’t start out with a fully realized plan I guess. But, then again, this way I’m learning a ton of stuff about what I’ll need for my next bench, and there will be a next bench.
If all goes well I should be able to start on the Christmas gifts soon. (Yes, I realize that the day is very fast approaching, what of it?)
Then again, maybe I should just flip this over, and start work on the gifts sooner. Hrm. Maybe just one Vise? Just one? Please?
🙂
The Adventures of Frankenbench continues…
A mystery solved
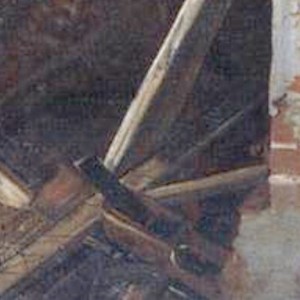
A while back I posted about a odd looking plane I’d found in an old painting by Jacopo from 1574. Recently I posted about a painting of building the Ark by Kaspar Memberger the Elder that had some great shots of workmen and tools. Yesterday I found another painting by Jacopo that I hadn’t seen before that showed nearly the same exact scene that Kaspar had painted, but with different tools. One of the paintings is a copy of the other for sure, but I wasn’t able to find much on the painting itself. The newly discovered Jacopo painting looks like it had been damaged either by cutting or folding, which might explain why it’s much less popular than the other ark painting he did.
The really cool thing about this new painting though, is that it shows one of the workmen clearly demonstrating how that strange looking plane with the roman style handle in front of the blade, rather than behind, is used. The fellow is clearly pulling the plane! And there are a couple other planes in the foreground as well.
It’s a little mystery solved, phew! It’s odd though, most European planes were designed to be pushed. The roman style handles are very rarely found due to ravages of time, but there are few examples still around due to volcanic action (Pompeii has a few). The cut out style was seen in the known examples as both ends of the plane, or behind the iron as seen below in these scans from Goodmans book on History of Woodworking Tools.
Interesting stuff. One of these days I’d love to make a reconstruction of these planes to see how they work, but I think I have a few more challenges to get through first.
Badger
Chopping some mortise
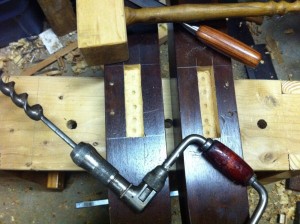
Tonight I achieved another first, in a long line of firsts. My first mortises, in my own shop. I chopped a single mortise when I attended the woodworking course at Roy Underhill’s Woodwright School but that was under controlled circumstances, and under the watchful eye of Roy himself. These are not very pretty, but they are mine all mine.
These are for my Frankenbench that I am building when I can. The legs are scavenged from a bed frame that I have been holding onto. One pair of the legs had really ugly mortises (uglier than mine, can you believe it?) that I will be able to re-use. The other pair of legs came from the head of the bed, and didn’t have the same mortises. So, I grabbed my gauge, marked it up and started drilling out the waste. It felt good to be able to do something simple like that without having to fake a tool or wonder if I was doing it right. I knew enough about this operation either through reading books or online, or having seen it on Roy’s show. Plus I got to use the big hammer for it’s intended purpose, thumping a chisel into wood. I still need to cut some of the side railing from this bed frame into some short stretchers to fit the mortise, and glue up the leg pairs and fit them to the top. I’ll admit to being a little nervous about this part, so I’m going slowly.
The bench top (a riff on a Nicholson top) is upside down on some sawhorses I got at IKEA.  Scoff not! I actually like these things a lot. We got them on sale a couple years ago intending to build an adjustable height work area for my wife to use in her sewing room. We never did get around to building that out like we wanted because my son came along and distracted us quite a bit from everything. They do that, I understand this now, but wouldn’t trade it for the world. Once I’m done with the workbench they might actually go into service in the sewing room as a desk, but that’s a project for spring I think.
I fit the end vise and drilled the holes for it. I just need to drill some counter sinks for the bolts into the top and I should be able to bolt it on. All in all I made some really good progress after being stalled for so long. If I can get this build and solid, I can start working on actual projects theoretically. And I will be getting some well deserved time off from work for the holidays, which is mostly eaten up by birthdays (3) and family gatherings for the family (2), but I will be able to get a few days here and there to work.
Also tomorrow I found another painting that actually solved a little mystery on one of the planes I discovered a while back in 1574 painting. More to come on that.
Badger
More tools in paintings, 1588
I’ve been sifting through old paintings looking for tools from pre-1600 and I found another good one. I use this site, the Web Gallery of Art, to find all these paintings by the way, if you’re looking for a way to burn a few hours on the internet, this place is great. I had an idea to search on Noah’s Ark pictures, since they frequently depict the building of the Ark using tools of the day. This one is a great example.
The original image can be found here: I pulled the section with the tools, zoomed it a little, and lightened it up to get more details on the tools. This painting is by
Painting Details:
Painter: Kaspar Memberger the Elder (1555-1618)
Title of Painting: Noah’s Ark Cycle: 1. Building of the Ark
Date: 1588
There are a couple of really interesting things in this one that I liked.
First the tools:
- Adze
- Wood bodied planes. The handled ones look like the Melancholia plane in Albrecht Dürer’s famous print.
- T handled augers
- Two axes
- Workbench, and Saw Bench
- Pair of Compasses
- Bow Saw
- Chisels
- Screw clamp
That last one is the most intriguing to me, as I’ve not seen a screw clamp in a pre-1600 context before. I haven’t really gone out of my way to look for it either, but it’s interesting nonetheless. I wonder what kind of joint they used to make the C on that. I’m assuming that it’s a jointed clamp, because otherwise it would just snap along the grain I would imagine. After the holidays I’m going to be ordering a couple screw box sets from Highland Woodworking and I might try making a couple of these just for kicks.
It’s also a great scene of “job site woodworking” where they have a couple benches and box of tools and getting down to work. The benches look pretty similar to the sawbench idea that floats around the internet, and you can clearly make construction details on one of them. There are three different styles of bench shown here. On the left it looks like the legs are either set into mortices or bored holes. The middle one is a much nicer bench with what looks like Gothic styling, and some decorative carving. The one one the right has the legs set into the side of the top, with cross braces much like the sawbench I build a while back based on a Chris Schwarz design.
Fun stuff.
A 1510 Joiners Tool Set
Details on Painting:
Artist: Jean Bourdichon b. 1457, d. 1521 Tours, France
Title: The Four Social Conditions- Work
Date of painting: 1510 (from “The history of woodworking tools” by W. L Goodman)
I ran across this great picture of a painting dated to 1510 of a Joiner in his workshop. I love these old pictures, because you can get a glimpse of the work and tools from a distant past.
A lot of discussion has happened about tools and work from the 17th century, due to a number of excellent books available in reprint these days, but there really isn’t a lot of resources available for pre-1600’s woodworking.
Here is one of the rare instances that I’ve seen that shows things so very clearly. It also shows a snapshot of life back then. The child on the floor collecting shavings for use in the fireplace presumably, the wife working on something, maybe weaving? But for me the really great part is the tools.
You can clearly see the following tools:
- Jointer or Try Plane
- Smoothing Plane
- Chisels of several types
- Mallet
- Square
- Compass
- Small axe
- Bowsaw
- Piercer or Brace
That’s a pretty solid set of tools. In the foreground you can see a linenfold carved chest, and the background you can see a gothic style carved chest. What little research I’ve done on this time period says that this is the transition period between those two styles of carving.
Interesting stuff.
Badger






You must be logged in to post a comment.