Posts in Category: workbench
Old German Workbench
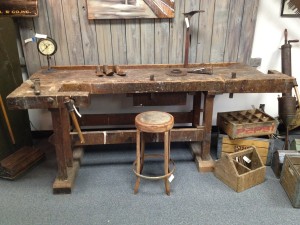
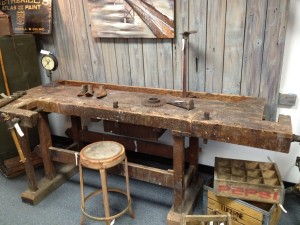
My wife and were out Antique store browsing, and I ran across this interesting piece of work.
It’s supposedly from the 1800’s, and was German in origin. The plate for the shoulder vise was missing, but otherwise it was complete. It was very well worn, and had seen a lot of use in it’s day. I couldn’t afford it, or had any space for it, but it was pretty cool to check out.
Stuff like this is pretty rare out here on the West Coast. I’m sure those East Coast people are all like “whatever dude, I see five of those every time I turn around”. Heh.
Badger
More Scroll work and my new Carving Bench
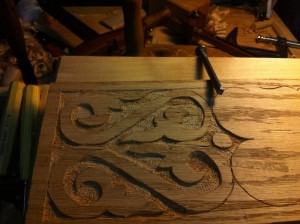
I snuck down to the shop after I got my kiddo to sleep to continue work on the S Scroll box face. I got a second scroll complete, and some of the outline of the other two. I’ve also learned a few things about crappy hardware store wood along the way. The open porous grain of this oak causes some serious issues when carving, and it’s difficult to get a nice clean surface (not flat, just clean) because the would just disintegrates as I try to carve it out. It also is weaker than the solid parts (fairly obvious really) and causes some splintering on the areas where it shouldn’t. I’ll have to fix those later once I’ve gotten this all done, or maybe I can plane it down, not sure.
I did modify the design here and there to accommodate sections of weakness to good effect, but I have a couple spots that are going to be a problem. I see a little more clearly now though why some of the designs I’ve looked at, and PF has discussed as well are not totally symmetrical.
I also am learning a lot about what I need to learn. Sounds awkward, but it means I’ve learning some of the things that I will have to simply practice a lot to get better at. You can feel it when it works right, it just… Makes Sense. In a Zen sort of way, it feels right. And the converse is true. You can really feel it when it’s not at all right. I’m trying to learn to take a deep breath, slow down and think those areas through rather than my natural reaction which is to panic and push harder or move faster. Which usually doesn’t work so well, as you might imagine.
I also snapped a picture of my new “carving bench” or maybe it’s a “bench on a bench” or something. I’ve seen a few blog posts around the woodworking blogs about these, and I decided it was probably the best thing for my aching back after a long session of carving. Night and Day! I just screwed together some pieces of left over construction grade lumber, and clamped it between the bench dogs and vice to hold it down. Nothing fancy either to hold the work. I have visions of using some of those fancy Wonder Dogs, or whatever they call them from Lee Valley, but that was too complicated and I didn’t have them anyway. Clamps work great and the board is not going anywhere.
Off to bed, with visions of S Scrolls dancing in my head.
Badger
Couple of new vices
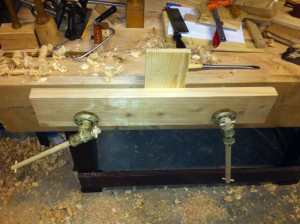
I have a couple of new vices, I mean vises. I finally mounted the quick release metal monster that I got from the local Second Use store ages ago, and the twin screw “book press” to my Frankenbench. Due to the style of my bench, the so-called Nicholson style bench, I had to mount the quick release vise as an end vise. Then I had to buy a new 1 1/4″ fornster bit to make the holes for the screws on the front for the twin screws. I think I drilled the holes too low in the wood for the vise, but we’ll see how it goes for now.
I used them last night in the train rack project and I can honestly say they made an immediate difference in my ability to do work. The end vise works great, and is a dream to use. I kind of wish it was on the front because of the ease of use on the quick release part. The twin screw part is a little clunky to use so far, but it works fine for now.
That’s why you build a bench right, so you know what you want or how to build your NEXT bench. :) But for now, I think this will suffice. At least for a while anyway. I’m going to make some mental notes, and either build or buy a new on eventually.
The best thing though is that I can stop obsessing on this part of the work bench, and actually do some work with them. Work holding is so freaking awesome when you haven’t had anything, it changes the game completely.
It’s got legs!
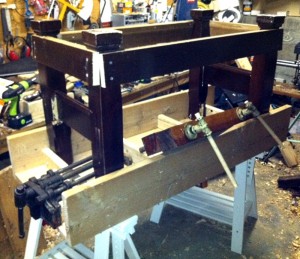
Tonight’s big accomplishment takes me a long ways towards actually working on projects. My “Frankenbench” now has some sturdy legs attached. These are the legs from a bed frame I am salvaging after it got messed up during a friends move. I’d been hanging on to this thing for ages knowing I could do SOMETHING with all this.
I figured out how I was going to do the legs as I went, and I was able to re-use the stretchers from the bed frame to create the bottom portion with pre-built shelf brackets (it used to hold the box spring, should hold my tools just fine). Although I wasn’t able to go with the old brackets, the slots were too high up on the leg to form a useful storage area, which is too bad because that would have been easier to break down.
I’m not going to say this is pretty, no way, no how, but it’s a workbench so I don’t think it has too be pretty, just functional. And speaking of function, the next step is to start attaching the real reason to build a bench… The VISE hardware. Work holding is super important for working wood with hand tools, I have come to realize that. So, this bench has a old sturdy quick release vise in the end vise position, and a salvaged “book press” to serve as the Twin Screw face vise. I’m not sure I’ll be able to use the wood from the press, or just the two beefy screws. I think the top will be too deep to have the chunk of wood that came with the press to line up with the outside of the bench top, so I’ll probably have to put some Douglas Fir 2 x 8 which just might be better.
After I attack the vises, the next step is to thicken up the top by gluing 2 x 4 or 1 x 6 under the top. This should help make it thicker, and help with the holdfasts. I’ll have to drill a bunch of holdfast holes as well, and that’s going to be fun spacing it out to miss the stretchers. This is what happens when I don’t start out with a fully realized plan I guess. But, then again, this way I’m learning a ton of stuff about what I’ll need for my next bench, and there will be a next bench.
If all goes well I should be able to start on the Christmas gifts soon. (Yes, I realize that the day is very fast approaching, what of it?)
Then again, maybe I should just flip this over, and start work on the gifts sooner. Hrm. Maybe just one Vise? Just one? Please?
🙂
The Adventures of Frankenbench continues…
Chopping some mortise
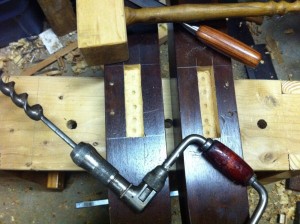
Tonight I achieved another first, in a long line of firsts. My first mortises, in my own shop. I chopped a single mortise when I attended the woodworking course at Roy Underhill’s Woodwright School but that was under controlled circumstances, and under the watchful eye of Roy himself. These are not very pretty, but they are mine all mine.
These are for my Frankenbench that I am building when I can. The legs are scavenged from a bed frame that I have been holding onto. One pair of the legs had really ugly mortises (uglier than mine, can you believe it?) that I will be able to re-use. The other pair of legs came from the head of the bed, and didn’t have the same mortises. So, I grabbed my gauge, marked it up and started drilling out the waste. It felt good to be able to do something simple like that without having to fake a tool or wonder if I was doing it right. I knew enough about this operation either through reading books or online, or having seen it on Roy’s show. Plus I got to use the big hammer for it’s intended purpose, thumping a chisel into wood. I still need to cut some of the side railing from this bed frame into some short stretchers to fit the mortise, and glue up the leg pairs and fit them to the top. I’ll admit to being a little nervous about this part, so I’m going slowly.
The bench top (a riff on a Nicholson top) is upside down on some sawhorses I got at IKEA.  Scoff not! I actually like these things a lot. We got them on sale a couple years ago intending to build an adjustable height work area for my wife to use in her sewing room. We never did get around to building that out like we wanted because my son came along and distracted us quite a bit from everything. They do that, I understand this now, but wouldn’t trade it for the world. Once I’m done with the workbench they might actually go into service in the sewing room as a desk, but that’s a project for spring I think.
I fit the end vise and drilled the holes for it. I just need to drill some counter sinks for the bolts into the top and I should be able to bolt it on. All in all I made some really good progress after being stalled for so long. If I can get this build and solid, I can start working on actual projects theoretically. And I will be getting some well deserved time off from work for the holidays, which is mostly eaten up by birthdays (3) and family gatherings for the family (2), but I will be able to get a few days here and there to work.
Also tomorrow I found another painting that actually solved a little mystery on one of the planes I discovered a while back in 1574 painting. More to come on that.
Badger

