Yearly Archives: 2012
Question about how to start carving…
In response to my post tonight about my carved tool tote, I got a question about how to start carving similar stuff. The answer I thought might be of more general interest, so I thought I’d post my answer here.
“I was reading your blog post about carving your tool tote. I would like to get started doing some really small and simple carvings. Do you have a book/dvd that you recommend and what are a few needed tools to get started?”
The answer kind of depends on what kind of carving you want to do really, but since the question was about the stuff I have been doing I’ll answer in that regard.
DVD
- Peter Follansbee – 17th Century New England Carving
- Peter Follansbee – 17th Century New England Carving: Carving the S-Scroll
http://www.lie-nielsen.com/catalog.php?grp=1320
Scroll down a bit for the first one, it’s the best for starting out. Then follow up with the S-Scroll dvd. Absolutely top notch stuff, and very easy to understand and learn from.
Blog
Reading Peter’s blog: http://pfollansbee.wordpress.com/ from start to finish. :) That is if you are a geek about history and woodworking like me. Otherwise search on carving.
Books
Tools
I posted a while back about my starter set of tools, based on the recommendations of Peter Follansbee and his basic kit.
https://badgerwoodworks.com/2010/12/peters-carving-tools-interpreted/
this has the list of Tools I started with and how I got the list.
- Pfeil Gouge #9/10 mm
- Pfeil Gouge #6/20 mm
- Pfeil Gouge #8/13 mm
- Pfeil Gouge #8/20 mm
- Pfeil Gouge #5/12 mm
- Pfeil V-Parting Tool #12 8mm
I did about 4-5 fully carved pieces with that set before I started expanding. I’ve added about half dozen chisels so far, but only as I need them for specific projects. The set above is a decent starting place I figure for the kind of carving I do. It’s hard to say specifically what you’ll need since you might have a different design style in mind, but a good V tool and small variety of gouges will be a good as place as any to start.
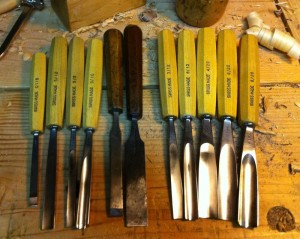
Here is part of my current kit, which I used nearly off of these for the Tool Tote carving.
Hope that helps.
Badger
Carved Tool Tote finished!
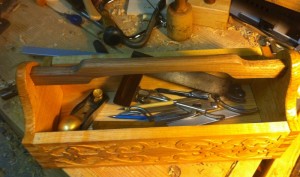
When I took the class out at Port Townsend on Planes, we all came away with a nice plank of air dried Alder wood that we had taken from rough stock to finished width over the course of the class. Tim, Jim and I were talking about how it might carve, and I set out to find out. Not content with simply carving a panel, I decided to make something useful out of the plank. And for the record, it carves beautifully!
I’ve been wanting to make a tool tote to carry tools to my sons preschool where I do work from time to time. Plus, I wanted to have something to take stuff to Port Townsend classes other than a cardboard box or something. Something with a little class that showed off some of my skills as a woodworker (or in the case of my dovetails, the lack of skills, but shhhh… on that.)
Looking around I found a nice “strap work” pattern in my inspiration folder, and started out with some pencil and paper to work out the layout. That took a bit of doing, but I finally got the basic lay out. I cannot stress enough how helpful it is to work on paper first for carving layouts, unless you’re a master carver like Peter Follansbee that is. If you’re working out a new layout that you’ve never done, it’s vital. If nothing else, you have to figure out what your layout lines are going to be. Once you get that, the rest is fairly easy, but it’s not always easy to tell what you need by looking at a finished piece. Sometimes you can see the faint leftovers of scratched lines for layout that will give you clues like the S scrolls I worked out before.
I did notice that after my first panel, the second panel layout flowed out quickly and without any fuss, so I can tel that practice and experience will quickly eliminate the need for the paper eventually. Until then, I plan on sketching a lot before I start.
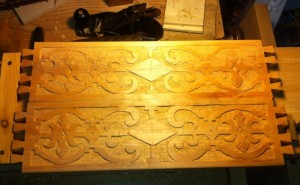
Once I had the pattern worked out, and the guidelines established I was able to scale it down to my boards. This one came down to a simple rectangular grid, and layout was a snap because it was simple division of space not complicated measuring. For this one it was, set in a border with the marking gauge then divide the remaining space into half length and width, and then subdivide the spaces again. You can see in step 1 below what I ended up with.
To set the pattern into the wood I took a variety of chisels, and matched the shapes to my sketches and set them straight down into the wood with a sharp rap of the carving mallet. Matching curves to chisels is the key here, and once you get it established it goes quickly. I got into a groove where I would hit one mark, and then repeat it down the line of the pattern.
Once I get the whole pattern set in (#2) I start in on the background with a couple of small slightly curved chisels to scoop out roughly the background. I’m not looking for super flat, just a good clean line around the pattern. I quickly realized I had to be ambidextrous quite a bit to make all the cuts safely, but after a bit of practice it soon became second nature. The biggest trick was making sure that I was cutting the right direction, and trying to accommodate the grain. I got pretty good at the first, and a little better about the second. You can see in #3 what it looked like about half way through.
Once I’m happy with the background I took my homemade texture punches, and worked the background. It really makes the flat strap work pop out then, once you texture the background. Also, this is why you don’t really need to have a perfect background for this, because the punch takes care of any minor bumps.
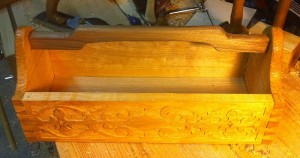
As for the rest of it, the ends are Oak, and the handle is a bit of Walnut scrap I found in the shop. I decided to give it some interest by shaping the handle sort of inspired by the Greene and Green or Craftsman styles. It was also partially an excuse to use my new Lee Valley spokeshaves to be honest, but I am pretty happy with the result. The shape of the ends didn’t turn out the way I was hoping, but it’s not too bad. I would do it differently if I did it again.
The whole thing was dovetailed together, and a the bottom is a bit of 1/2″ Oak left over from another project set into a rabbet on the bottom boards. The less said about the dovetailing the better, since I managed to botch it a couple of small times, and one major blunder I had to fix that almost ruined the whole piece. Simply put, I really need to pay attention to my marks to match the sides to the right end piece. Sigh.
I applied a simple spray coat of clear Shellac to finish it since I wanted something that was simple, easy and fast (it needs to be in service asap) and I could renew it if I needed to. It’s meant to be a functional piece, so I didn’t put a lot of effort into a glassy mirror smooth finish, which would be silly for a tool box anyway.
All in all I’m pleased with it, especially the way the carving came out.
Badger
How much does she love me?
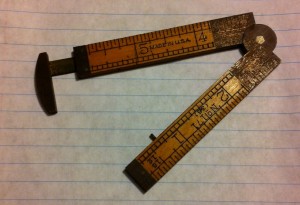
This much apparently.
My wife found a little mini folding rule for Valentines day for me. I’m not sure how it happened but I think I am kind of collecting these things now. I’ve seen a few folding rules out there, but nothing this small. I have his 1′ folding cousin that I use in the shop all the time, so I think this one is pretty awesome. Not real useful, but awesome.
Badger
My woodworking heroes…
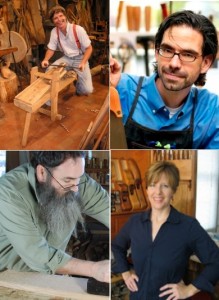
There as a post on the Popular Woodworking blog titled “Who are your woodworking heroes?“ The title gave me pause, because I could think of one quickly but then I was a little more stumped. I had LOTS of heroes, so many it was hard to pick, or worse remember their names because much of what inspires me is the object, not the maker in most cases. I narrowed it down by a criteria of who started me down this crazy journey of hand tool wood-working and making things. I also restricted this list to people alive today, the modern day heroes. I have a couple of historical ones, but I’ll keep it current day for now.
Roy Underhill – Sort of a “Gimme” for this list, but I really can’t say enough good things about this man. I was lucky enough to travel across the country to take a class at his school, and it’s still one of the all time best experiences I’ve had. He is an author, teacher, comedian and entertainer and is genuinely the guy he portrays on TV.   I’ve read all the books, and watched as many of the episodes of Woodwright’s Shop as I can.
Chris Schwarz – I sort of view Chris as the heir to the throne for what Roy has been teaching. He’s taken the cause to heart and is doing an amazing amount to promote and educate on the craft. I like the enthusiasm he shows for it, and the energy he puts into it. Writing books, starting a small press, and educating people. He’s gained a near cult of followers for his troubles, and I really enjoyed his “Anarchists Toolbox” book. One of his editorials in Popular Woodworking about what we could all do to “save woodworking” and said “start a blog!” so I did.
Kari Hultman – I found her blog through another linked blog, and ended up reading the entire thing over the course of a few days. She got me excited about making wooden things, but more importantly gave me the feeling that “Hey, I can do that…” She takes great clear progress shots, and explains just what you need to try it your self.
Peter Follansbee – In addition to woodworking, I have a passion for history. Peter helps combine both, and educates every one who reads his blog on both. It’s inspired me to dig deeper into what I want to do, and helped me learn relief carving quickly. He has a new book coming out, and I’m hoping he will write and write and write.
Wretched Coping Saw, Begone!
I’ve been doing a little dovetailing lately, and that means I’m also doing a little bit with the coping saw to clear the waste. Every time I drag that plastic handled demon out of my tool box, I am reminded how much I despise this saw. It’s a struggle to use, it fights me constantly, and is simply a pain the butt to use.
I was reading through bits and pieces of the Anarchists Toolbox again, and came across his diatribe about his first coping saw that he used an example of a poor quality tool. I resolved then and there to do something about my coping saw issue, and set out to do some research into a replacement. I finally settled on the Olson Coping saw from Tools for Working Wood, although the Gramercy bow saw with coping saw blade was a serious close second. It came down to price really, and I sort of compromised by getting the Olson, as well as the blades and pins for building my own frame for the bow/turning saw at some future date.
I gave the Olson a little test run tonight, and it was worlds apart from the plastic handled demon that has vexed me so! I got the Skip Tooth 18 TPI blades on a recommendation and it was a good one. The frame is nice and solid, the handle feels good and the blade cut through walnut like something close to butter.  I’m looking forward to doing more dovetails now, and am glad to be giving my old coping saw the boot.
badger
Oak Furniture The British Tradition Reprinted? Yes!
 Oak Furniture | The British Tradition – Victor Chinnery – 9781851490134 – Antique Collectors Club US.
Looks like one of the most sought after books on English Oak Furniture is going to finally get a second printing. This book is the GO TO source for this stuff, and it’s really hard to find used. We’re talking hundreds usually for this book.
A reprint is on it’s way according to the publisher’s site, which is fantastic news for us recreating these old styles or just studying them for new ideas.
Looks like it’s coming out some time in March. Just in time for my birthday…
** edited ** Peter let me know that they apparently have a regular printing schedule as soon as they run out, they print more. So, it remains to be seen whether it’s a full on second edition, or more of the same book printed again. Either way, I’ll be happy because I’m going to get a copy.
Badger




You must be logged in to post a comment.