A much improved carving attempt
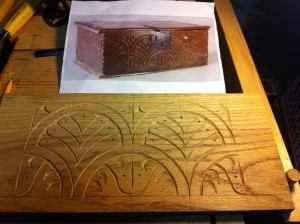
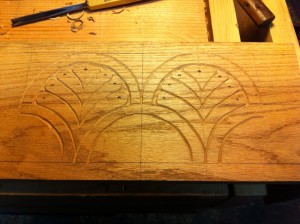
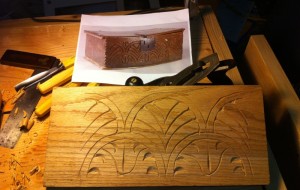
Tonight was a good carving night. I wanted to try the carving pattern on the 17th century box again, to see if I could improve my carving. Normally these boxes are only carved on the front face of the box, but I am going to carve both sides just to get the practice. I can tell that the practice helped from side one to side two, as my second attempt was so much better.
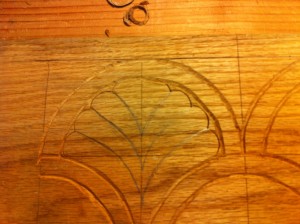
I learned a few tricks the first time I was able to apply the second time, and I came up with a couple new ideas and tools. I also re-watched the Peter Follansbee carving video again. I also had a better feel for the spacing of the “fans”, and found an old nail punch in a drawer that made a nice dot for the decoration.
As requested on the last post I took a lot more pictures along the line.
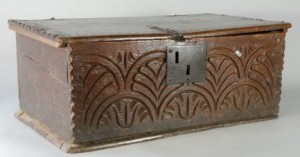
Here is the source of the design inspiration again. I keep a print out of it on my workbench to keep referring to, and looking at the carving over and over again.
Carving layout trick
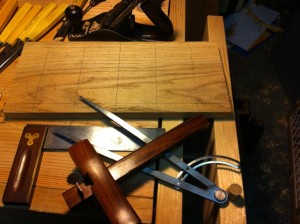
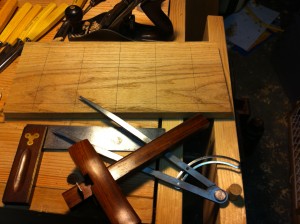
Tonight I started work on another version of the carving layout from last time. I was setting up to measure out the layout, and happened on a method of laying out perfect squares with no measuring. The 17th century layout that I’m using, is based on squares, and my first attempt was a little off because my measuring wasn’t perfect. This trick worked great, and my squares were right on.
Here is the finished layout, with the tools I used to accomplish this.
Steps:
1. Using a marking gauge, layout a border along the top and bottom of the board along the long edge.
2. Using the compass starting at one end along one of the edge lines, figure out the middle point. I just keep switching back and forth between the ends moving it a little each time until the arms of the compass are at the same point from both ends.
3. Using a square draw a line down the mid point line across both edge lines.
4. Put your compass in the point where the mid point and top edge line meet, and spread the arms to the opposite point on the bottom.
5. Make an arc lightly on both sides, and repeat from the bottom point.
6. The point where the two arcs cross is the middle length line, and you can mark this line with a straight edge through both points.
7. Now put the compass arms to the top mid point, and the point where the middle lines meet. This is the size of your squares.
8. Pace out points along the top line, using the width you found in step seven, and mark lines from each of these points with the square again.
Ta Da! You have a square layout, no measuring, and you didn’t have to do any complicated math to figure out the size of the squares. Now it does help to measure out some rough idea of what you want to make sure you cut the wood to the right size, but I leave a little on each end to trim down later.
The first time I tried doing the squares, I spent a lot of time trying to find the right size for the squares, dividing and fudging, and in the end my measurements were off a little bit. This way I can make it close enough in length, and just pace out the squares based on initial measurement (the top and bottom edge setting on the marking gauge).
I made a Top 100 list!
Woodworkers Guide: Top 100 Woodworking Sites.
I just discovered that I’ve been included in a top 100 list on the linked blog above.
That’s pretty cool, I wasn’t expecting that and I’m in some good company too.
badger
My first 17th century carving attempt
The last month or so has been a whirlwind of stress at work, as well as being very cold in the shop so I haven’t been able to get down there as much as I wanted. But finally I got a little time to work on this carving that I wanted to work on since I got my Peter Follansbee set of carving chisels. I’d been admiring this particular pattern on a 17th century box he’d posted in his blog a few times, and I thought it might be a good place to start working from. The reason I chose it to start was because it was mostly V tool work, and I could visualize almost every step in my head. Plus it looks very cool, which is always a plus. I’m going to be making a bible box in the near future as a present, and this was one thought for the carving I wanted to add to the box. So, I cut up some flatsawn Oak stock and gave it a whirl, and it came out pretty good for my first attempt really even if I can’t get any riven partially green stock like PF uses.
To achieve this carving, I started with a simple grid layout of 3″ squares centered on the front. I did multiple sketches on paper first to work out the details, and this was the easiest way to start the layout process. Once I had the grid lightly marked into the wood, I got out the compass and made a series of arcs along the top and bottom rows, alternating the starting points to get them offset. I made one big mistake here, and didn’t count out the grid exactly right and as such, my design was short one set of arcs/grid squares, but it works out because the design looks good on any number of repeats.
Once I had my first set of arcs down (I penciled them in above to make them clearer in the photo) I eyeballed a good looking distance and carved another set of arcs inside the first set of arcs.  This could have been a little bigger I think, but overall it didn’t look too bad to my eye.
And that was the extent of the actual layout for this design.  I did most of the rest of the design freehand with what looked good, trying to follow with traditional carving techniques as I’ve learned of then in PF’s blog. He shows numerous examples of symmetry being off for our modern eyes and numerous things we would call “mistakes”. Once you look at it as a whole though, it all looks good. The major mistakes I made doing this were the bottom U shaped cuts, I need to actually lay those out next time, as going from either side was difficult to reproduce, and my half moons in the lower arc were chipping out a lot which could be wood, or technique issues.
But overall, for a first practice piece I felt pretty good about it, and it was good to finally get to practice what I’d been reading about on PF’s Blog, and watching his DVD.
Badger
Tools from History, 1427
Another classic tools painting, this time from 1427 from a painter known as “Master of Flémalle” which I found on the ever so handy site Web Gallery of Art. In this painting you can clearly see Joseph working in his carpenters shop (this is the right side of a larger painting) and the artist put great detail into the tools. In this scene you can see the following:
- Spoon bit auger
- Hammer
- Chisel (fishtail)
- Pincers and Nails
- Interesting shaped knife
- Brace and spoon bit
- Axe
- Saw with straight handle
Nothing too unusual, expect the brace is clearly displayed and in use. I had wondered how far back the brace went, and this shows in in use back as far as 1427. The Mastermyr find had a number of spoon auger bits that dated the use back to roughly 1000 AD, but the wood bits all rotted away on that particular find and we don’t know what sort of mechanism was used to turn them. I would presume it’s something like the one show here.
The other odd thing was the saw handle. It’s a straight rod, which does seem a bit uncomfortable. The teeth look to be cut on the push as well, but it’s hard to be certain that the artists painted this aspect exactly as it was seen. There is some good detail in all the tools that leads me to believe that he was painting from real life tools, but it’s hard to be certain on small details like saw teeth. Just something to scratch your head at I suppose.
Badger
How to cut a dado using hand tools.
Cutting a dado
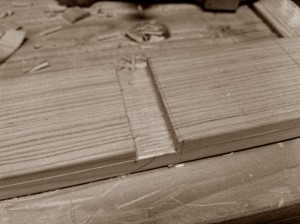
When I set out to the dado for the train rack project, I sat down with the internet and browsed a few books. It took longer than I wanted to find a method using no power tools. Cutting a dado slot is most frequently done by table saw if you believed the internet. I didn’t want to use my table saw, besides, I don’t have a stacked set of a dado blades either. I finally found what I was looking for in the Tomes of Saint Roy, and I set out to do this my self. It turned out to be as easy as he said it would be. And I was able to get a nice crisp line slot cut quickly without having to use my noisy, and to be honest a little scary, table saw. Here is how I cut my first dado slots by hand.
Marking the Board
The first step is to mark all the important lines you’ll need to make your dados clean and even. Take a marking gauge and mark the long side with the depth the dados should be. Then take your take your square and mark out the lines where the dado’s will go. Plan this part carefully, and take your time laying the lines out and will show in the final work.
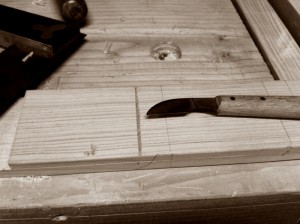
It really helps to have your work secure as you start this, but it could be done on a bench hook if you don’t have an end vise and bench dogs set up. Once you have your line drawn in a light pencil mark, take a marking knife to follow that line with a shallow cut. It helps to hold the square firmly, and keep the knife pressed against the edge of the square, and the handle straight up and down from the board. First pass should be a light cut, focused on keeping it straight and true. Subsequent cuts should follow this line, going deeper each pass until you have a nice deep cut. The goal is to sever the fibers, and make a square straight line with a clean edge. If you just cut straight on the pencil line with a saw you’ll likely end up with frayed or rough edges. Now is a good time to mark the waste side as well, just like in dovetailing, so you can keep your cuts on the correct side of the line.
Cutting the V
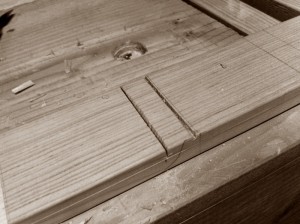
Once you’ve got a good cut line in the board, you take your knife and cut a sort of V groove on waste side of the line.  Make sure to not undercut your straight side, and keep the cuts in the waste side of the line. It doesn’t have to be super straight, since you’ll be getting rid of this material anyway. You’re going to create a trough for the saw to ride in, which will make your cut go straight and keep it riding where you want it to. It’s too easy for a saw to skip when you’re starting your first cut which can lead to ugly edges where it might show on your finished piece. I also find it helpful to cut an extra notch with my knife where the saw cut would start to prevent any chance of skipping, just make sure to only notch the waste side, otherwise it will show.
Sawing the line
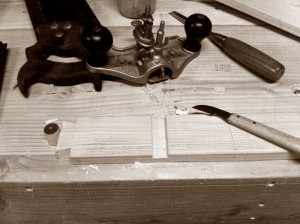
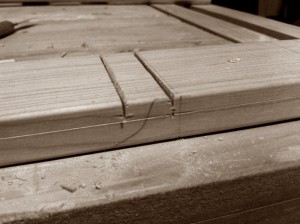
Now that we have a trough for the saw to ride in, it’s time to cut the line down to our marked depth. I’m using a vintage Disston back saw that I picked up at an antique store and rehabbed for this, but any clean cutting saw should do as long as the kerf isn’t too wide. Take the saw and rest it in your groove, and carefully start your cut. Keep an eye on the cut and make sure it’s on track and it’s not jumping around scarring the work. Once you have a good cut going, you can pick up the pace a little, just keep good control in mind. Check frequently on both sides to make sure you are not cutting below your marked depth. It doesn’t take long to get to the depth usually, since the dado is probably not too deep. Make sure you’re right up to the depth line on both sides, and stop.
Make the second cut
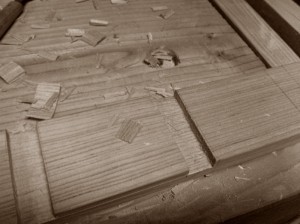
Now we should be ready to cut the second line, but first it’s a good idea to double check your width by holding your shelf board to the line, and seeing if you need to adjust it any. I had been sloppy in marking my lines the first time, so you can see second pencil line in the photo. Sizing from the actual board is a good way to eliminate any measuring mistakes. Repeat the steps for cutting the first line with the marking knife, but be this time be sure to cut your V on the other side of the line, keeping it in the waste as always. After cutting a good V, saw down to the line as before.
Chisel out the waste
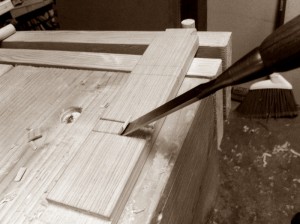
Now it’s time to start making the actual dado after all that measuring, marking and and cutting. Take a chisel as close to the width of your dado as possible, or smaller if you don’t have close, and begin to chisel out the waste. I like to start on each side with a quick tap a third to half way from the top to prevent tear out. Don’t try and hog the whole thing out at once, just take a couple layers out first. Go easy for the first third to create the walls, and then you can be a little more aggressive. Once you’re into it, I liked laying it bevel up and holding it flat and pushing it horizontally to peel up the bulk of the waste, but use whatever chisel technique you’re comfortable with. If you’re going to use a router plane to finish, then don’t go all the way to the bottom of you cut, leave it a little proud. Otherwise, pare down the wood as smooth as you can.
Finish the bottom of the cut
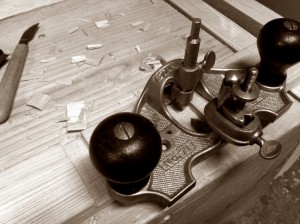
I used a Stanley #71 to finish out the dado bottom to ensure a clean tight fit. I set the depth at just shy of the marked line for the first couple of passes to avoid tearing out too much, but it went really quickly and I had a nice clean trough in no time. A final pass at the marked depth, and I was done and had a clean edged dado.
Final Thoughts
This took a lot less time than I thought it would, and once I had the technique down (and took lots of photos) on the first board, I was able to assembly line the second board in half the time. The project was well recieved by my “client” aka my 3 year old son, who got a sweet new rack for his growing Thomas Train collection.
Jewelry Box
Unfortunately I have to go back to work tomorrow. :(Â But before I go, I wanted to finish a project up before I lost all my time again to my day job.
I started on this project a couple of days ago, and was able to finish it fairly quickly. This is quite a bit quicker than I expected, even though the box is a simple design. I used my new dovetail and it was a dream to use. Comfortable, smooth and very effective, I highly recommend it.
The box is 1/2″ Poplar from the Home Depot, dovetailed on all four sides, and finished with two coats Bulls Eye Amber Shellac (another first for me.) The top and bottom are rebated to set into the body with the bottom glued in, and the top just resting. Funny story about the design though, I had all four sides dovetailed, and thought I was doing great until I realized that the wide board that I had bought with the side material was not as wide as I thought it was. I had to change my plans all together, and came up with this design. It works out pretty well, gives the box a floating appearance.
The shellac was super easy to use, I was surprised. I’ve been dreading learning finishing, but this went on easy (I could use work on my application for sure) and dried quickly enough to do two coats in one night. I’m going to use this stuff again for sure, I might try thinning it the first coat though, and getting a better brush like I’ve seen suggested.
The wife was very pleased, to see such immediate return on the gift of the saw, and I’m pleased with how it turned out. Too bad I have to go back to work.
Badger
Peter’s Carving Tools interpreted…
I follow a fantastic blog by a fellow who goes by the name Peter Follansbee. He works as a joiner at the Plimoth Plantation and has done some incredible research into period techniques for carving and joinery. Just browse through his blog, you’ll be blown away. A bit ago he posted pictures of his basic carving set of tools that he uses. You can check out the post here. I had a bit of money on a gift card from Christmas so I went to Woodcraft to see if I could build the same basic set based on the picture of his tools (many of which are antiques or unmarked as to sizes etc.)
Here is what I’m calling my “Peter Follansbee Carving Kit” and what sizes I got to match his. I came pretty close I think.
Here are the sizes I think come close to what he pictured:
- Pfeil “Swiss made” Carving Gouge #9 Sweep 10 mm (Woodcraft #05G07)
- Pfeil “Swiss made” Carving Gouge #6 Sweep 20 mm (Woodcraft #05B04)
- Pfeil “Swiss made” Carving Gouge #8 Sweep 13 mm (Woodcraft#05F05)
- Pfeil “Swiss made” Carving Gouge #8 Sweep 20 mm (Woodcraft#05E14)
- Pfeil “Swiss made” Carving Gouge #5 Sweep 12 mm (Woodcraft #05D05)
- Pfeil “Swiss made” V-Parting Tool #12 Sweep 8mm (Woodcraft #05T85)
For reference here is his original posted picture.
I’m working on a box right now that I hope to be able to try some of this style carving on using these tools. I would also highly recommend picking up his DVD on the subject of 17th Century Carving. It’s what me inspired to try out the style of carving he shows on the disc. Once I watched it I started looking at period carving in a whole new way. Like I could actually do some of that stuff, just maybe. I am going to try my hand at it soon, wish me luck!
Badger
P.S. I am not affiliated with Peter Follansbee, Woodcraft, Pfeil or Lie Nielson Toolworks in anyway. I’m just a fan of all four. 🙂
P.S.S. I also am not advocating the Pfeil brand over any other brand, I just had a gift card to the store and they are local to me. The quality is decent from what I can tell, but I will bet you can find similar or better quality tools in other stores.
A Wooden C Clamp
Today the family and I went out to check out an antique mall we’d heard about down south. Very little in the way of tools, but I did pick up this one item for $20 because it intrigued me. I’d seen a wood C clamp in an old painting a while back, and was curious as to what kind of joint could be used for that. Well, now I know what one joint might be used.
I have no idea how old this is, there wasn’t anything I could to date it. The only marking is “HERRBURGER SCHWANDER” stamped in a couple places on the side. Probably an owners stamp. I would guess in the last 50-100 years for this.
Any help in identifying it?
Here is a picture of the old painting depicting a wooden C clamp in use:
Merry Christmas and Happy Dovetailing!
I started this blog with little goal other than to chronicle my aimless pursuit of woodworking. It’s still exactly that, but I do feel like it’s seen its fair share of cool things. I’ve grown my skills substantially, and expanded my knowledge base quite a bit.
I’m looking forward to the year of 2011 and the Year of the Hand Tool (or if I’m at work, it’s the Year of the Escalation, but that is a whole different affair, and I’ll just leave that at work thank you very much.)
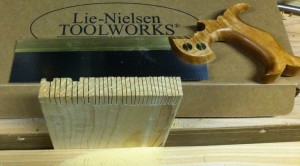
To aid in that quest of Hand Tool zen, my lovely and talented wife got me a Lie-Nielson dovetail saw for Christmas. This is quite possibly the best tool I’ve owned. It’s my first LN tool, and I’m impressed, this is a definite improvement over what I’ve been using. It’s a joy to use, it cuts well and straight and clean. I’m off to the in-laws for some heaping portions of Christmas Ham, but I see some dove tail in my future. I have a board of Poplar that might just turn into a box. I need another box to hold some of my tools since my son absconded with my pinned wooden box for his giant pile of wooden railway train tracks.
Oh darn, more shop time.
badger












You must be logged in to post a comment.