Posts in Category: Tools
Quick Stock Removal Tip – Drawknife
I’m thinking of starting a regular feature on this blog called “things I learned in the shop” because it feels like every time I go down there I feel like I learn something new. Which is part of why I do this stuff, I love to keep pushing and challenging myself.
I had to trim the bottom of my sliding tray drawer for the Saw Bench Box about a half inch. I thought I could just set my Jack up for a heavy cut, and plane it down quick like. But I soon discovered it was taking way too long. On a lark I reached for a drawknife that I had purchased ages ago and hung on my wall waiting for an appropriate moment to use it. I started pulling along the edge of my board that I had marked with my cutting gauge on all sides (this is important) and the wood came off in very thick shavings, I’m talking 1/4″ or more at a time. It is important to pay attention to the grain (when is it not) because it could easily dive down under my cut line if not careful and grain was not straight.
When I neared my cut line, it actually split along my cut on both sides. It took only a few moments to pare down the waste, and a few passes with my bevel up Jack plane to lower the high spots. Speaking of Bevel Up, I was using the drawknife in the mode, instead of bevel down. It worked really well, and I think I might use this again before reaching for a saw. Which is ironic because this is a sliding tray for my Saw Box.
Badger
The “Anarchists” Saw Bench Box
Apologies to Mr. Schwarz for tagging onto his book title, but I felt it was appropriate. I’m a good way through a project that I’ve drawn the inspiration from his fun essay on tools as well my own personal research into historical forms.  It’s also very fashionably “on trend” with the use of nails, bonus! For the record, I started this project before Adam’s nail seminar at WIA, so I get credit for being ahead of the curve, right?
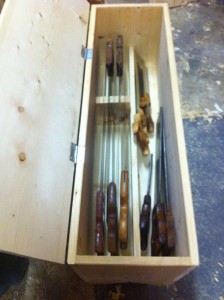
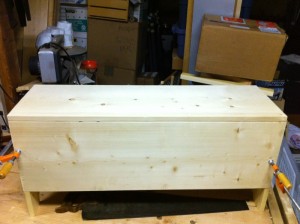
The basic concept of this project is Saw bench + Saw Storage + Historical Recreation = Saw Bench Box?
Since moving my tools into my rolling tool box, the only things that didn’t have a real distinct home were the Saws, and the Molding planes. I cast about for different ideas for storage, including possibly a saw till based on some of the designs that were all the rage for a while with the bloggers. (Any one noticed that these projects come and go in waves? Kind of interesting if you ask me.) However, I don’t have a lot of free wall space for hanging anything due to the nature of my shop. I was cruising the Marhamchurch Antiques site for carving inspiration when I was given a jolt of another kind of inspiration. The old style of chest, storage box known as the “Six Board Chest” would actually be a great way to store the saws I have. It could replace my existing rickety saw bench (I rushed the construction, and paid for it in a sloppy piece of work) It could store my saws, and as an added bonus I get to do a recreation of historical forms of boxes, always a plus for me. I studies a lot of pictures, settled on a design, and went for it.
Key elements of this project that I wanted to work on:
- Deliberate and steady pace of work
- Clean cuts, and extra care in getting the fit right
- Only hand tools would be used
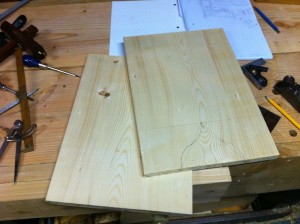
I found a few boards of relatively flat, and somewhat knot-free Spruce in the 1 x 12 size range, and started mapping out my cuts. I had to get 4 boards of 6 foot boards because all the 8 – 10 foot boards I found were simply AWFUL looking.  I’ve seen better boards in the garbage than what I was finding at all the hardware stores in my area. Unfortunately, the lumber yards are all closed on the weekends here, which makes it difficult to get wood sometimes.
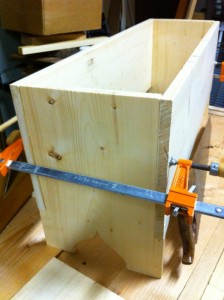
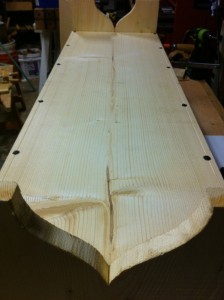
First step was laying out the end boards, as the rest of the boards were simple rectangles. These boards really needed precision to make the rest of the box come together flawlessly. For the height, I measured the height of my current saw bench which fit my knee just about perfectly. The width is the width of the lumber stock for the base + top. There is an inset on the sides that is sized to the side boards width, and height. The cut out is a simple Ogee shape, scribed with compass to be pleasing to the eye.
This was where I made my only major mistake of this project. Somehow I measured (twice) the width of the board for the cut out, and proceeded to make it too long anyway. I had to glue a couple blocks back in to make up the difference, but it came out just fine after that and I haven’t made any serious flub’s since. Luckily I had only cut one end board before testing it, so I was able to fix my measurements for the second end board. Ooops.
The length of the sides of the box are determined by the length of the saws, plus little bit for getting my hand down in there. Also, it helped to pick a length that was pretty close to half the length of the boards I had been able to find in clear(ish) pine.
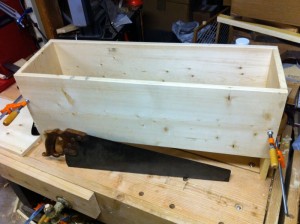
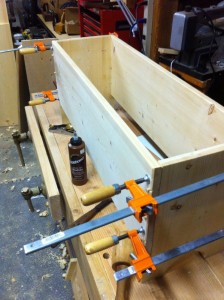
I spent a lot of time juggling the sides in and out of the clamps, making sure every thing was square and fit perfectly. I could have just slapped it together, but I wanted to spend the extra time to make sure all surfaces co-planer, and smoothly planed even the end grain. I’m glad I did this, as it really made a difference in the fit and finish of the final box.
The lid was sized to the box length, and made to fit exactly as I could, so that there was no overhang that I could saw into easily. I wanted to make this as close fitting as I could.
One area that I wish I had maybe done a little different was joining the sides. After I finished the case with doweled glued joints, I had a thought that it would have been much easier to rabbet the side rails for a better fit (it would hold it self square much easier, and the pegs were a pain to put together. I could and should have just nailed the thing together. I really over thought this part, and after I was done, and looking at doing the same with the bottom, I figured it out. Live and learn I guess.
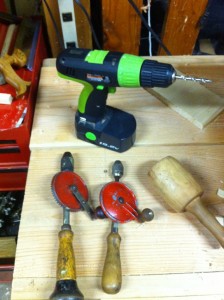
The bottom was much easier to simply nail down, after I had that revelation. Ordinarily I would have used my cordless drill here, but I opted instead to use a reconditioned eggbeater drill with a twist drill bit.  It worked so well, I was able to finally cut the cord (pun intended) on my use of the power tool. A quick hammer job, and voila! Bottom done. I think there is more than enough holding power in the nails to stand up to the test of time. If not, it’s easily replaced.
For the inside of the box, I’m making a set of dividers (I had made two last night, but one snapped in half on me at a weak point) to keep the saws in place. I test fit the single one, and it works well enough that I’m thinking of just using one in the middle. I’ll put a couple small risers to keep the bottom from getting chewed up, probably just a couple oak strips tacked in for easy replacement later.
Next step is to put a sliding tool tray in the top for additional storage. And apply a couple coats of Amber Shellac for some protection and color.
A couple questions you might be asking yourself right now…
You said something about molding planes? And perhaps, how is this anything to do with the word “anarchist”?
To the former, I had intended to put the molding planes on edge along the other side of the bottom, like in Chris’s tool chest, but they took up too much space. Also, I had more saws than I thought I had originally. Plus it would have interfered with the tool tray.
As for the “Anarchist” question…Â I looked the the book as a “call to arms’ as it were to think differently, to think past the standard knowledge of today, and apply a different perspective while keeping with some of the ideals of our theoretical craftsman fore bearers.
This box is not a new idea, but it’s a different application of an old idea. It’s a standard design six board chest, but it’s also built to store saws as well as be a saw bench for those saws. It combines several sound ideas into something that fits well in my shop. Is everything that Mr. Schwarz puts forth in his tome to be treated as Gospel? I highly doubt that is what he intended. I feel that he’s trying to get us to think past the dogma (flat backs on chisels anyone?) and apply some reasoning to the things we do. The book is really just his opinion, well reasoned, and well put forth, but from his world view.
— Badger
As a side note, the box makes a very comfortable seat as I sit and ponder the right way to tackle a problem. I had barely built the thing, and I was already sitting on it, holding a tool in my hand and thinking out some problem.
Another Power Tool Replaced
I’ve been slowly moving away from the use of Power Tools in my shop as I delve more into the Hand Tool world. One of the last ones I couldn’t and didn’t want to let go of was my trusty cordless drill. Lately though, the batteries have been running out sooner and sooner. To the point of being completely unreliable, which was making me sad. I have a bad wrist from a life of computer keyboard typing, and I can’t really do too much twisting and turning by hand.
Enter the hand drill. I’d picked up a couple of these at an Antique Store about a year ago, and lost them in the clutter of my shop. Recently, as I put all my tools in my rolling tool box, I discovered them under a pile of tools. I did a little work on them, chiefly oiling the moving bits and gears, and tried it out. I was pleasantly surprised at how easy it was to drill small holes with this. It worked so much easier than I had imagined it would, and used it to drill the 1/4″ holes for my doweled joint on my Saw Box project.
If I needed to do any screw driving, another task I used my cordless for a lot, I will be using the Brace and a neato bit I found at Lee Valley
that takes a 1/4″ hex bit like a screwdriver.  I understand it will give me a lot more control, and a lot more torque if I need it for driving screws. I’ve yet to use it, but I’m curious as to how it will perform.
At this point the only powered tool I still use is the Lathe, and it’s going to be a cold day in someplace before I give that up. I’ve found that it’s so much easier to grab a hand tool and do the job quickly with out all the setup, noise, and dust of my other tools. This includes the table saw, which I find to be a very noisy scary device in general. I really enjoy the peace in the shop, and not having to wear a dust mask all the time. It makes my woodworking time so much more relaxing, and that is something I can really use these days with all the stress at my day job.
Badger
A few thoughts on nails
** EDITED POST – Added link to TFWW Nail Shop **
Recently there have been a few posts around the the blogo-sphere, the best being on the ever fantastic blog Village Carpenter, about the WIA class on nailed furniture. I recently had a similar revelation in my shop while working on my “Anarchist’s Saw Bench Box” (more on this later) about the use of nails.
I had spent an entire evening of my precious time wresting with a series of doweled joints for the side of the box, and was prepping for doing the same thing for the bottom of the box. It struck me then, that all the effort and wrestling and balancing of the boards didn’t seem very efficient. What would have my theoretical counter part have done in my stead?
He would have nailed the damn thing down and have done with it.
I think we tend to over-complicate, and over-analyze the methods of work they used, and focus entirely too much on the show piece joints. The fascination with dovetails leads us to use them in places that are more than is needed. People spend hours and volumes of words debating angles, and tails vs. pins when our craft ancestors would have just done the quickest method and moved on. And don’t even go anywhere near sharpening!
So, some thoughts on nails…
The first project in the The Joiner and Cabinet Maker is a simple nailed box. No dovetails, or fancy joints, just a simple nailed box done with care and pride. Dovetails ARE an appropriate and beautiful joint, and I fully intend to make many a piece with them, but do they belong on every thing? Sometimes a simple rabbet joint, and a few nails is all you need.
I’ve used a couple different kinds of more or less period nails lately and enjoyed the look of them, and the ease of use.
The wrought head nails from Rockler work quite well, and the look of the box after completion was great. I loved the look of them, and have been using them more and more. The shaft is not perfectly smooth, which gives it a bit more grip.
The Tremont Nail Company is still making nails the old way. They are bit more expensive than your ordinary hardware store nails, but they give the work a bit of panache that would be missing with an ordinary nail, as well as the ability to “clinch” a nail through the wood for greater holding power.
There is one small note of caution though on the use of these nails. You can’t simply poke them into the wood and hammer away freely, because you’ll likely end up splitting the wood. The shape of these nails is more of a wedge generally, and can force the wood apart. You need to dig into the past a little to complete the picture. To prevent splitting you’ll need to open up a small hole first all the way through the wood with a tool of some kind.
There are a couple different ways to do this, one of which I’ve been experimenting with lately is the use of a “brad-awl” which looks like a small flat bladed screwdriver and is driven into the wood with a twisting back and forth motion to open up a hole. When done right it doesn’t so much as drill a hole as move the wood fibers to the sides. This allows the fibers to grab the nail as they are driven into the hole. This works best in softwoods like Pine as far as I can tell from my experimentation. In hardwoods like Oak, I’ve found that “birdcage awl” or a gimlet bit works best to make a hole through the wood.
I’ve made my own from regular scratch awl blades I picked up at HF, and cut the two flat facets on the blade on the grinder.  I initially made my angles way to steep and the metal bent and twist at the tip because it was too weak. I’ve been experimenting on a broader angles to good success. To make a “birdcage awl” I ground a four sided pyramid shape into the tip of another scratch awl (I bought a handful of these things for cheap) and it works wonders on Oak with a simple twisting motion. I can get a hole through a 1/2″ board quicker than I could have found my bits and got it chucked up in the cordless drill (which is usually out of juice most of the time anyway). For multiple holes, it can be a pain, but for a few holes it’s super easy and quick.
And finally, I leave you with a link to an article I found on the net titled “Forged and Cut Iron Nails” by Gregory LeFever.
— Badger
P.S. Tools for Working Wood has opened up a new “Nail Salon” on their site, selling Tremont Nails in small lots, which is a good idea to order a few different kinds to experiment with.
Working towards my own “Anarchist†tool set. (part 2)
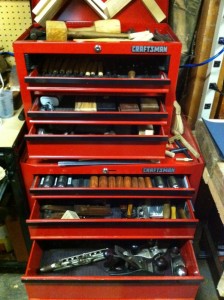
Continuing on the topic of building out a tool set inspired by the book “The Anarchist’s Tool Chest†and seeing how I’ve fared of late. Before this weekend my tools were scattered all over the shop, and in piles. It was very frustrating for me, and was probably risky for my tools. Also, I’d lost a few tools under the piles, and I couldn’t find some of the items I’d picked up. This weekend I completed my conversion to the Hand Tool side of the force, and dug out the Craftsman rolling toolbox that was holding my power tools, and cleaned it out. I put most of the power tools in a plastic bin, where I could get to them if I needed to, and cleaned out the crap in the drawers. The Taig Mini metal lathe went into it’s own box, the drill bits into a small box by the drill press, and so on. Then I gathered all my hand tools together and finally gave them a home.
Is it a fancy wooden chest with sliding tills, and dovetailed corners? No. Will it do for now? Yes, and quite well too. My amazing wife got me this chest ages ago, and I had lost it into the back corner of the garage. In cleaning and clearing this last weekend, I was able to unbury it, and reload it with my hand tools. It felt nice to put all of them in one spot, and organize them. Additionally, my bench top was clear for the first time in months.
Now to the rest of the Tools mentioned in the book, using his headings.
Essential Cutting Tools
He places great stock in the bevel edge chisel style, and I think he’s got a point. I had purchased a nice full set of non-bevel edged Woodriver socket chisels on a recent sale, and they work great. However I recently saw a set by Narex (a well known “best value” kind of chisel) with bevel edges. So I picked up a small 4 piece set from Lee Valley, and they are quite nice. They are the same quality tools as the Mortise chisel set I picked up, and look to be good user tools. So, for bench and mortise chisels, I’m set.
I’ve got a Stanley #51 Spokeshave, but I’m going to try and track down a #151 adjustable one like he recommends in his book. As for the rasps, I think I’ll wait a bit to get a little bit better at the regular stuff before throwing in more complicated curves.
Striking and Fastening Tools
I’m doing all right in this department, some of it intentionally, some of it by accident. I made my own striking tools for carving and bench chisels. I have a nice set of knock off of a vintage style flathead screwdrivers, they are well made even though they are obviously out of the far east somewhere.
The first real purchase I made with the intent to build out a tool kit of hand tools was a roll of auger bits, and a nice rosewood handled sliding bevel by Stanley at an Antique Show. The auger bits were a mixed back in terms of quality, but there were also a lot of duplicates in there as well, so I was able to build out enough working ones to make a set. Combined with a brace, they are quite useful and I use them frequently. I recently picked up a bit driver for the brace from Lee Valley for driving screws to try out. I think I can get some good results with this.
Saws
Other than having no place to store them (more on that in a later post) I have a pretty good selection of saws now. I used to hate hand sawing, with a serious passion. I sucked at it so badly I usually screwed up whatever I tried to do, kinked the saw, or hurt myself. Or all three. Seriously, I was a miserable failure at sawing, which seemed like it should be so easy. It was very frustrating, and quite a bit discouraging. Until I learned how to do it right. Wow, what a difference actually applying common sense, and proper body posture makes.
I’ve got a couple vintage Disston crosscut saws, a no name (and a little rusty but other wise servicable) rip saw. I want to either rehab the rip saw, or pick up a new one fairly soon, but it will do for now. I need to remove the rust though, it’s pretty gross.
The most awesome wife in the world (my blog, my opinion, deal) got me a couple of Lie Nielson back saws of the Dovetail (amazing) and a Carcase saw (awesome), and they’ve been a joy to use. I could use a better coping saw though, so something to put on the list.
That’s it for now, but I’m definitely feeling pretty good about my tool kit these days. Next up the Sharpening, and “Nice to have” list.
Badger
Working towards my own “Anarchist” tool set. (part 1)
I recently read through the latest work by Chris Schwarz, titled “The Anarchist’s Tool Chest” and enjoyed it quite a bit. I’ve been drifting in the direction of fewer, but higher quality tools for a bit, and inspired by other much older writings a semi-minimalist tool kit. The kit listed in Our Workshop, or shown in some of the medieval paintings is quite spartan compared to the modern collect-o-holic amateur woodsmith. While the book gets a little preachy at times, I quite enjoyed the style and prose of Chris’s writing. I also loved his analysis and reasoning for what tools he chose for his chest, and more importantly WHY he chose them.
It helped me realize which of mass of tools that I had been gathering but not really using all that well I really needed. And what tools I needed to acquire or upgrade eventually. What follows are mostly some notes for myself, and project plans I wanted to get into a list for doing some day.
Planes
I’m doing ok on this front, with a set of #4, #5, plus my newly acquired #3 and #7 planes. What I really needed to do, and I’ve been doing lately is sharpening and tuning my irons. I’ve been intimidated and perplexed by sharpening, but I picked up a decent side-clamp honing guide, and it’s going much better. I recently moved the #5 from “someday” to regular user by simply getting the blade to a reasonable state and adjusting it a little.
I am also debating the shoulder plane recommendation he offers, but I have a nice rosewood rabbet plane that works well, and a wooden moving fillister plane that doesn’t. I can either tune it up, or make look into the Veritas version that was recommended.
One final, but annoying note. I have a router plane, a nice #71 but it’s only got the spear point bit and I’m having a devil of time finding the flat one that fits. The one I have works pretty well, but I would like to have the other blade to do different cuts.
Marking and Measuring
I have a few marking gauges, and a decent rosewood cutting gauge, but I really want to make my own. I’m even going to attempt to build a reproduction of a 1450 marking gauge, stay tuned for more on that.
I also plan on making a panel gauge the same way as the above historical marking gauge, but with a longer arm and a pencil hole.
He highly recommends the 6″ metal combination square, but I have a good selection of vintage squares that I like to use and I don’t really like the look of the “engineer” style it has, even though highly functional. I’ll break with his advice (which is what it is, not gospel) and go with what I have. Although, I am quite keen to make a few of those wooden try squares, and maybe the English layout square he uses as a logo.
I’m good on dividers (although I could use another set of small and large) with my HF el-cheapo dividers. I bought mine as a set of metal compass with a pencil holder, and simply twisted off the metal ring where the pencil goes. Functional, sharp points, and cheap. Works for me.
As for the wooden straight edge, I’m going to break with his advice again. I’m planning on picking up a length of aluminum bar stock from my local hardware store (the small locally based one, not the big box home center) and cutting it into straight edge, and a couple winding sticks. It has a super straight edge, and is cheap and light. However, I am totally aware of the irony here, eschewing the metal combinations square and then buying aluminum bar stock. For me it’s a matter of how much time I get down in the shop and what I get to do down there.
On my make list however, is making a really nice marking knife in the style of this guy’s work.
More later, as I go through each section of his essential tool list and analyze where I am at and where I want to be.
Badger
Two new shop planes
The ever dangerous (to my bank account at least) Hyperkitten has gone and tempted me again. This time with a pair of planes to add to my shop set. Seriously, Josh is dangerous. But I’m a sucker for good tool at a good price, especially when they fill a need in my shop.
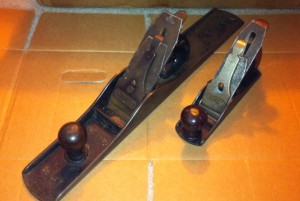
I have a large wood jointer, but it’s being a bear to tune up, and I am really deficient in the smoother department.  I have a #4 that’s doing well enough, but I wanted to try a smaller one for some of the projects. The Jointer however was the primary score, as I’ve rarely seen these for reasonable prices at the antique stores, or tool shows. They just aren’t that common around here for some reason. This one is in good shape, with a little bit of rust that will clean up easily, and the blade looks like it should be good. It will need a bit of sharpening clearly, but I have a new “side clamp” style honing guide, and it’s made a world of difference in the blade edges I’m getting.
I tried to learn free hand sharpening, and got moderate but inconsistent results. I was reading The Anarchist’s Tool Chest and Chris tells it straight on the sharpening front. It made sense to me, so I bought one, and it does help me get to the part I want to do, namely working the wood. Too much is made on the internet about sharpening in my opinion, it’s quite literally becoming a religion to some (gauging on how much arguing is done on otherwise respectable internet forums). I just want to work the wood, and I could care less if I can see myself in the back of my plane iron or chisel. But that’s just me.
Another thing that I am excited about is a Wonder Pup that I got for my carving bench. I had been braining all kinds of ways to hold the carving work in place, that wouldn’t get in my way, and I realized I COULD have solved it on my own, but there was a reasonably good solution already made, and again do I spend time working on the set up or do I spend the time working the wood? Where is my time better spent? Especially when I get so little of it in the shop. Plus the wife said I could buy it.
I’ll be starting a new project in the shop soon, so more pictures will be showing up. Probably a tool box for myself, with some S scroll carving. Or I could get totally side tracked and make a chisel rack, who knows. :) I’ve also started drawing out a bookshelf on some paper to hold our every growing library of books. We’ve filled all the book cases in the house, and need more space.
What can I say, we both love books.
Badger
Making a Textured Punch
I’ve been swamped at work, and laid out with a nasty cold so I’ve had very little time in the shop which makes me a sad panda. However, I did get a little time tonight to work on a side project while working on a commission for a repeat customer of my pens. While some of the glue was drying, I managed to put together a textured punch for use in the 16th-17th century reproduction work I’ve been playing with. Specifically for the background texturing as so ably displayed on Peter Follansbee’s blog. I linked the post where he shows some close up shots of his tools and his punches.
I made a texture punch to go with my nail punch I’ve already got for making marks. I want to carve a Cross shaped stamp as well, and I’m thinking of making a Fleur de Lys punch because my wife loves the French historical stuff so I thought I’d make her a carved box as well.
I snapped a picture of it finished, with some test punches on some pine board that I had lying around. I quite like the look of it, and I can’t wait to get some time to work on some new carved panels and add this element.
It was pretty simple to make, and took me about 15-20 minute tops.
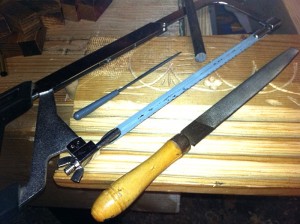
I took a piece of cold rolled steel rod I got at a hardware store a while back, and cut a small length of it off with the hacksaw.
The I flattened the end with metal file with the small section clamped in my metal vise.
Once I got it flat, I took the hacksaw again and cut some parallel lines as evenly as I could. I just eye balled it really, and I think it came out OK. I did 5 lines in one direction and 5 in the other. I kept going over each line slowly to make it deeper, and carefully to make sure the blade didn’t jump out of the track. I turned it 90 degrees and did the other side, and back again until I was happy with the depth on all the lines.
Then I took a small triangular file I had picked up at the cheap tools store, and refined the lines into triangular troughs, to create the pyramid pointed shapes on the end of the punch. I kept eye balling the filing until they were all even (ish) and a good shape. It really helps to have good light for this, and maybe even a magnifying glass.
A final clean up around the edge to remove some of the burrs, and it was done. I tried some test stamps, and cleaned up a couple lines after looking at the resulting impression, but it didn’t take hardly any time at all.
EDIT: After posting this, I re-read Peter’s original post and went back down to the garage and played with nails and the needle file set. I managed to make a passable small cross punch, but I think I need better nails to start with. I’m going to make a run to the hardware store to get some bigger nails to play with making punches. I think they’re a fun easy way to add life to the carving work, and really make it more period. I’ve stared at many pictures of 17th century stuff in Chinnery and online and you can see the use of them pretty frequently to fill spaces.
Badger
Carved box progress
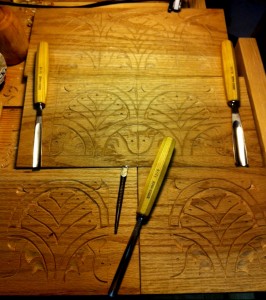
I managed to finish the end panels this afternoon while the kiddo was sleeping. I’m taking my practice panels and making them into a box, because I’m pretty happy with the carving.  I’m going to rabbet the ends, nail it together with some wrought iron head nails I got from Rockler. For the carving on the end panels, I picked one fan tail design for each panel, just to carry the theme around. I even went back to my first panel, and fixed it up to be more in line with the other panels, since I’d improved on my skills a bit in the subsequent panels.
Just some trimming, and nailing to do to make the box sides, now to get some wood for a top and bottom for the box, since I don’t have anything big enough in the shop. Speaking of trimming…
Look what my lovely wife bought for me for my birthday! It was earlier this month, but she knew the Lie Nielson hand tool event was coming to town, so she let me buy something there. I have a dovetail marker coming too, something she’d wanted to get me for my Christmas stocking, but they were out of stock.
It’s a thing of beauty, as all the LN tools are, and it cuts well, and is a comfortable fit in the hand. I’ve got some rip back saws, mostly antique store rusty treasure finds. Just need to get them sharpened, or take another whack at it myself.
Badger
Tools from History, 1427
Another classic tools painting, this time from 1427 from a painter known as “Master of Flémalle” which I found on the ever so handy site Web Gallery of Art. In this painting you can clearly see Joseph working in his carpenters shop (this is the right side of a larger painting) and the artist put great detail into the tools. In this scene you can see the following:
- Spoon bit auger
- Hammer
- Chisel (fishtail)
- Pincers and Nails
- Interesting shaped knife
- Brace and spoon bit
- Axe
- Saw with straight handle
Nothing too unusual, expect the brace is clearly displayed and in use. I had wondered how far back the brace went, and this shows in in use back as far as 1427. The Mastermyr find had a number of spoon auger bits that dated the use back to roughly 1000 AD, but the wood bits all rotted away on that particular find and we don’t know what sort of mechanism was used to turn them. I would presume it’s something like the one show here.
The other odd thing was the saw handle. It’s a straight rod, which does seem a bit uncomfortable. The teeth look to be cut on the push as well, but it’s hard to be certain that the artists painted this aspect exactly as it was seen. There is some good detail in all the tools that leads me to believe that he was painting from real life tools, but it’s hard to be certain on small details like saw teeth. Just something to scratch your head at I suppose.
Badger









You must be logged in to post a comment.