Posts in Category: Tools
Meet the Thundergod
My mother is in town, and that means I can sneak down to the shop when my son is asleep. Today I got a rare second day in a row in the shop, and I really wanted to MAKE something. I’ve bought a lot of tools, and even tuned and cleaned/sharpened a few. Today I was set to actually make something, and I did.
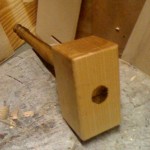
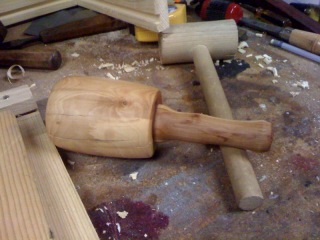
Meet the Thundergod.
I am going to be needing to cut some mortises sometime soon, and I didn’t have a good heavy hammer. I had my Apple wood hammer I made on the lathe, but it’s a bit lightweight for chopping mortise holes. The Thundergod gets his name from the shape of the handle which makes it somewhat Comic book Thor styled. The head is 2 3/4″ Maple wood, and the handle is a bit of Oregon Myrtle I had laying around. The Myrtle had some issues with checking and a big knot hole so I turned it bit more fancy than I was intending on a whim, and get rid of some flaws.
To make it I used mostly hand tools. I even tried to use power tools, and that was a mistake. I cut the head on the band saw and it went all kinds of funny directions. I tried to fix it on the belt sander, but it was too much for it and blew a fuse. I ended up using a block plane on the end grain to fix the band saw screw up, but I gotta tell you that thick of maple is hard to work with any tool.
To cut the handle I tried ripping it with a hand saw, but the only rip saw I have is dull. So I took a deep breath and sharpened it with a saw vise and files from the old toolbox. I worked surprisingly well, and it cuts quick now. Except my technique or sharpening is off, since the cut kept drift away from the line. I ended up just splitting it out after the saw cut drifted too far. Which of course ripped out a big knot hole.
I turned handle on the lathe (powered, but I’m not giving that up totally, it’s too much fun.) I had to cut in a lot near the top to turn away most of the hole left from tearing out the knot. I turned a fancy end for fun, and made it fit my hand. The top shoulder led to a 1″ shaft for the hammer head.
I was going to drill out the top on my drill press, but again my 1″ fornster bit is kaput. So I pulled out the auger bits I got in a roll at an antique store ages ago, and tried the 1″ bits. The first one was so dull it did nothing (note to self, must learn to sharpen these bits) but the second one cut quick. Well sort of quick, this is nearly 3″ maple. But I made my way through it, fairly straght and only sweating a bit. (I lie. I sweated a lot.) A little glue, a walnut wedge, and some walnut oil finish, and voila!
My son seems to approve.
Badger
shop time groove and paduak
It’s been a little tough to find shop time lately, but today I got a little bit of time and I took full advantage.
I’ve started work on a saw bench out of some reclaimed Yellow Pine, and I’ve got the top and legs cut out. More on that later, I was making good progress but started second guessing my design. I was going to just bodge it together, and not try for mortised legs or anything. I’m not confident with my skills enough to try and angled mortise quite yet. But now I’m redesigning the bench a bit, and we’ll see. For sure I’m going to use it for more than just sawing and will be using my brand new holdfasts as well, so that will be part of the design.
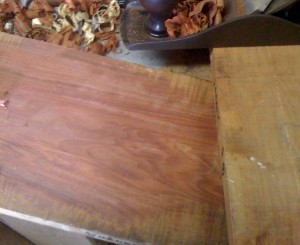
In other news I did some reclaimed lumber shopping at Second Use today. I got a box of Koa wood, and a couple pieces of surprise Paduak wood. Check out the picture, the color is insane! These are bound for pen blanks, so there will be some in the store soon I hope.
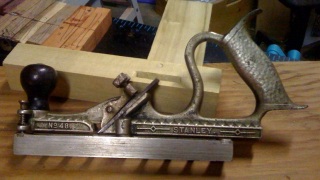
I also got a chance to play with a previously purchased tool, an old Stanley #48 tongue and groove plane. I bought it ways back, but I never got a chance to break it in. I took some scrap pine, and just checked the blades (looked sharp) and tried it out. It cut in right away, and worked fine just as is. It’s a simple, no-nonsense plane, just does it’s job with now muss for fuss. The tongue and groove fit great, and it’s user with little or no adjusting.
Very nice.
That was all I got, but it was refreshing. The old Disston 8 point crosscut saw made for easy work, but I still broke a sweat. Gotta get some more shop time more often. But then we had to go to Soccer game, go Sounders!
badger
Hook Tools
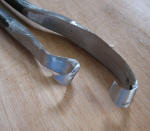
I just ordered a set of Traditional style hook tools from Hilton Handcraft. For use on my Pole Lathe. I had been considering these a while ago, then I lost this site. I am going to bust out the Pole Lathe again and see if I can make a few bowls this summer.
Having the proper tools is a big help.
My first PNTC Meeting
I found a local tool collectors group. Woo!
It took a little digging, but I found a local tool collecting group that had a lot of the old tools I can’t find any other place. I found it fairly non linearly, but I attended my first meeting today. I had to get a hold of the Mid West Tool Collectors group, looking for a local chapter of which there were none. MWTC were recommended to me Roy Underhill when I was over taking classes at the Woodwright’s Shop. They recommended I check out the Pacific Northwest Tool Collectors group. The meetings are held in Portland and Seattle alternately, and I’d managed to miss the one that week I found out about them. So it was a couple months before I could get to check them out.
Today I made it, and it was a blast. I joined the club, attended the meeting and got some tools today. They use an odd system for the tool show, which took a bit to figure out. Every tool has a tag, with a price, and some lines. If you want it, put your name down. If you’re the only name, you get it at the price stated on the tag. If there are two names, you find the other guy and bid between the both of you. If there are three or more names, it goes up to auction for everyone at lunch time. If there are no names, then in “open sale” period you can go haggle with the guy for it. It’s kind of like a mutant silent auction, but what the heck.
It’s a little tricky, but it kind of makes sense. I had to do a lot of math to make sure I had cash on me to get it all if I won them all, and even then I had to run the bank. I had a couple hours to browse the whole thing, which was about 1/2 the size of the PATINA show I went to on the east coast, but impressive for this area. I had to go over it a few times to see what I wanted to put my name on. It took a little while to figure out a good plan, but I ended up spending $120 and getting quite a bit. I’ll share more on the tools later when I can get my camera down the the garage. But I got a lot, which also means I need to go down and MAKE somethings before buy anymore tools. Heh.
Here is the schedule for the tool meetings, PNTC Meeting Schedule maybe I’ll see you at one of them, I’m going to try and make a few more. There is a big to-do going on in August, that I might try to talk the wife into. We shall see.
Badger
Look what followed me home…
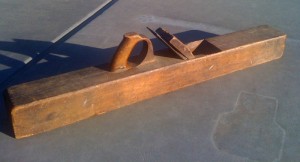
Had a lovely weekend out in Port Angeles where I was on child wrangling duty, in support of the lovely wife who had a thing this weekend out there. While we were there, I spied this nice old jointer plane in an antique store. He looked lonely but I didn’t really need another plane (shhh… for the sake of the story, just go with it…) We left the store, but happened to walk past again on the way to get some coffee at the cafe down the street. We stopped in again, and what do you know this little guy followed me home!
I couldn’t resist. I actually have been thinking about a jointer plane lately, as I’m reading the “The Joiner and Cabinet Maker” from Lost Art Press. Which by the way, is an amazing book, I’ll review it later but for now just trust me on this one. This book is unique and without peer, and is a must buy for any serious hand tool woodworker, or any one who would one day like to pretend to be one.
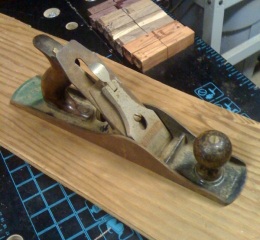
Anyway, back to this lost waif of a jointer plane that followed me home. Actually I’m not giving the old guy his proper due using words like “waif” and “little guy” as its a solid and heavy fellow with a lot of life left in the blade. The bottom is nearly flat at least to the eye, and I only say nearly because I have yet to check it with a square. It’s been pretty well cared for, but it has a few bumps and bruises and the possibility of a minor crack that I think it’s going to affect it much. It’s very solid, and heavy but comfortable in the grip. It’s a user all right.
I bought it for two reasons I will admit though, one I’ve mentioned, I might need to actually joint some long boards when I try some of the projects in the “Joiner and Cabinet Maker” book, and the other a bit more sentimental. When I took the class from Roy Underhill at the Woodwright’s School we played with a big old wooden jointer very similar to the one I bought. It was Roy’s pride and joy, and we did a fun “who can make the longest shaving” contest at the end of the night with it. So yeah, I bought it because my woodworking hero had one, but hey it’s also a very useful addition to the shop arsenal! Really.
Without further ado… Here is the stout fellow who followed me home. I haven’t cleaned him up yet, but he’ll get a light scrubbing and some oil soon as can get down to the shop. Plus some serious time on the sharpening stone with the blade which looks to be in decent condition with no major dings or nicks.
Stanley Number 5 all cleaned up
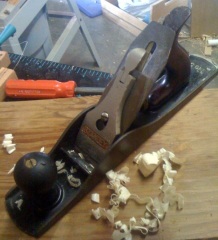
I had a little time today before starting up my production line of pens for the big order. I took a bit to finish cleaning and tuning the new Stanley #5 jack plane I got yesterday.
I didn’t need to do a lot since most of the rust was surface level, and the grime was easily removed. I took a pass at the blade, and I got it reasonable sharp but it’s going to need a little more work I think. It’s been rounded a bit too much, and they put a back bevel on it that is going to take some work to back to flat. I did “scary sharp” sandpaper method through 600 grit, and then switched to my combination white/black Arkansas stone. Got some decent shavings off of some tricky maple, but like I said it’s going to take some work.
I also got rid of most of the “institutional green” color that the school had painted on the heel. Just a light scraping and some wire brush work, and it came loose pretty quick. Plus I tuned up the knob a little, removed some of the paint, grime, and glue that was on it. It happened to fit onto my pen mandrel, so I just pressed it on and sanded away. A couple coats of Walnut oil, and it looks much better.
All in all, for $5, this is a fantastic plane.
Now, lunch and back to work on the pens, I’m 12 into the 16 I need.
A tool swap score
Finding old tools around here (the Pacific Northwest) is a bit of a challenge, and finding ones that are users as well, even harder. Let’s not even talk about the ridiculous prices that people put on them in antique stores around here.
I’d got a hint of a tool swap that would have at least one table of old tools, and after some online sleuthing figured out a date and location. I swear it was harder to find out information than just about any event I’ve been to recently. They really didn’t promote it at all, and I only had a couple of mentions and posts in random places. But went out on a limb, got up way too early, and checked it out.
Surprisingly there were quite a few old tools there, scattered among a lot of dusty old power tools and boxes of screwdrivers. It was an odd mix of people, mostly older, with a few young folks as well. I did pretty well for myself I thought, and am happy I got up way to early (time for a nap maybe?) to go check it out.
Here is what I picked up:
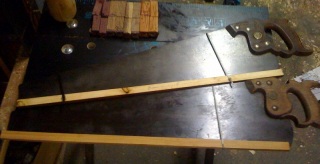
Two saws of good quality. A Disston 8 pt Crosscut, and a Disston 11 pt Crosscut saw in good shape with saw guards. I sort of put myself in the old guys hands on this one. He had a rack of saws that were obviously in good shape, well cared for, and he seemed to know what he was doing. I asked him what he thought I might need, and recommended those two. I offered $30 to his $35 and he took it.
 A Stanley #5 Jack Plane. This guy had a line of well used dusty/rusty #5’s with the back end painted green. I walked by a few times, and finally asked the price on them. He replied with “How much do you want to pay?” so I quipped back “$5” thinking he’d start bargaining from there, but replied “Sure. I just want cut down on the amount of stuff I have.” Rolling with it, I asked him which one was in the best shape, and he pulled the blade from one and put it in the one with best body for me. I guessed some kind of shop over stock, because they were all so similar looking and green paint, and he said “former shop teacher”. Good deal for me!
Here was my favorite purchase. A Stanley #48 “Tongue and Groove” plane, in good shape. This is a single unit that does both the “Tongue” and the “Groove” with a simple switching of the fence. The fence pivots on a single point to cover one of the blades, and align it with the center of the wood for the groove part. Swung the other way, it’s fence for the tongue part with both blades in play. It’s really clever, and surprisingly simple. When I was at the Woodwright’s School for my class, they demoed one of these and I thought it was pretty neat. It’s also, once I sharpen and tune it up, going to be put into use on a project I’m contemplating. He was asking $75 but he took $60 which is pretty fair for the condition and rarity of these.
All in all, it was a good day, and I feel happy with my purchases. I’ve already cleaned up the #5 and under the light rust it’s in great shape, and it’s cleaned up nicely with just some WD-40 and a light wire brush work.
Badger
Second Use purchase
I was going to make some crack about Vice or Vise, but I think it’s come off a bit flat. Instead, I’ll just post a pic of my new score and babble on a bit about my workbench plans. (and struggles.)
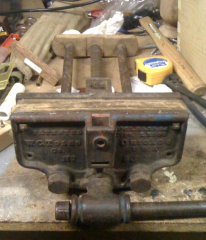
I found this at a fun store to visit, Second Use, where I like to check for recycled materials to use in my woodworking. Kind of my thing, which should be interesting as I move into more furniture type things. I did see a bunch of Poplar that might be good for a project I’m considering. Any way, I saw the vise pictured to the right on the site, and went down to take a look. It is a bit rusty on the surface, but it’s still usable, and it’s massive! It cost me $45 at that size, and condition for a quick release vise I think that’s about fair. A little elbow grease, a wire brush and some WD-40 should be good.
As for the bench this goes on, it’s a bit of a struggle right now. I’m having lots of problems figuring out what I want out of a bench, at what I can afford to pay. I want it solid, a thick top, a good height for hand tool wood working, and able to hold work well in lots of ways.  I’ve been reading Chris Scwarz’s book on Workbenches, and it’s full of good ideas. Too many good ideas. It’s somewhat maddening because I want to narrow it down, not expand the list.
I’m actually coming close to a final idea, only just recently, from the book mentioned above. The “roubo” which is oft mentioned on the internet, in the woodworking forums, etc. However, it’s got a lot of what I want, plus it’s compatible with what I already have. I have a base pretty much built already in another bench that came with the house. It’s got solid 4×4’s for legs, and is a good layout size, it’s too high but some sawing will fix that. It really just needs a good top, and some hardware.
Which brings us back to the vise. :)Â See what I did there?
I heartily recommend the book, and the author for reading. They have a good blog and magazine for us woodworkers.
Badger
Apple Hammer
I made a quick hammer on the lathe tonight, out of some applewood I had lying around. It spent some time outside, so it’s got lots of checks and cracks, but it’s still pretty solid hardwood. And what I was making was intended to be used for hammering chisels, so it could be less than perfect.
Turned out pretty nice, all things considered. (No pun intended really.) I only finished with a hand rubbed walnut oil coat to bring out the color, nothing more. I would like to find some non-checked applewood to make a nicer one sometime, it does have some pretty grain.
badger
PATINA Tool show shopping…
Still catching up on my posts after coming back from Vacation. This post is just a “show off” or “tool gloat” post.
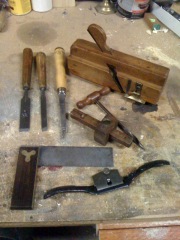
Shown in the picture from the Top Left.
2 different width paring chisels- these are not as common as they used to be, and these look nice. I learned to use them at the Woodwrights Shop and I wanted a couple for myself.
Mortise Chisel – looks like a buck brothers handle on a different bland blade. The tip was extremely hollow ground, like on an 8″ grinder wheel, I’ll need to fix that up, but for the price ($12) it was worth trying to fix.
Moving Fillister Plane – This was my big score, and made the drive worth it. I paid $27, and I should have bought both they had. I set it up and tried it out this weekend, and it worked great after a quick sharpen. I love this tool, Roy was right.
Gimlet – I got it for cheap with the Fillister plane, and I’ll try it out later.
Mortising Gauge – I needed one after taking Roy’s Mortise and Tenon class, and this one was $7 (but he took $5) and needs a little TLC, but is in good enough shape to use.
Try Square – I used on like this at Roy’s class, and wanted my own.  I only had flat contractor squares in the shop.
Stanley Spokeshave – I need a good spokeshave for my bowsaw project, and this looks workable. The two I picked up for cheap at Harbor Freight are worthless (big surprise) and I need one that is built better.
That’s all for now, I got some shop time today, and I’ll post some results later…
badger





You must be logged in to post a comment.