Posts in Category: books
Book Review: The Anarchist’s Design Book
Short Summary: Interesting book with good ideas that makes me want to build furniture.
I recently finished the latest subversive rant “The Anarchist’s Design Book” from the chief anarchist of woodworking, Chris Schwarz.  I’ve been a fan of his work before, and have had the opportunity to take a week long class from him making the infamous tool chest.  So, I’m obviously somewhat in the Schwarz camp already, so this review should be taken in that light.  Also, I should note this review is of the Electronic version.  I wish more publishers gave me the electronic version with the printed version, then I could have it both ways with a easily portable library at my finger tips, and a book case full of wonderfully tactile tomes.
Anyway, on to the review.  The book is written even more so in his laid back and somewhat sardonic style than previous books.  This is not a dry textbook style book, but rather one full of personality and life.  This may not appeal to people for sure, especially those who are already not fans of the Schwarz.  I personally like this style, because it’s more interesting to read and you can get a real sense of the person.
The book is divided into two main sections, each tackling what the author considers somewhat lost arts (see what I did there?) of “staked furniture” and “boarded construction” techniques. Â The text is a mix of projects, instructions, and opinion blended together. Â You have to read the whole thing to get the sense of it. You can’t really just skip to the projects, and jump in. Â The projects them selves are interesting, and I found myself considering taking on at least half of them. Which is pretty good for me as I tend to only be interested in one or two projects. Â The staked chair section is of particular interest, as I’ve been turned off by many of the designs, and styles out there. Â Building a Windsor chair seems terribly daunting, and overly complicated for someone who doesn’t get a lot a shop time. Â The four legged chair is likely on my list to build.
He does go on at length about the 3 legged chair, but it’s not something that appeals to me. Â This is one of the places where it felt a little forced to me, where he had an idea that he was intellectually in love with and tried to force the idea a bit. Â This is the anarchist in him showing a bit, challenging the status quo for which I applaud him. Â Ultimately it’s interesting as a thought exercise, but visually I just don’t love the look.
In the next section he tackles boarded construction, which is something I’m a bit more familiar with personally, but still contained quite a bit of great information in it. Â I’m going to give the bookshelf construction a go, following his steps verbatim for one, and then try applying them to larger projects. Â We have a lot of books, and a lot of sagging IKEA shelves. Â I would love to replace the tall ones with hand made ones, so that’s going on the project list after I try the shorter version.
For me this book will occupy a place on my woodworking bookshelf, or rather will likely have a spot reserved for it, but will probably be down on my work bench for a while, while I experiment with staked tenons, and octagonal legs.
Badger
Quick Review: Woodwright’s Shop DVD 1,2
When I first heard the news that Popular Woodworking Magazine was going to be re-releasing the Woodwright’s Shop on DVD Â I had a number of reactions.
First and foremost my reaction was ABOUT DAMN TIME! I’ve been trying to record as many of them on my DVR as I could, but it’s a pain to save them to DVD-r and we had a equipment failure that wiped about 10 episodes. Â I’ve been watching Roy since I was young, and since I’ve gotten into the “hand tool” world, he’s become even more important. Â So the fact that these episodes were not available on DVD was a true crime.
My second thought was, oh man, there goes my bank account. Â No matter what the cost was, there are over 30 seasons of this show, and it was going to add up. Â This thought was quickly shut down by my wife, as she was having none of that argument. Â She accepted right away that we were buying ALL of them, no matter what. Â I love that woman.
My third thought was best described by quoting a comment on the thread for the original announcement by Megan Fitzpatrick.  “Shut up and take my money!”
Since then, I’ve managed to get three of the videos, and next paycheck will be season three. Â I’ve picked up seasons 20, 1, and 2 so far in that order. Â Here are my thoughts on the first two seasons.
Season 1
After having watched a lot of the most recent season, this first season was almost painful to watch. Â Roy is clearly new to doing this and has not found his groove yet. Â He’s a little stiff and appears almost nervous to start out, but his passion for the subject shines through like a beacon. Â You can see some of the standard Roy mannerisms in their infancy, and you get to see him developing the patter that he will use for years. Â Still it’s a little hard to watch him nervously careen around the shop as he presents the material.
Production quality of the disc is fine, although the source material’s age shows through at times with a few glitches here and there. Â The source material is in pretty good shape though for how old it is, and I am very thankful that it was preserved for us to watch these decades later. Â It’s almost comical to watch the “high tech” computer graphics used in the intro for PBS, and the university.
My favorite episode of this season is “Panel Frame and Dovetail” episode, followed by the “Timber Frame Construction” episode. Â Watching these episodes have me thinking about finding a blacksmith to make me a froe, and building myself a shaving horse.
Season 2
It’s amazing to watch the confidence building and his ease in front of the camera growing in each episode.  The skinny nervous woodworking zealot slowly transforms into a smooth talking trickster and educator, albeit a clumsy one.  His increasing confidence and experience in pacing himself over the material grew by leaps and bounds in one year.  You can more clearly see the Roy Underhill that we’ve grown used to in the later seasons really clearly.  The transformation is quite amazing, and very entertaining to watch.
My favorite episodes in this season are “In Yer Drawers” with the highlight of glue pot freezing on him at the last minute, and the “Saws” episode. Â I really hope they keep putting these out, and I’m looking forward to watching my through all of the seasons again and again. Â There is a tremendous amount of knowledge and inspiration contained in this show, and it makes me very happy to have them.
Thanks Popular Woodworking for bringing these to us, and thanks to Roy for… well… being Roy.
Badger
Drawing some Gothic Tracery for carving layout
I’ve always been fascinated with the carving examples of “Gothic Tracery”, and the intricate and delicate feel to them. After taking the “By hand and by eye” class with Jim Tolpin, and the ideas I picked up behind laying out things with a compass, I was somewhat inspired to do a little research. However, there is VERY little out there for the aspiring carver to pick up and learn from.
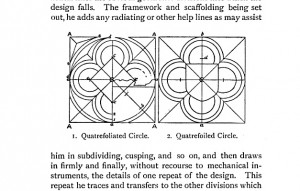
I did finally find a book on Google Books that was of some help: Practical wood-carving: a book for the student, carver, teacher, designer, and architect by Eleanor Rowe. She touches on Gothic Tracery in some what obscure language in the book, and I sat down today to try and figure out how to lay this stuff out.
Starting with this (Page 99)
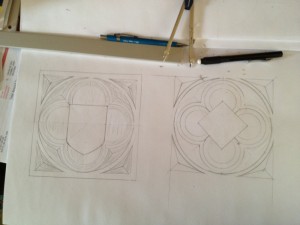
I came up with this:
I learned a few things, and actually feel pretty good about laying out this basic “quatrefoil”. No measuring happened, just arcs and lines. It’s a starting point, and I’m going to try and get some time down in the garage to lay this out, and try some carving.
This one was my favorite of the two, where I used a midpoint on the radius to base the circular lobes on. I know that makes no sense, but putting compass to paper really helped figure this stuff out in my head. The layout was fairly simple once I got started, it’s just complex looking to start out doing.
Let’s see what happens when the chisel hits the wood.
Badger
Oak Furniture The British Tradition Reprinted? Yes!
 Oak Furniture | The British Tradition – Victor Chinnery – 9781851490134 – Antique Collectors Club US.
Looks like one of the most sought after books on English Oak Furniture is going to finally get a second printing. This book is the GO TO source for this stuff, and it’s really hard to find used. We’re talking hundreds usually for this book.
A reprint is on it’s way according to the publisher’s site, which is fantastic news for us recreating these old styles or just studying them for new ideas.
Looks like it’s coming out some time in March. Just in time for my birthday…
** edited ** Peter let me know that they apparently have a regular printing schedule as soon as they run out, they print more. So, it remains to be seen whether it’s a full on second edition, or more of the same book printed again. Either way, I’ll be happy because I’m going to get a copy.
Badger
By Hand and By Eye
I just registered for the class linked above, which I heard about at the Hand Plane Essentials class I took this weekend from Jim Tolpin. It was a great class, and I am really looking forward to this design class.
“Design and Construction Strategies for Hand Tool Woodworkers
This class is based on the research that Jim Tolpin is doing for his forthcoming book with George Walker on the design and layout techniques used in the 17-18th centuries.
These traditional techniques use basic (and simple) geometric techniques to create designs for well proportioned furniture. The notion of well proportioned is ingrained in the human eye and is rooted in the different elements of the piece of furniture having whole number proportions (like 1:3 or 3:5).Â
These proportioned dimensions are easy to create using a sector and dividers. A sector is a simple tool made of two sticks hinged together (you’ll make one in class).
You can, in fact, create a whole design with out needing to reduce the dimensions to feet and inches (or millimetres)! This can be liberating for the hand tool woodworker – it can help you escape the tyranny of the machine or getting overwhelmed trying to use a drawing program on your computer.
Jim also looks at how your design and layout of joinery should be slaved to your tools. Making simple decisions during this stage can greatly simplify the process of dimensioning the stock and cutting the joinery.“
We were discussing this on Sunday as the class was winding down, about the difference between the engineer perspective and the artisan perspective. I made a comment that I really liked. “Measuring is so imprecise!“  It really is, when you are talking about woodworking, you spend a lot of time get a measurement dead one, and the saw drifts a tiny bit, and you’re short. That is if, you’re cutting all the pieces in one go. If you cut one piece, and then fit it to the next, and then base the next off that, etc. you will be guaranteed to have it fitting right. This is how the artisans who built all the furniture we love to emulate, and are inspired by. At best they had a two fold rule, no digital calipers, or table saws. I am super excited about this class and the book that follows the research they did coming out at Lost Art Press.
Badger
Rules for Work from the Boys Own Workshop.
The boy’s own workshop – Jacob Abbott – Google Books.
Discussion about this book is making the rounds of the blogs right now, and I wanted to call it out as well. I read this on my Kindle while on vacation and it was a great read, that I learned some fun stuff about hand tool woodworking, and more to the point I learned some things about how to approach the craft as well. I highly recommend reading this book, and if I had any idea how to do it I would reprint this book in a nice bound format to put on my shelf next to my Lost Art books.
“Rules for Work
It was late on Saturday afternoon when the boys completed the work of procuring and laying in their stock and their tools; and several days elapsed after this before John had an opportunity to commence his work. Ebenezer advised him, if he really wished to learn to do anything with tools, to consider it work, and not play; and not to undertake any operations until he had ample time for them, and then to proceed step by step, in the most deliberate and cautious manner. He must never act in a hurry, he said, in order to finish something at a particular time, or attempt to work with a tool that was dull or out of order, or to use a poor or unsuitable piece of wood because he had no proper piece at hand. Such management as that, Ebenezer said, only led to disappointment, worrying, vexation, and failure. “Â — Boy’s Own Workshop by Jacob Abbot
I am interpreting this as the following Rules for Work:
1. Work Deliberately. I tend to rush when I get close to the end of a project. And usually screw things up by doing something stupid. Now I am taking the time to think through each step, and find the simplest solution, not the first thing that comes to mind.
2. Use the right tool for the job. Sometimes when I rush, I’ll grab whatever is handy and try to force it work the way I want, and sometimes this ends badly.
3. Work with Sharp Tools. I sometimes want to get right to work, but I’m making myself stop and make sure my tools are ready to go before I start. Even if this means that is all I get to that night in the shop.
4. Work in discrete chunks. I am trying to work in stages, and only tackle a project that I can finish in the time I have. This way I feel successful at the end of each section, and I start each session with a starting point and an end point.
I’m still working on these rules, and feeling out how it works in the shop, but I feel good about this so far. Work Deliberately seems to be encompass a lot of the idea. My first project with these rules in mind went much better than previous ones. The end result just simple felt better, and I felt like I actually knew what I was doing. It’s a good feeling.
Badger
Working towards my own “Anarchist†tool set. (part 2)
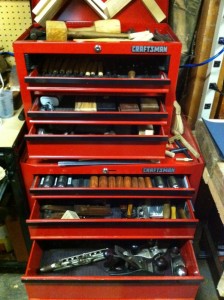
Continuing on the topic of building out a tool set inspired by the book “The Anarchist’s Tool Chest†and seeing how I’ve fared of late. Before this weekend my tools were scattered all over the shop, and in piles. It was very frustrating for me, and was probably risky for my tools. Also, I’d lost a few tools under the piles, and I couldn’t find some of the items I’d picked up. This weekend I completed my conversion to the Hand Tool side of the force, and dug out the Craftsman rolling toolbox that was holding my power tools, and cleaned it out. I put most of the power tools in a plastic bin, where I could get to them if I needed to, and cleaned out the crap in the drawers. The Taig Mini metal lathe went into it’s own box, the drill bits into a small box by the drill press, and so on. Then I gathered all my hand tools together and finally gave them a home.
Is it a fancy wooden chest with sliding tills, and dovetailed corners? No. Will it do for now? Yes, and quite well too. My amazing wife got me this chest ages ago, and I had lost it into the back corner of the garage. In cleaning and clearing this last weekend, I was able to unbury it, and reload it with my hand tools. It felt nice to put all of them in one spot, and organize them. Additionally, my bench top was clear for the first time in months.
Now to the rest of the Tools mentioned in the book, using his headings.
Essential Cutting Tools
He places great stock in the bevel edge chisel style, and I think he’s got a point. I had purchased a nice full set of non-bevel edged Woodriver socket chisels on a recent sale, and they work great. However I recently saw a set by Narex (a well known “best value” kind of chisel) with bevel edges. So I picked up a small 4 piece set from Lee Valley, and they are quite nice. They are the same quality tools as the Mortise chisel set I picked up, and look to be good user tools. So, for bench and mortise chisels, I’m set.
I’ve got a Stanley #51 Spokeshave, but I’m going to try and track down a #151 adjustable one like he recommends in his book. As for the rasps, I think I’ll wait a bit to get a little bit better at the regular stuff before throwing in more complicated curves.
Striking and Fastening Tools
I’m doing all right in this department, some of it intentionally, some of it by accident. I made my own striking tools for carving and bench chisels. I have a nice set of knock off of a vintage style flathead screwdrivers, they are well made even though they are obviously out of the far east somewhere.
The first real purchase I made with the intent to build out a tool kit of hand tools was a roll of auger bits, and a nice rosewood handled sliding bevel by Stanley at an Antique Show. The auger bits were a mixed back in terms of quality, but there were also a lot of duplicates in there as well, so I was able to build out enough working ones to make a set. Combined with a brace, they are quite useful and I use them frequently. I recently picked up a bit driver for the brace from Lee Valley for driving screws to try out. I think I can get some good results with this.
Saws
Other than having no place to store them (more on that in a later post) I have a pretty good selection of saws now. I used to hate hand sawing, with a serious passion. I sucked at it so badly I usually screwed up whatever I tried to do, kinked the saw, or hurt myself. Or all three. Seriously, I was a miserable failure at sawing, which seemed like it should be so easy. It was very frustrating, and quite a bit discouraging. Until I learned how to do it right. Wow, what a difference actually applying common sense, and proper body posture makes.
I’ve got a couple vintage Disston crosscut saws, a no name (and a little rusty but other wise servicable) rip saw. I want to either rehab the rip saw, or pick up a new one fairly soon, but it will do for now. I need to remove the rust though, it’s pretty gross.
The most awesome wife in the world (my blog, my opinion, deal) got me a couple of Lie Nielson back saws of the Dovetail (amazing) and a Carcase saw (awesome), and they’ve been a joy to use. I could use a better coping saw though, so something to put on the list.
That’s it for now, but I’m definitely feeling pretty good about my tool kit these days. Next up the Sharpening, and “Nice to have” list.
Badger
Working towards my own “Anarchist” tool set. (part 1)
I recently read through the latest work by Chris Schwarz, titled “The Anarchist’s Tool Chest” and enjoyed it quite a bit. I’ve been drifting in the direction of fewer, but higher quality tools for a bit, and inspired by other much older writings a semi-minimalist tool kit. The kit listed in Our Workshop, or shown in some of the medieval paintings is quite spartan compared to the modern collect-o-holic amateur woodsmith. While the book gets a little preachy at times, I quite enjoyed the style and prose of Chris’s writing. I also loved his analysis and reasoning for what tools he chose for his chest, and more importantly WHY he chose them.
It helped me realize which of mass of tools that I had been gathering but not really using all that well I really needed. And what tools I needed to acquire or upgrade eventually. What follows are mostly some notes for myself, and project plans I wanted to get into a list for doing some day.
Planes
I’m doing ok on this front, with a set of #4, #5, plus my newly acquired #3 and #7 planes. What I really needed to do, and I’ve been doing lately is sharpening and tuning my irons. I’ve been intimidated and perplexed by sharpening, but I picked up a decent side-clamp honing guide, and it’s going much better. I recently moved the #5 from “someday” to regular user by simply getting the blade to a reasonable state and adjusting it a little.
I am also debating the shoulder plane recommendation he offers, but I have a nice rosewood rabbet plane that works well, and a wooden moving fillister plane that doesn’t. I can either tune it up, or make look into the Veritas version that was recommended.
One final, but annoying note. I have a router plane, a nice #71 but it’s only got the spear point bit and I’m having a devil of time finding the flat one that fits. The one I have works pretty well, but I would like to have the other blade to do different cuts.
Marking and Measuring
I have a few marking gauges, and a decent rosewood cutting gauge, but I really want to make my own. I’m even going to attempt to build a reproduction of a 1450 marking gauge, stay tuned for more on that.
I also plan on making a panel gauge the same way as the above historical marking gauge, but with a longer arm and a pencil hole.
He highly recommends the 6″ metal combination square, but I have a good selection of vintage squares that I like to use and I don’t really like the look of the “engineer” style it has, even though highly functional. I’ll break with his advice (which is what it is, not gospel) and go with what I have. Although, I am quite keen to make a few of those wooden try squares, and maybe the English layout square he uses as a logo.
I’m good on dividers (although I could use another set of small and large) with my HF el-cheapo dividers. I bought mine as a set of metal compass with a pencil holder, and simply twisted off the metal ring where the pencil goes. Functional, sharp points, and cheap. Works for me.
As for the wooden straight edge, I’m going to break with his advice again. I’m planning on picking up a length of aluminum bar stock from my local hardware store (the small locally based one, not the big box home center) and cutting it into straight edge, and a couple winding sticks. It has a super straight edge, and is cheap and light. However, I am totally aware of the irony here, eschewing the metal combinations square and then buying aluminum bar stock. For me it’s a matter of how much time I get down in the shop and what I get to do down there.
On my make list however, is making a really nice marking knife in the style of this guy’s work.
More later, as I go through each section of his essential tool list and analyze where I am at and where I want to be.
Badger
A new Chris Schwarz workbench book…
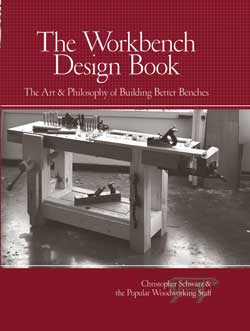
Just saw a posting about a new book by Chris Schwarz workbenches.
And it’s on sale for pre-order plus free shipping.
Sounds like a must purchase to me. Mr. Schwarz is doing quite a lot to further woodworking as a craft, and research methods into the practical history. He’s starting to work his way into my list of favorite woodworking gurus who are advancing the craft. I just ordered my copy.
I am hoping that this book might help me in my “workbench paralysis” that I’m in right now. There are lots of options, and many ways to go, but I am stuck trying to figure out whether to build or to buy. I don’t have a lot of time in the shop, but when I do I would like to be able to work on a thing rather than the stuff to make the thing. I’m spending my spare moments building stuff to make stuff, and while very fun and rewarding, is not making things. But then, a new work bench is VERY expensive and if I only spend a little time in the shop, is it worth it to spend that kind of money?
And around and around I go.
** Edited to fix mistake in spelling of Schwarz **
The Essential Woodworker reprinted!
The Essential Woodworker.
This highly recommended book has been finally reprinted by Lost Art Press who also brought us the Joiner and Cabinet Maker book I so enjoyed and have been raving about.
I pre-ordered it and got a PDF copy of the book for free for pre-ordering. Go do it! This book has been hard to find for reasonable prices, and now it’s available in a high quality reprint.
Badger









You must be logged in to post a comment.