
Posts in Category: carving
Getting to know… Alder and a new Chisel
After getting back from the Coyote wood shop with the new planks, and letting them acclimate for a while I thought I’d get acquainted… Well, I also thought I’d get my wisdom teeth removed, and then recover in time for a major crap storm at work, and then I thought I’d get some carving done.
Anyway, I also had a new V chisel to try out that I picked up at the Lie Nielson event. Â They are selling the new Auriou carving chisels designed in partnership with Chris Pye. Â I didn’t intend to buy one, but after picking it up and feeling how good it felt… well I just had to.
After rough planing, and ripping a small chunk of Alder to two 1/2″ planks I decided I would revisit a carving pattern I had used before. Â It is mostly V-tool work, so it was a good introduction to the tool.
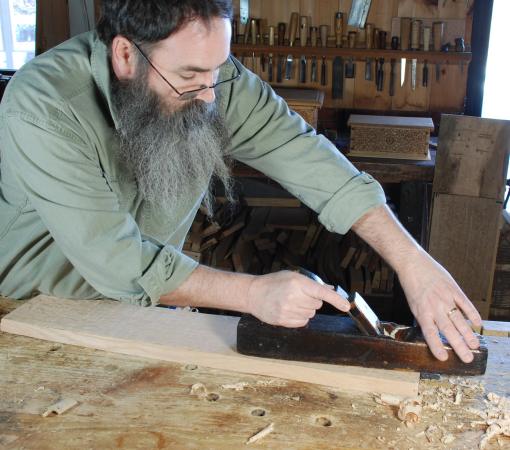
The chisel feels good in the hand, but the heel is a lot lower angled so I have to get used to a new grip and posture with the tool. Â It went in deep at the angle I was used to with my Pfiel “Swiss Made” chisel. Â It also needed a quick sharpening on the Translucent Arkansas and strop. Â The top panel is the chisel right out of the box, the lower panel is after a quick pass on the stone and strop.

Alder carving tests with new chisel.
The alder is a bit light, and I want to try a different section of the board before I decide how much I like this wood. Â So far the jury is still out.
The chisel is a fine tool, and once I got used to it it was pretty nice to use.
badger
Attention NW Woodworkers!
I read on Peter Follansbee’s blog that the attendance for his two classes at Port Townsend might get cancelled because not enough people are signed up!?!
“still hoping for students out west at the Port Townsend School of Woodworking. Right now, it sounds like we need 6 more students for each workshop. Otherwise, these 2 classes will get cancelled. One is a week-long “make a joint stool†class… the other a 2-day class in carving. It would be a shame it we have to scrap it, the school and I have dedicated the time slot and can’t really make it up if it falls through. I know time/money/logistics are all a concern for all of us. But I often get requests “When are you coming to X,Y, Z?†– I only get to come if we get students. I won’t harp about it again, just one last nudge if you know someone out that way, or wanting to visit out that way…dates are April 22-26 for the joinery class, and the 27th & 28th for the carving http://www.ptwoodschool.com/ “
Hey MWA folks and any other PNW woodworkers, you should think about these classes! Peter Follansbee is one of the most knowledgeable guys out there for 17th century carving. If you have any interest at all, it would be well worth the time and money to attend, as I doubt he’s going to make his way out here again.
I’ve already signed up ages ago, and will be majorly disappointed if this gets cancelled. Please spread the word! Tell your friends! I’ve been hoping to get a chance to meet Peter and learn from him since I started reading his blog. It started me down the path of carving, and is a major reason why I’ve been able to figure out the stuff I’ve done lately.
Peter Follansbee
Carving some Heraldic Roses for a box
It’s been a bit since I’ve updated the blog due to a variety of reasons including a minor surgery that had a rough recovery. Â I have been working the wood in the shop, just not posting here. Â I have at least two other major posts I will be adding as I catch including one on my sons 6 board chest build, some finished carved boxes, and a couple shop made tools.
But for now, I want to share this bit of carving I did on Saturday which I think came out really nicely.

Completed carved panel with three heraldic roses
This is going to be the front panel of a traditional style nailed box, sometimes erroneously called a “bible box” that I’m making as a gift for someone.  The roses are modeled after heraldic roses from the Tudor period, and were new to me in terms of carving.  I studied a lot of period examples to get a sense of the form, and watched one of the recent videos from Chris Pye’s woodcarving workshop series in which he does a double-rose in a Gothic mirror.  (If you’re interested in learning carving, this is a very nice investment in your craft, Chris does a fantastic job of explaining and showing how to carve.)
I also took some step by step shots of the progression as a demonstration of how easy it really was to do. Â As I worked on the first one I worked out the steps I needed and then captured a shot of the tool used to do each of the dozen or so steps to complete a single rose. Â Then I put them together “Kari Hultman Style“.

Steps 1 – 3
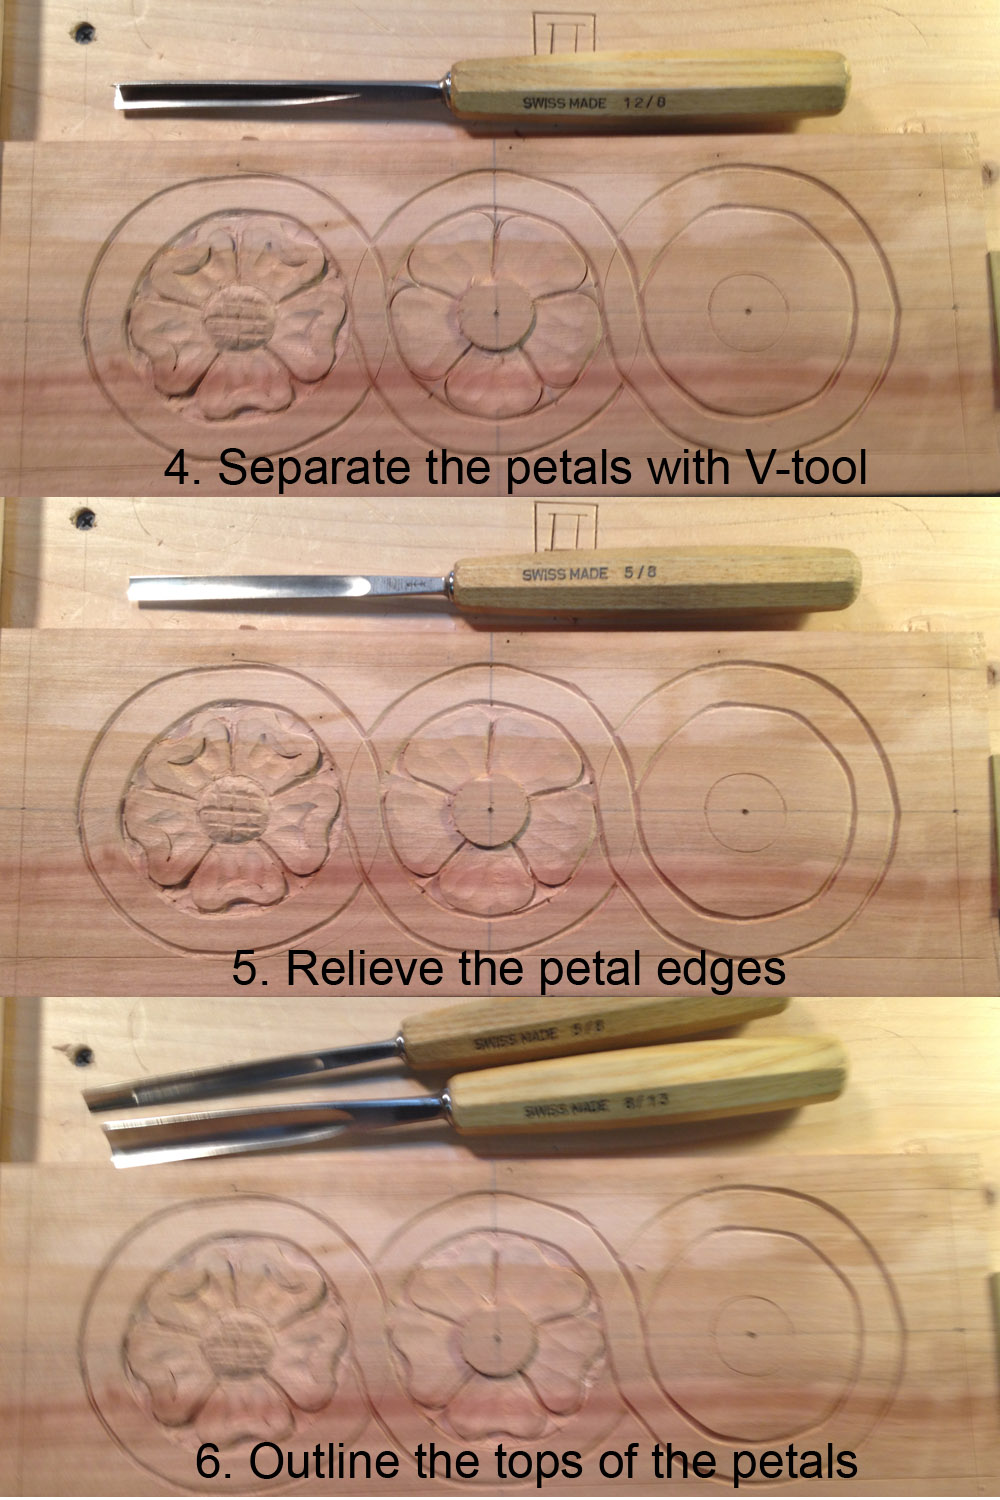
Steps 4 – 6

Steps 7 – 9
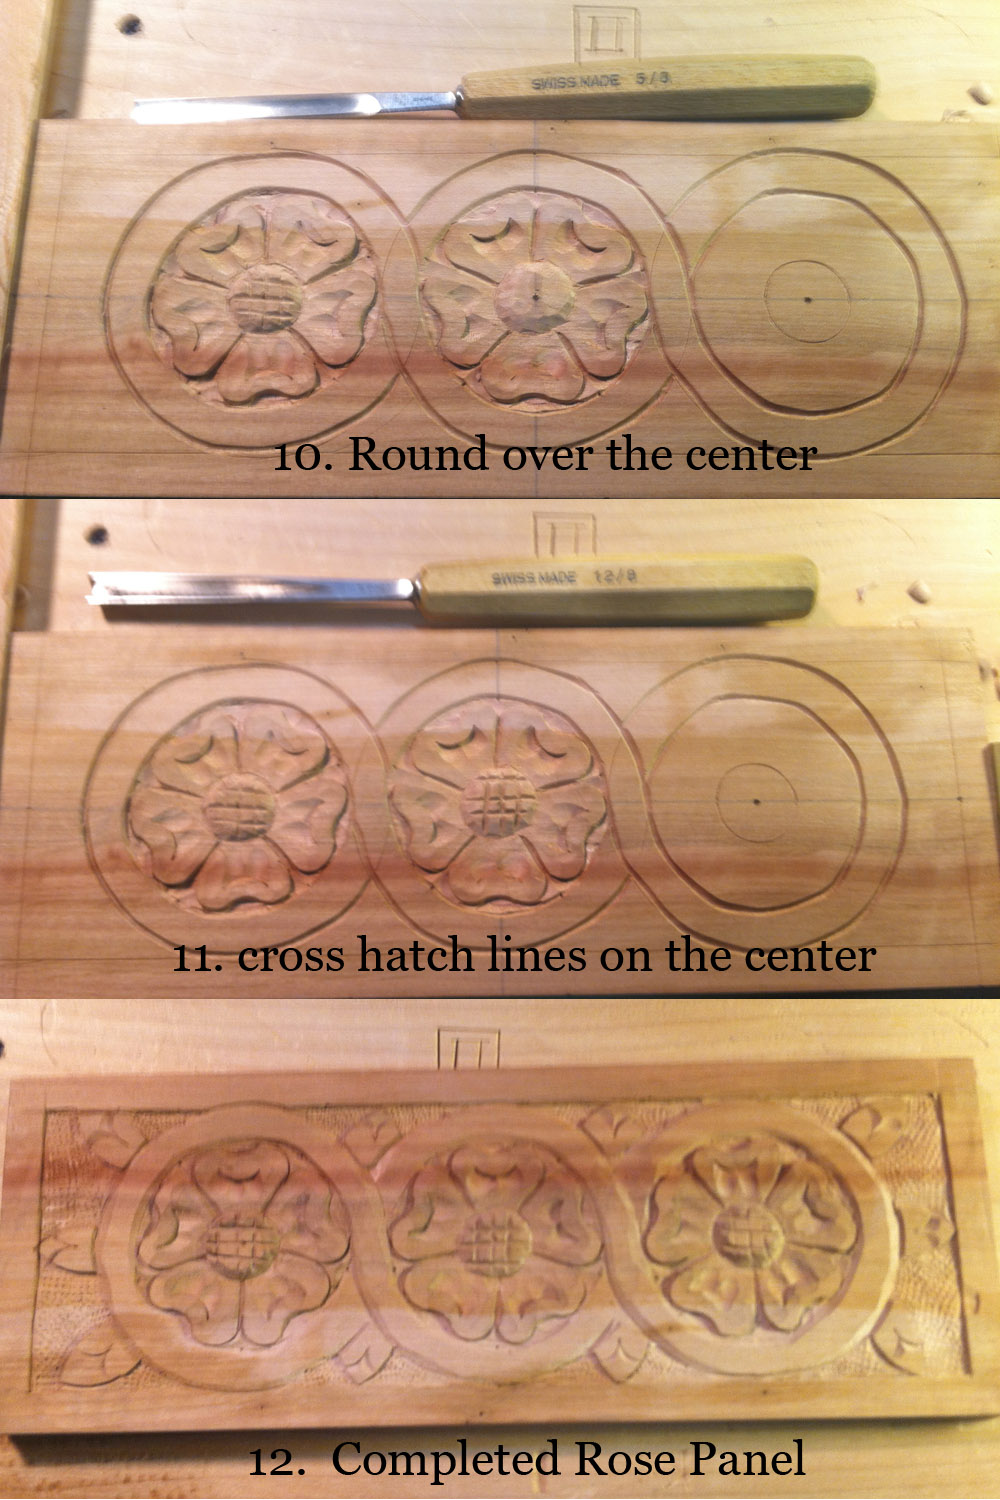
Steps 10 – 11
Some of the shots were blurry, sorry about that I was grabbing these quickly with my iPhone and getting back to work. Â If you have any questions about which tool or want to know more about a step I took let me know. I hope it’s somewhat self evident what each step is.
badger
Finished the panels for the S-Scroll box
Just a quick update to show off the last of the panels I completed this weekend.
I repeated the same pattern as the first long panel, but this time attempted to stay a little truer to the original design. Â I’d gotten a comment on the first carving in relation to the original about too much open space, so I concentrated on reducing the amount of background visible. Â I think it came out pretty nicely actually, and I see what he was talking about. Â He should know, as he’s studied the original.

Final Panel for the box
Changing the layout slightly and focusing on filling the space made it so that I didn’t really need the punchwork to level the background.  I spent a little more time on the “facets” of the background, to get a pleasing look and quickly found a groove that worked well.
Next step it to turn this into a box with a top and bottom. Â I’m going to nail it together with cut nails from Tremont, with a rabbet on the front and back. Â Â Not sure yet if I’m going to carve the top, or leave it plain with a simple molded edge or not.

All the panels laid out
All in all, I’m very pleased with how this is going.
badger
More Carved S-Scroll box progress
A little more carving done this weekend, in two different snatches of time in the garage. Â These two panels are going to be the sides of the box I started carving last week. Â The front can been seen in a previous post on S Scroll carving step by step. Â I’m playing around with different layout choices for these sides, trying to get more practice and experimenting with different ideas as I go.

S Scroll side panel for box 1
The first side I was experimenting with simply stretching the S out a bit to fit the shape, as well as putting the center circle or button in the same plane line rather than offsetting them a little. Â Overall I’m not sure about this one, something seems a little “Off” about it, but I can’t really put my finger on it.

S Scroll side panel for box 2
The second side I tried a new trick with crossing the S shapes in the center, which visually fills the space a little more pleasingly to my eye.  I did struggle a little with some grain tear out as I tried something new to me in the top and bottom spaces.  I need a  lot more practice to get some of these muscle memories established.
Over all I can feel myself getting a little more comfortable with chisels, and the body motions on each panel. Â This is sort of the point of this box project, practicing and developing my skills in this area. Â That and trying different designs and layouts to see what I enjoy carving, and what looks good.
Next up is the back panel, which I’m going to layout in pencil this evening. Â I’m probably going to try the front design again, but I might change my mind.
Badger
Carving S Scrolls step by step

Carving S Scrolls – Finished Panel
I thought I’d do a post on carving, and show the process step by step.  The design I picked for this box front was taken from a carved chest image that I got from Peter Follansbee.  The bottom rail has a nice simple S Scroll pattern than I am using as the inspiration for this carving.  The original box  is a carved joined chest, dated 1676 that is attributed to Thomas Dennis of Ipswich Massachusetts.  The extant chest is housed at the Winterthur Museum and doesn’t appear to be pictured anywhere on the net.  There is a lot of patterns on this chest and I’ve already used a strapwork pattern from this chest for my tool box.  You can find examples of these carved chests all around the net, and Peter Follansbee does a lot of this kind of work on his blog which I highly recommend checking out if you’re interested in this type of historical carving.
The wood I’m using here is Alder wood that I picked up, and resawed down to approximately 1/2″.  I think it’s kiln dried, but the grain is nice and tight so it carves pretty well.  I took a series of pictures as I went to show the step by step process of carving the scrolls with little measuring.  The layout started out with eyeballed edges scribed with a marking gauge.  I found the mid point with a pair of dividers, and scribed center lines to start out.

Step 1 – Starting with the corners
Chisel: Swiss made 8/20 Gouge
I start out bounding the curved scrolls by using a curved gouge that looked right, although in retrospect I think it might be too small. Â I probably should have used a compass here to draw out the circle at the ends to give my self a starting point. Â It didn’t turn out too badly, but I think it could be improved.

Step 2 – setting in the “Button”
Chisel: Swiss made 8/13 Gouge
Here is where I made my first “mistake” but it was I was able to quickly pivot and move on. Â The center of the top curve of the S starts out as a circle, but if you notice, they are not directly on the center line. Â I did them opposite of the picture I was working from, but I was able to cut the picture in half and tape it back together (with duct tape, naturally) so that it matched where I was going. Â It helps to have the image in front of you, but it’s mostly for reference since I’m using the shape of the tools as the guide lines for the most part.

Step 3 – V-tool work on the main body of the S
Chisel: Swiss made 12/8 V Tool
Now we need to connect the “Buttons” (which is the term that Peter Follansbee uses in his S Scrolls video. Â I used a V tool to connect the two of each, and to be sure I wasn’t screwing up I sketched it lightly with pencil first on one side. Â After I got it work out the other side was easy to follow and it’s quick work to outline the main body of the S in the S Scroll. Â the rest of the work is done with a variety of gouge shapes.

Step 4 – Outlining the pattern
Chisel: Swiss made 4/20, 6/20, and 8/20 Gouges
Next comes the part that looks hard but really is the easiest.  With your pattern in front of you (or sketched out on the wood lightly) lay a variety of gouges down on the wood till you find the right curve that matches approximately the curve you need, and set it into the wood with a couple quick raps of the carving mallet.  Be sure to strike straight down so you don’t pop out the wood.  For this pattern I started on the circles and built out from there.  You’ll notice the center pattern is a mirror of the outer pattern.  If you look closely you can see that I’m not really that precise but the eye is very forgiving and will see the pattern for what it is.  I need to practice more to get more precision, but it is not a huge concern for me.

Step 5 – Outline the edge
Chisel: Flat chisels
Next step is to take a flat edge chisel and outline any edges that don’t get cut in the main pattern. Â I reground a couple old flat chisels I got ages ago with a sharper angle and a double bevel for these two.

Step 6a – Relieving the background (halfway)
Chisel: Swiss made 5/12, and 5/8 Gouges
Taking a couple sizes of gouges with a flat curve to them, I start working out or relieving the background.  I find the #5 sweep to be perfect for this work, and I have a couple sizes for bigger removal or getting into tighter corners.  The best way to do this step is work towards on of your gouge cuts, and take a bit out at a time.  Grip is important, and control is desired so work slowly and carefully.  You’re looking for a nice crisp edge, but not necessarily a flat bottom.  It will somewhat faceted once you’re finished, and a roughly uniform depth is good.

Step 6b – Finished relief
Here is a shot of the relief work all complete prior to texturing the background. Â It’s useful to have a coarse stiff brush to get all the chips out. Â I also spend a little time going over the whole pattern in detail to find any missed spots, or areas that need a little clean up.

Texture Punches
I thought I’d show you my home made text punches that will be used in the next step. Â The one on the far right is just a nail set which work perfectly for this, and makes a mark very accurate to the old examples. Â You probably have one in your tool box already. Â I also make a simple “maltese” cross punch for decoration from a nail, and some files. Â The two texture punches are made from round bar stock I got at the hardware store, and a big nail cut short. Â I just free handed the grid with a needle file.

Step 7 Â – Texture the background and add decoration
I use the big punch where ever it fits into the background and tapping it with a metal hammer. Â You don’t have to fill the whole background precisely, just try to cover as much as you can. Â Any areas the big punch won’t fit, I hit with the smaller sized texture punch. Â I added a couple circles with the nail punch, and added a couple cross punches. Â I realized I should have set the sides in further on the design since I plan on nailing this together, and didn’t allow for that. Â The nail set punch decoration is straight out of the original pattern.

Step 8 – Decoration on the Leaves
Chisel: Swiss made 8/13, 8/20 Gouges and 12/8 V Tool
I used a couple of gouges to add some decorative “half moon” cuts to the leaves, as it was in the main pattern I am following. Â I also added a little V tool work as well to break up the flat spaces. Â Once thing I’ve noticed about the patterns of carved boxes from this period is that they really don’t leave much open space clear, either in the background or the surface level. Â I guess nature abhors a vacuum in the design, and I think it helps.
Carving S Scrolls – Finished Panel
All finished with this box front.  I’m planning doing the sides of the box with a single length of the S, and maybe a different pattern for the back.  I am mostly just practicing my carving and design, as well as testing out this Alder wood for carving.  I don’t have regular access to the wonderful riven white Oak that Peter uses, but this might just be a good local substitute.  I like the color and grain, and I can pick it up fairly easily around here in the Pacific Northwest.
There you go, let me know what you think and I hope it helps understand this type of carving. Â It’s easier than it looks, is very forgiving and makes a great presentation.
Badger
Drawing some Gothic Tracery for carving layout
I’ve always been fascinated with the carving examples of “Gothic Tracery”, and the intricate and delicate feel to them. After taking the “By hand and by eye” class with Jim Tolpin, and the ideas I picked up behind laying out things with a compass, I was somewhat inspired to do a little research. However, there is VERY little out there for the aspiring carver to pick up and learn from.

- Gothic Carving example from a 15th Century French Chest.

I did finally find a book on Google Books that was of some help: Practical wood-carving: a book for the student, carver, teacher, designer, and architect by Eleanor Rowe. She touches on Gothic Tracery in some what obscure language in the book, and I sat down today to try and figure out how to lay this stuff out.
Starting with this (Page 99)

- Layout starting point

I came up with this:

- Sketching some Gothic Tracery…

I learned a few things, and actually feel pretty good about laying out this basic “quatrefoil”. No measuring happened, just arcs and lines. It’s a starting point, and I’m going to try and get some time down in the garage to lay this out, and try some carving.
This one was my favorite of the two, where I used a midpoint on the radius to base the circular lobes on. I know that makes no sense, but putting compass to paper really helped figure this stuff out in my head. The layout was fairly simple once I got started, it’s just complex looking to start out doing.

- Shield shaped center quatrefoil

Let’s see what happens when the chisel hits the wood.
Badger
Question about how to start carving…
In response to my post tonight about my carved tool tote, I got a question about how to start carving similar stuff. The answer I thought might be of more general interest, so I thought I’d post my answer here.
“I was reading your blog post about carving your tool tote. I would like to get started doing some really small and simple carvings. Do you have a book/dvd that you recommend and what are a few needed tools to get started?”
The answer kind of depends on what kind of carving you want to do really, but since the question was about the stuff I have been doing I’ll answer in that regard.
DVD
- Peter Follansbee – 17th Century New England Carving
- Peter Follansbee – 17th Century New England Carving: Carving the S-Scroll
http://www.lie-nielsen.com/catalog.php?grp=1320
Scroll down a bit for the first one, it’s the best for starting out. Then follow up with the S-Scroll dvd. Absolutely top notch stuff, and very easy to understand and learn from.
Blog
Reading Peter’s blog: http://pfollansbee.wordpress.com/ from start to finish. :) That is if you are a geek about history and woodworking like me. Otherwise search on carving.
Books
Tools
I posted a while back about my starter set of tools, based on the recommendations of Peter Follansbee and his basic kit.
https://badgerwoodworks.com/2010/12/peters-carving-tools-interpreted/
this has the list of Tools I started with and how I got the list.
- Pfeil Gouge #9/10 mm
- Pfeil Gouge #6/20 mm
- Pfeil Gouge #8/13 mm
- Pfeil Gouge #8/20 mm
- Pfeil Gouge #5/12 mm
- Pfeil V-Parting Tool #12 8mm
I did about 4-5 fully carved pieces with that set before I started expanding. I’ve added about half dozen chisels so far, but only as I need them for specific projects. The set above is a decent starting place I figure for the kind of carving I do. It’s hard to say specifically what you’ll need since you might have a different design style in mind, but a good V tool and small variety of gouges will be a good as place as any to start.
Here is part of my current kit, which I used nearly off of these for the Tool Tote carving.

Some of my carving tools...
Hope that helps.
Badger
Carved Tool Tote finished!

Tool Tote all loaded up
When I took the class out at Port Townsend on Planes, we all came away with a nice plank of air dried Alder wood that we had taken from rough stock to finished width over the course of the class. Tim, Jim and I were talking about how it might carve, and I set out to find out. Not content with simply carving a panel, I decided to make something useful out of the plank. And for the record, it carves beautifully!
I’ve been wanting to make a tool tote to carry tools to my sons preschool where I do work from time to time. Plus, I wanted to have something to take stuff to Port Townsend classes other than a cardboard box or something. Something with a little class that showed off some of my skills as a woodworker (or in the case of my dovetails, the lack of skills, but shhhh… on that.)
Looking around I found a nice “strap work” pattern in my inspiration folder, and started out with some pencil and paper to work out the layout. That took a bit of doing, but I finally got the basic lay out. I cannot stress enough how helpful it is to work on paper first for carving layouts, unless you’re a master carver like Peter Follansbee that is. If you’re working out a new layout that you’ve never done, it’s vital. If nothing else, you have to figure out what your layout lines are going to be. Once you get that, the rest is fairly easy, but it’s not always easy to tell what you need by looking at a finished piece. Sometimes you can see the faint leftovers of scratched lines for layout that will give you clues like the S scrolls I worked out before.
I did notice that after my first panel, the second panel layout flowed out quickly and without any fuss, so I can tel that practice and experience will quickly eliminate the need for the paper eventually. Until then, I plan on sketching a lot before I start.
Once I had the pattern worked out, and the guidelines established I was able to scale it down to my boards. This one came down to a simple rectangular grid, and layout was a snap because it was simple division of space not complicated measuring. For this one it was, set in a border with the marking gauge then divide the remaining space into half length and width, and then subdivide the spaces again. You can see in step 1 below what I ended up with.

Carving Progression from Layout to Finished
To set the pattern into the wood I took a variety of chisels, and matched the shapes to my sketches and set them straight down into the wood with a sharp rap of the carving mallet. Matching curves to chisels is the key here, and once you get it established it goes quickly. I got into a groove where I would hit one mark, and then repeat it down the line of the pattern.
Once I get the whole pattern set in (#2) I start in on the background with a couple of small slightly curved chisels to scoop out roughly the background. I’m not looking for super flat, just a good clean line around the pattern. I quickly realized I had to be ambidextrous quite a bit to make all the cuts safely, but after a bit of practice it soon became second nature. The biggest trick was making sure that I was cutting the right direction, and trying to accommodate the grain. I got pretty good at the first, and a little better about the second. You can see in #3 what it looked like about half way through.
Once I’m happy with the background I took my homemade texture punches, and worked the background. It really makes the flat strap work pop out then, once you texture the background. Also, this is why you don’t really need to have a perfect background for this, because the punch takes care of any minor bumps.

The Finished Panels
As for the rest of it, the ends are Oak, and the handle is a bit of Walnut scrap I found in the shop. I decided to give it some interest by shaping the handle sort of inspired by the Greene and Green or Craftsman styles. It was also partially an excuse to use my new Lee Valley spokeshaves to be honest, but I am pretty happy with the result. The shape of the ends didn’t turn out the way I was hoping, but it’s not too bad. I would do it differently if I did it again.
The whole thing was dovetailed together, and a the bottom is a bit of 1/2″ Oak left over from another project set into a rabbet on the bottom boards. The less said about the dovetailing the better, since I managed to botch it a couple of small times, and one major blunder I had to fix that almost ruined the whole piece. Simply put, I really need to pay attention to my marks to match the sides to the right end piece. Sigh.
I applied a simple spray coat of clear Shellac to finish it since I wanted something that was simple, easy and fast (it needs to be in service asap) and I could renew it if I needed to. It’s meant to be a functional piece, so I didn’t put a lot of effort into a glassy mirror smooth finish, which would be silly for a tool box anyway.

Finished Tool Tote - 3/4 view

Finished Tool Tote - side view
All in all I’m pleased with it, especially the way the carving came out.
Badger
Carving in Alder
Hope everyone had a great holiday season, and is looking forward to a grand year of hand tool woodworking! I am through the marathon that is my family’s Christmas and Birthday (3) bonanza, and putting my mind towards some woodworking again.
While I was at the Hand Plane Essentials class in Port Townsend we worked in some local Alder wood supplied for the class by the instructors. We were each given a rough sawn plank to work to a finished board through a series of planing techniques. We then took our plank home proudly to show our spouses what we had spent all that money on. :) I also grabbed a couple scraps for testing on carving since it felt like it might be a decent carving wood.
My plank will be come the sides of a toolbox tote I am building, but I did spend a little holiday time testing out the carving tools on the Alder.
Things I learned about Alder wood:
- You need sharp tools (duh).
- It chips out fairly easily.
- It carves really easily.

Test Carving in Alder wood
I discovered pretty quickly that my larger V tool was a little dull. You can see how it crushed the wood fibers, rather than cutting. I pulled out my quite sharp smaller V tool for a similar test and it cut nicely and cleanly. I then did a little gouge work (lower edge) and some low relief work with punched background like I am hoping to do on my toolbox.
I think the test results were encouraging enough to proceed with the carving, although I’m a little nervous about the V tool work. I’m considering a layout that is heavy on the low relief method, and keeping it simple. We’ll see.
Right now I have the sides smoothed, rabbeted on the bottom edge, and sized perfectly. I have a scrap of hardware store 1/2″ thick Oak that will work as the bottom, and I’m probably going to use some Oak for the ends. For the handle I’m thinking of using a little bit of Walnut. Most everything will be carved just so I can get more practice in a variety of woods, and to decorate my toolbox marking it uniquely as mine.
More to come including some thoughts on how to sharpen a V tool.
Badger
You must be logged in to post a comment.