Posts in Category: carving
Tool chest progress, Lids and Trays
Tool chest project: Part 1 – Part 2
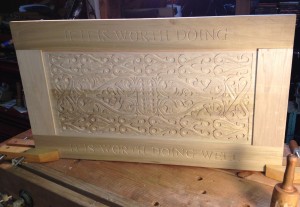
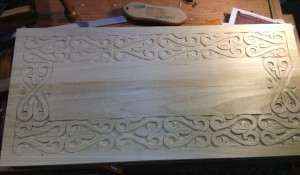
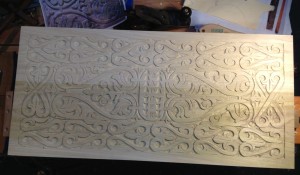
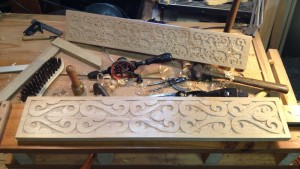
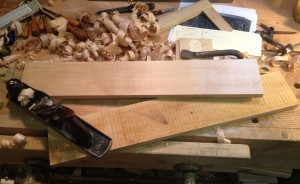
I’ve been making slow but steady progress on my tool chest. Â I glued up my panel and frame lid, and it turned out quite nicely.
The next step for the lid is to dovetail and attach the lid skirt aka the “dust seal” and put the hinges on. Â I’ve been taking a little bit of break from the lid, to work on the tool trays a bit. Â I had to stop work on the lid because I realized I didn’t have clamps long enough to put the right kind of pressure on dust seal. Â Besides, I like carving…
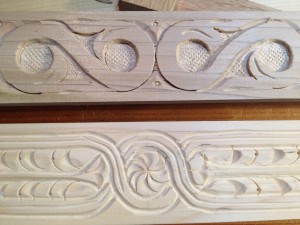
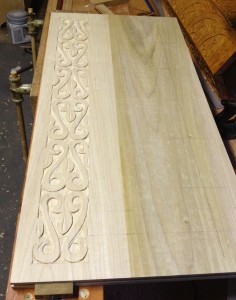
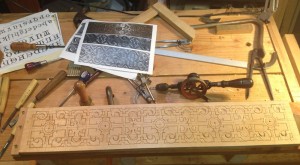
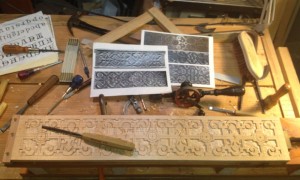
The top two trays will be shorter, with the bottom tray much deeper. I am trying out some of long thin patterns that normally go on the thin stiles of chests in 17th century style carving. Â The S Scroll should come as no surprise, it’s common as dirt on most carved items from the period. Â This is primarily due to (in my humble and increasingly practiced opinion) it’s incredibly flexible nature. Â You can fit it in long thin areas, wider long areas, or as more elaborate center panel design. It stretches, and scales nicely into lots of spaces, unlike strapwork or guilloche type carving which requires a more careful layout approach. Â It’s also a relatively simple pattern to carve, especially when your tool kit is more limited. I’ve even seen chests that use primarily if not exclusively the V tool to carve all the scrolls.
The second pattern is a new one for me, that I quite like how it worked out. Â It’s based on the vertical stile (I hope that’s the right term, I get my muntins and stiles mixed up) on a Thomas Dennis or William Searle chest at the Met. Â It looks floral which was common, but I keep thinking of it as a feather.
Hoping to get some quality time in the shop this weekend, but I might end up playing with Legos with my son. Â Tough job sometimes, but it’s got to be done.
Badger
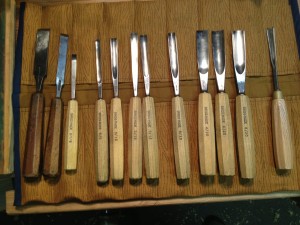
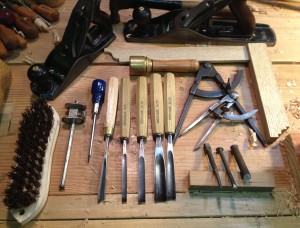
My carving tool kit.
As I was working on the carving for my tool chest lid, I was struck by how few chisels I actually use and how much I get from them. Â I’ve seen photos of carvers who have vast amounts of chisels in their arsenal, and I am always a little jealous of those people. Â However, at $35 – $50 a pop for mid range chisels, it’s hard to justify that kind of expenditure for my hobby.
I originally started with six chisels, and have added a few here and there. Â My initial purchase decisions were based on Peter Follansbee’s recommendations, and this gave me a very solid and flexible starting set. Â To this initial set, Â I’ve added a couple of straight chisels that I got in a lot of tools I picked up somewhere. Â They were straight sided and with decent steel so I reground them to be flat carving chisels. Â I usually only use them for outlining the outside of a pattern, so these aren’t must haves. In fact, I could probably get the same out of my bench chisels.
I also added a small flattish gouge for relieving the background, the 5/8 does a great job of getting into tighter spaces than the 12’s do for some of the patterns. Â I also added couple of different curved gouges to fill in some of the gaps, but they are not used as much as my core set.
I’ve also upgraded my V tool from the Pfeil to a Auriou version from the Chris Pye set that Lie Nielsen is selling now.  The V tool is very important, and the Auriou is very comfortable to hold and use.  If you want to get into it you can read a lot of good stuff from Chris Pye and Mary May on the V tool, it’s worth spending the time to understand this tool.  It’s also worth the time to practice A LOT with this tool to build the muscle memory and comfort level, something I’m still working on.
In the style of carving I do, you can get a lot of mileage out of a few curved gouges and it’s really hard to go wrong with Peter’s original suggestion and build from there. Â My next purchases will probably something in the 7/12 range to give me a smaller gouge for outlining.
Badger
Tool chest progress, finishing the lid.
Previous post on tool chest here.
Made some progress on my tool chest this weekend. Â I’ve been plugging away at it slowly since I brought it home from my class in Port Townsend.
First challenge was fitting the beast into my small shop, which is really just the back end of a two car garage that is full of boxes of stuff. Â I was worried that it wouldn’t fit, and I’d have to dance around it to get anything done until I totally re-arranged everything.
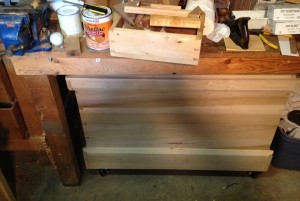
Luckily it just barely fits under the grungy shop workbenches that came with the house. Â With room for the lid.
With that sorted, I was able to turn my attention to the lid, which was still un-assembled because I wanted to trick it out with some carving. Â My understanding is that traditional chests were plain on the outside (because they get beat up a lot) and the underside of the lid and inside were usually prettied up with marquetry, and fancy veneer and the like. Â Since I can’t do any of that I thought I’d do some carving, like I like to do.
It started as conversation at the tool chest class, about how Peter Follansbee used some of his sample carvings for the runners inside his chest. Â One thing led to another and I decided to carve the underside of the lid, the tray sides, and possible the runners as well. Â You know, just to show off. 🙂
Here are some progress shots of the lid.
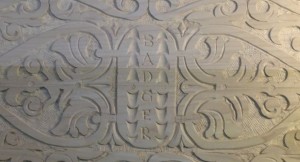
I had some thoughts around the design of the outside edge of the frame, but it had taken quite a while to get to this points, so I was thinking of a few different options including calling to good enough.  I’ve been re-reading the Joiner and Cabinet Maker and a quote from Thomas jumped out at me.  So I carved it into the upper and lower rail to remind me to slow down and do it right.
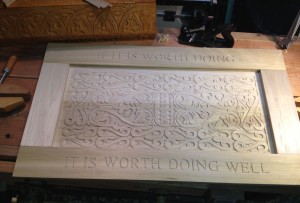
Frame and panel for the lid. The frame is just laid on top of the panel, just to show how it would look.
To get the lettering right, I printed out the words in 2″ on my inkjet and cut them out in rows. Â Taping this to the frame rail with blue painters tape I went over each letter with a pen to impress the outline into the wood underneath. Â Followed by a pencil to outline the edges, which gave me a guide to follow with my V tool. Â I have never done lettering like this before, but I have been carving for a while now so I went with my instinct and put tool to wood. Â It worked out well, and I was actually pleased with how it came out. I found an article later that says I figured it out pretty well.
Next step, fitting the panel into the grooves of the lid (it’s being stubborn about it right now, so I need to trim some edges), and gluing everything together. Â Not sure if I’m going to finish the underside of the lid though, it really wants one but I’ve heard that is a bad idea. Â Maybe just some clear shellac?
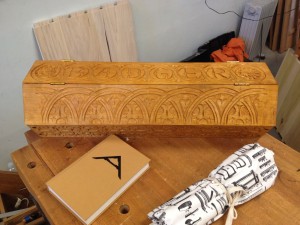
Travelling Hexagon toolbox – Finished!
See Previous installments on this project here:
Part  1 - Part 2 - Part 3 - Part 4 – Part 5
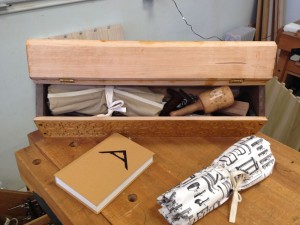
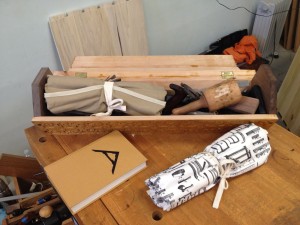
Here are some glamour shots of the Hex toolbox where it debuted at the Port Townsend edition of the Anarchist Toolchest class by Chris Schwarz. Â It was a great time and I’ll post about that next.
All in all I’m pretty pleased with how it turned out, and how it was to work out of at the class.
Badger
Travelling Hexagon toolbox – Part 5
See Previous installments on this project here:
Part  1 - Part 2 - Part 3 – Part 4
It was buckle down and get this done time in the Badger Woodworks shop, so I didn’t take a lot of pictures of the final stages. Â If there had been it probably would have been me looking confused and sweating a lot. Â I did all right in my high school geometry classes, that’s not the issue here, it’s more of how long ago those classes were. Â I had to puzzle my way through some basic “math” on the final stages of the box was mostly victorious. Â It didn’t help that I was rushing to finish, and it was pretty dang hot outside making the “workshop” aka small section of a crowded garage pretty stuffy.
Regardless of those massive challenges (first world problems for sure) I was able to persevere and triumph. Â For varying definitions of the word “triumph”.
After lots of working planing, and copious use of a drawknife at the end, I was able to get the angle set on all the boards. Â At this point I discovered a potential issue. Â The thickness of the boards were not even. Â This meant the inside width post chamfer was not consistent and would cause issues with the hexagon shape. Â I briefly flirted with the idea of planing the four thickest boards down, but I was running short of time (and daylight) so I opted to use my moving filister plane to just do the ends. Â I struggled a bit with getting it even and consistent (see a later blog post on how Chris Schwarz helped me fix this) but eventually got it roughed in enough to move on to the hexagon.
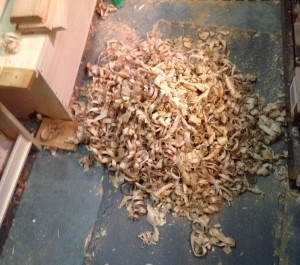
At this point I was I tired of stepping on shavings, and swept up a bit. I was tempted to call the kiddo down to get pictures of him jumping in the shavings like a pile of leaves (it was that big) but I didn’t want to lose him.
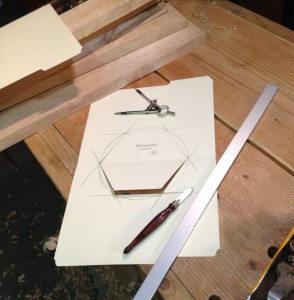
To make the end pieces I measured all the inside widths of my boards to find the minimum width. Â They were close, but I knew I would have to get them even, fitting this to the smallest one. Â Then I took this length, set my compass to this and drew a circle on a manila file folder which I have a big old stack of from a previous job. (They are really handy for making templates and stuff in the shop.)
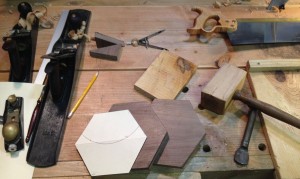
Now that I have this, and double checked it against the work as best I could, I looked around the shop for some wood that I could use. I had a small piece of walnut board left over from a previous project, and decided to use it. Â I had planned on using my pine boards, but it felt like a crime to cut into these 12″ boards for a small project. Â The walnut was really close to the width, which meant less sawing too, so there you go… lazy wins again!
I cut the hexagon on my bench with a crosscut saw plenty wide of the line, and planed it flat taking real care to watch the grain direction on the four sides that were angled across the grain. Â I left the whole hex a bit proud of the line so I could fit it later.
At this point I started laying the ends to the work on panel at a time. It was getting late, so I didn’t take any pictures past this point because I was in a hurry. Â I started by laying it to the bottom board (the one with out carving, and fit the width of the face to the inside edge. Â This I nailed down with cut nails after holding it up with wooden clamps. Â From here I worked my way around the back edge, fitting each board to the edge of the corresponding hexagon edge and adjusting the long edge to fit each time. Â With varying degrees of success. Since it was late, and I was rushing I opted to skip glue and just use nails so I could revisit this later if I needed to. Â After I nailed the two bottom carved panels forming the bottom of the box, I moved onto the top.
In the Toolbox Book by Jim Tolpin, he used a leather strap around the outside. Â I didn’t want to cover my carving, so I opted for small brass hinges to connect the three top panels. Â It was a little tricky working with the angled faces but in the end it was simple matter of installing the hinges. Â The hardest part was fitting the three hinged panels to the bottom boards because it was tough to hold them up with everything falling over.
Then it was slap a coat of amber shellac, and go to bed for a really early wake up to get on the road to the Toolchest Class in Port Townsend.
I’ll post final pics in my next post.
Travelling Hexagon toolbox – Part 4
See Previous installments on this project here:
The deadline (self imposed) for this project is coming up, and I needed to make some serious progress this weekend. Â I’ve been busier than my normal level of insanely busy at work due to a “restructuring” that saw 50 people laid off, but my group got three additional people from other groups so I had to get them integrated and up to speed. Â So, extra levels of chaos at work and mental exhaustion means I didn’t get anything done last week like I wanted to.
Fortunately this weekend I had some clear space and an accommodating wife who sent me down to get it done. Â On Saturday I knocked out two complete panels as well started chamfering the edges for the hex shape.
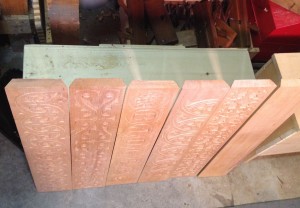
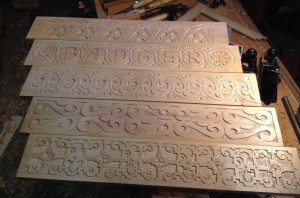
Here is a shot of the finished panels and the the sixth panel will be the bottom, and won’t get decorated.  The order completed is first on the bottom with most recent at the top.  I got more comfortable as I went, and feel like my first panel was the worst in term of ease and final product.  Starting at the bottom, they are arranged in order of completion.
The one with my nickname on it will be on top, and presented a unique challenge, lettering. Â I have never done anything like that before, and didn’t have a clear idea on how to do it. Â But, I kind of made up my letters based on a mish mash of times new roman, and some letters I saw carved on a chest from the 16th century. Â Turned out ok, I suppose.
The top pattern is totally new to me, and is from a partial pattern of a wainscot chair back that I had in my photo collection that I believe came from museum shot from Peter’s Blog. Â The pattern was pretty simple to layout with three of my collection of dividers, and I like how it came out. Â It works pretty well in the relatively soft Alder I’m working in, since small details can be fragile in this wood.
Last night I had gotten the 30 degree bevel planed on three panels so far, but that was enough for one day. Â Today I got back to work on the bevels, and thankfully for my sore back learned a new lesson.
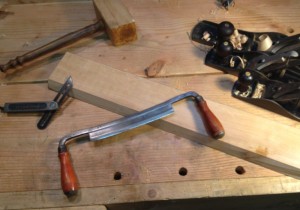
I was spending 30-40 strokes with the #5 fore plane set very aggressive. Â I was working up a serious sweat, and my back is sore from yesterday. Â I thought there has to be a better way, and then I remembered my old drawknife. I bought this back in the beginning of my woodworking adventure, and never really found a use for it. Â Today I learned the lesson, don’t forget the old tool. Â The drawknife takes aggressive cuts easily, and I was able to hog off the waste in a few dozen strokes with a lot less effort. Â Then a few passes of the #5 and #7 planes and done.
I think I can get this done in time to take it to the Tool Chest class out in Port Townsend. Â I’m hoping to use it to carry all or most of my tools I want to take to the class with me. Â We’ll see how many fit once I’ve actually got it together.
Travelling Hexagon toolbox – Part 3
See Previous installments on this project here:
Today saw the completion of the third panel for my toolbox project, which I am pretty pleased with. This pattern is based on the work of Peter Follansbee whom I owe a great debt of gratitude to for his blog, and his heavy emphasis on authenticity and style.  He has done a great video on this exact pattern, which I believe is based on a pattern from a William Savell box from sometime in his life 1590 – 1669 which you can see here: http://pfollansbee.wordpress.com/2009/04/30/seventeenth-century-carved-boxes/
I took some liberties with the pattern, making it my own which was partially dictated by the tools I have and width and characteristics of the Alder. Â Based on all the images I’ve pored over, comparing patterns by the same maker, or from the same shop I think this is pretty much how the period craftsman did it.
This pattern is laid on a square grid due to the arcs that are the basis for this pattern. Â To find this scale, I laid out the long center-line, and the short center-line as usual, and used my dividers to find a spacing that worked which took a few tries to get right. Â I started with one point in the center and put the other near the top in what looked like a decent border for the edge. Â The first attempt was somewhere in the neighborhood of 1/2″, and when I walked this down the length to the end. Â The first attempt ended up roughly halfway to the end, so I adjusted the arm a little bit, and did it again until I found a measurement that looked right at the end and the top margin.
Pricking the top and bottom margin first, I used my marking gauge to set these in with the scratch point. Â Then I walked this out again along the center-line, pricking the board deep enough to leave a mark. Â Finally I used my square and awl to scratch a line at each of these points to complete the layout.
To create the arcs, I picked a point along the center and with my dividers scratched a half circle onto the top half. Â Leaving the point in the wood I scratched the bottom half, then repeat all the way down doing the top and bottom half. (Really, go by Follansbee’s video, he does a better job explaining this).
Then I pulled the arms in a little judging it by eye what would look good, and struck a series of arcs inside the first arc. Â This is my main outline for the circular bits which I followed the scratch lines with my V tool going down the line, stopping at the center line as seen above. (I snapped the picture showing the little pigtails that get left behind as I went down the line.)
Next it’s a simple matter to set in the fleur portion at the points where the half circles meet. I used small deep gouge first for the underside of the fleur, then followed by a bigger slightly less deep gouge to make the leaves. Â Remove the background with a small flat gouge, and bevel the outside of the top arc. Â Finish with the texture punch on the inside, and add come half moon gouge cuts to the top, followed by a nail punch accent just for kicks.
Here are the tools I used in this carving.
Three more panels to go!
Travelling Hexagon toolbox – Part 2
Since I had finished up the previous panel last week, I started on the second panel while taking a break from the family that had invaded our house. Â Invaded is a bit of strong word, since I do enjoy their company but I wanted to make some progress on this project. Â I didn’t spend much time documenting this one, so all you get is my finished photo this time.
You can see the previous panel in the back, and the new S-Scroll panel in the foreground. Â I will be doing a different pattern on each of the six panels for this project just for fun, and showing off. Â Also, to get more practice at each of these styles.
Speaking of practice, all the effort I had spent on previous panels paid off this time. Â I started out with my standard scribe lines and thought I was going to do a different panel, a sort of “arcs and fleurs” pattern. Â However, I realized I had laid it out wrong! Â But I was able to simply switch to another pattern since many of them share a common layout of rectangles. Â The other pattern will be next, and I’ll be a little less cavalier about the layout this time.
The S-Scroll pattern I did here was a simplified version of a pattern I had done before, and was dictated as always by “the point of the tool”. Â I had laid out the rectangles, evenly divided by finding my center lines both vertical and horizontal as well as eyeballing a good margin. Â Then I stepped off from the middle with a pair of dividers till I got something looked about right. Â The ease in which I am able to do this (once I had let go of my ruler) has absolutely convinced me that its what craftsmen of old did. Â It just makes sense and is quite efficient with surprisingly little practice.
After finding the center line of the rectangles I marked some arcs with a divider to mark the end of the S shape. Â Then I picked up chisels till I had one that fit the arc well enough, and struck the half circles in. Â Then I sketched right on the wood to get an idea of how it would look, and then started fitting chisels to the sketch. Â The outside lines are struck in with chisels, and the center of each S is done with the V tool. Â All in all I used about 4-5 chisels of various sizes and curves to set in the outline, Â and two flat gouges small and medium to relieve the background. Â Once I had the background relieved I used my home made texture punches and gave the background some texture. Â Couple swipes of the smoother and voila!
All in all I think I was down there less than two hours, which made me feel good. I was able to recover from my layout mistake and come up with a simple quick pattern and execute it in an afternoon. Â That felt pretty good, I gotta say.
Badger
New carving project – Travelling Hexagon toolbox
It’s been a rough few months in terms of getting any woodworking in. My work is going like gang-busters right now, and I’ve got a lot going on inside my head (my job is pretty mentally intensive) which is exhausting at times.
This new project is going to be part carving pattern practice and demonstration, and part functional tool box for carrying tools out of my garage. Â I’m going for one of those six sided tool boxes seen in the Toolboxes book by Jim Tolpin. Â I’ve been fascinated by that for a while, and while it might not be “strictly necessary” because I have a nice carved tool tote… I just kind of want one. Â And I wanted some more carving, so there ya go.
Starting with some Alder wood that I picked up previously from Coyote I dressed the edges and face till it was reasonably flat and true.  Since I’m going to carve it I don’t really need to make it mirror smooth, but the Alder does plane up nicely with my fore plane.  Taking the concept of the “design at the point of the tool” I placed my crosscut saw down, padded it by a little bit, and called that the length after accounting for the wood panels at the end.  I don’t really need to measure it out since I know it will be big enough for my longest travelling tool.  I won’t be able to put my longer rip saw in it, but it’s not something I usually travel with and would make it far too long and cumbersome.
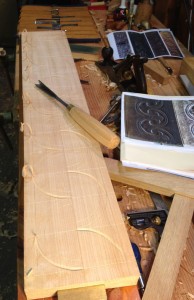
Since this will be a six sided box I’m going to do a different carving design on each side as part practice and part demonstration of period styles. Â To layout the pattern I struck a line with my awl down the middle and length. Â Then I used my dividers to pace out some divisions. Â This part is a bit subjective but as long as I base the layout from the center it tends to work out just fine. Â This design uses a square as it’s base unit so I started with a division based on roughly a half inch from the top and bottom, and then paced that out along the length. Â The first few times it was too short or too long, but I kept tweaking it until I had a nice balance between how much border it left at the top/bottom edges, and how far in from the ends it was. Â Again, no idea what measurement this is, and I don’t need to. Â I pricked the length down the board, and scratched in the horizontal layout lines with my awl and square.
You can see the starting point for one of the distinguishing features of “strapwork” with the curls. Â I was not copying a specific pattern here, but rather using a few print outs of designs from existing period boxes and chests I have in my archives. Â The I use my chisels as layout tools to set in the designs. Â This time I didn’t sketch anything out in advance as I have done in past designs, and in some ways it worked out but it was a struggle at times to work things out. Â I think I was mostly successful though, and with more practice it would be almost effortless. Â I tried it this way because I have a theory about the period craftsman I wanted to validate. Â I think they didn’t have templates and the like, they just started with layout lines and a pattern they learned from their Master or the shop, and just adjusted it to fit their stock.
I kept going along this way, figuring out the design on one of sections and then going down the line setting it in. Â Once I figured out the chisels that would make the pattern I wanted I would hold the tool in the same position and walk backwards down the board striking it in sequence. Â I picked this up from Peter’s video on S Scroll carving, and was very helpful for this longer pattern.
After that it’s time to grab my small flattish gouge and start relieving background. Â Here is where I discovered a flaw in my design. Â The little curls have a circular section in the middle that liked to pop out constantly. Â I’ve had to re-glue in almost every one as it would come flying out as I tried to carve away the background around it. Â Something in the way I struck the line, and the relative lightness of the wood.
I’ll be finishing this up and starting on the second panel in a bit, hopefully this weekend.
Badger
Center bead and some decorative carving
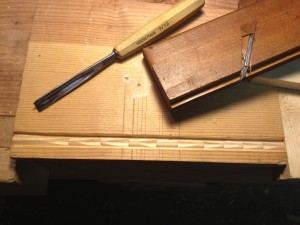
I picked up a center bead plane from Josh over at Hyperkitten Tools, and tuned it up this afternoon. Â The blade unfortunately had one of the two groove points messed up. Â I wasn’t sure if I was going to be able to fix it, but I gave it a go. Â I ground it on my coarse and medium oilstones and got the two groove blades in decent shape, but I had to take so much metal the center beading part of the blade was fairly shallow. Â I had a medium curved oilstone and was able to take some metal away in the center, while keeping the rounded area sharp.
Putting it into the plane body though, the blade profile did not match the sole any more. Â I took a risk and planed the boxing down slightly with my smoothing plane. Â It brought the profile back into a decent enough match, and putting it too wood it cut a decent bead.
Which brings me to the decorative molding carving, which was why I bought this plane in the first place. Â I was surprised at how easily this carved, even in crap Pine. Â The molding is something I picked up from Peter Follansbee, and it’s really quite easy. Â A straight vertical stab down with a gouge that matches the bead, on the center of bead. Â Then a downward sloping push cut into the back of the stab cut and out pops a little chip. Â Repeat this down the length of the bead evenly spaced in a single direction, or in opposing direction and you have a great decorative molding. Â It does some near stuff with light and shadow.
Badger




You must be logged in to post a comment.