Posts in Category: woodwork
Starting a new project for some drawers in pine.
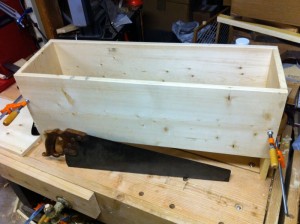
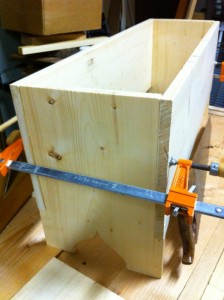
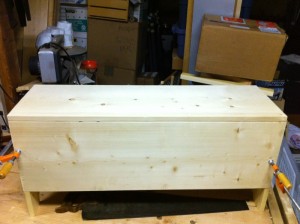
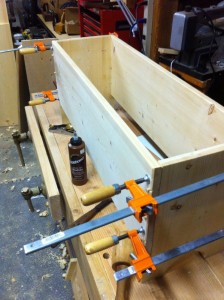
 Starting a new project in the shop after some downtime. I wanted to work on a couple skills, and try out a few new ones, so I grabbed a left over pine board (with knots, and voids, and all) and set out to make set of small drawers for my wifes sewing room.
Last night I fit the last two corners of dovetails, and it went together pretty well. This is a minor miracle for me really, as I’ve had a hand of these simple dovetail project go awry at this point, so I was very happy to see this come together. I used a much improved marking system to make absolutely sure I had lined it all up right this time, and not repeat the mistakes where I cut the pins on the wrong side, or similar rookie mistakes.
Some of the things that worked well this time:
- Using my new marking knife from Blue Spruce.
- Cutting to the line.
- Simple layout of tails with a divider to step it out, and the Lie Nielson dovetail marker.
- Sharpening and stropping my chisels before I set to work.
- Cutting the waste out with my bow/turning saw right to the line.
All in all I was pretty happy with things, except for the two times I cut my self on my chisels. I did this over two different evenings, and in true “Underhill” style managed to nick my fingers both times with the super sharp chisel.
Next steps are going to push me into new areas. I’m going to make this a three drawer chest (with a little luck, and hopefully some small amount of skill). I’m going to cut some dados and build out some drawer supports. If all goes well, then I’ll start building some drawers for it, and maybe even carve the fronts with some strapwork designs I’ve discovered.
Badger
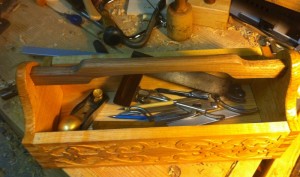
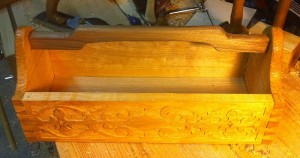
Carved Tool Tote finished!
When I took the class out at Port Townsend on Planes, we all came away with a nice plank of air dried Alder wood that we had taken from rough stock to finished width over the course of the class. Tim, Jim and I were talking about how it might carve, and I set out to find out. Not content with simply carving a panel, I decided to make something useful out of the plank. And for the record, it carves beautifully!
I’ve been wanting to make a tool tote to carry tools to my sons preschool where I do work from time to time. Plus, I wanted to have something to take stuff to Port Townsend classes other than a cardboard box or something. Something with a little class that showed off some of my skills as a woodworker (or in the case of my dovetails, the lack of skills, but shhhh… on that.)
Looking around I found a nice “strap work” pattern in my inspiration folder, and started out with some pencil and paper to work out the layout. That took a bit of doing, but I finally got the basic lay out. I cannot stress enough how helpful it is to work on paper first for carving layouts, unless you’re a master carver like Peter Follansbee that is. If you’re working out a new layout that you’ve never done, it’s vital. If nothing else, you have to figure out what your layout lines are going to be. Once you get that, the rest is fairly easy, but it’s not always easy to tell what you need by looking at a finished piece. Sometimes you can see the faint leftovers of scratched lines for layout that will give you clues like the S scrolls I worked out before.
I did notice that after my first panel, the second panel layout flowed out quickly and without any fuss, so I can tel that practice and experience will quickly eliminate the need for the paper eventually. Until then, I plan on sketching a lot before I start.
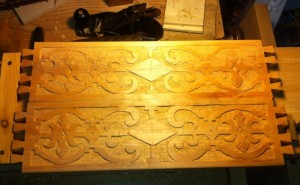
Once I had the pattern worked out, and the guidelines established I was able to scale it down to my boards. This one came down to a simple rectangular grid, and layout was a snap because it was simple division of space not complicated measuring. For this one it was, set in a border with the marking gauge then divide the remaining space into half length and width, and then subdivide the spaces again. You can see in step 1 below what I ended up with.
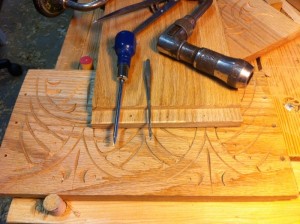
To set the pattern into the wood I took a variety of chisels, and matched the shapes to my sketches and set them straight down into the wood with a sharp rap of the carving mallet. Matching curves to chisels is the key here, and once you get it established it goes quickly. I got into a groove where I would hit one mark, and then repeat it down the line of the pattern.
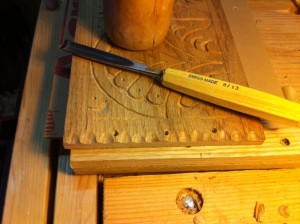
Once I get the whole pattern set in (#2) I start in on the background with a couple of small slightly curved chisels to scoop out roughly the background. I’m not looking for super flat, just a good clean line around the pattern. I quickly realized I had to be ambidextrous quite a bit to make all the cuts safely, but after a bit of practice it soon became second nature. The biggest trick was making sure that I was cutting the right direction, and trying to accommodate the grain. I got pretty good at the first, and a little better about the second. You can see in #3 what it looked like about half way through.
Once I’m happy with the background I took my homemade texture punches, and worked the background. It really makes the flat strap work pop out then, once you texture the background. Also, this is why you don’t really need to have a perfect background for this, because the punch takes care of any minor bumps.
As for the rest of it, the ends are Oak, and the handle is a bit of Walnut scrap I found in the shop. I decided to give it some interest by shaping the handle sort of inspired by the Greene and Green or Craftsman styles. It was also partially an excuse to use my new Lee Valley spokeshaves to be honest, but I am pretty happy with the result. The shape of the ends didn’t turn out the way I was hoping, but it’s not too bad. I would do it differently if I did it again.
The whole thing was dovetailed together, and a the bottom is a bit of 1/2″ Oak left over from another project set into a rabbet on the bottom boards. The less said about the dovetailing the better, since I managed to botch it a couple of small times, and one major blunder I had to fix that almost ruined the whole piece. Simply put, I really need to pay attention to my marks to match the sides to the right end piece. Sigh.
I applied a simple spray coat of clear Shellac to finish it since I wanted something that was simple, easy and fast (it needs to be in service asap) and I could renew it if I needed to. It’s meant to be a functional piece, so I didn’t put a lot of effort into a glassy mirror smooth finish, which would be silly for a tool box anyway.
All in all I’m pleased with it, especially the way the carving came out.
Badger
Training a young apprentice
It’s been a really brutal month at work, and I haven’t had ANY time to get into the garage. However, the Thanksgiving holiday is upon us, and I finally have a little time off. While at the local Harbor Freight store picking up some extra dividers, and a set of number stamps I saw a Kids Tool kit for like $15 and had to have it. The only really useful thing in the kit was a small hammer, but the hat goggles, and suspenders were fun for him to play with.
This lead me to something I’d been thinking about for a while, how to do teach my kiddo how to work the wood, and when to start. I’ve decided to start now, even though he’s not even four yet. I’m going to start by teaching him a tool at a time, like a true apprentice. The first project will be a small tool tote in Pine for him. I’ll do the cutting and stuff, but he is going to do the nailing part. And he’ll get a hammer to put into it. After that we can work on sawing, and other tasks.
Badger
The “Anarchists†Saw Bench Box Part 2
One of the key elements of this box that drove me to use the word “Anarchist” as an homage to Chris’s book was this sliding drawer/tool trays. I was intrigued with how they worked, and how they really added to the tool holding awesomeness of the “Anarchists Tool Chest” that he builds in the book. Part two of the box build tonight was adding one of those tool trays to my saw bench box.
It’s built from Pine with an Oak bottom for durability, and increased wear. There are two strips of oak nailed to the inside of the box that act as rails for the tray to slide back and forth. It also introduced me to one of the really nice benefits of using cut nails in your work. I put the first nail in and it projected a tiny bit through the other side of the wood. I thought it would clear, but I was wrong. So I pounded that one back, and used some nippers to cut the rest of the nails a little shorter. The iron on traditional cut nails is not hardened like most modern day nails, so this is an easy step. Plus, you’re already pre-drilling the holes for the nails, so the fact that the tip is slightly less pointy (and still square) doesn’t make a bit of difference.
The tray itself is simply a box. I had started out with a simple rabbet on the ends of the sides, but when I mocked it up, it was off a bit in size by being too deep, and too narrow. So I changed course and set up my Stanley #45 to cut a long rabbet along the bottom of hold the tray bottom. I nailed it together with some cut nails, and trimmed up the edges to fit smoothly in the chest.
One thing that was nice about tonight’s work was how confident I felt about what I was doing. I’ve been banging around the shop for a while now, but tonight it didn’t feel like I was flounder, I almost felt like I had some of this stuff down. I have a LOT to learn for sure, but it was nice not to feel so lost every time I picked up a tool.
It’s now in it’s home up against the MDF workbench the came with the house. I don’t use that bench for much now that I’ve gone all hand tool and stuff, mainly because it’s way to high for proper use of the planes. It can be shoved under if it’s in the way, but it’s mostly going live there so I can easily get my saws out as needed. It also makes a comfortable seat to sit on while contemplating my next move, something I’ve tried to do more of as I build my skill set. Rather than launching into the next step, planning and thinking it out so I can be sure to do it right the first time.
Plus when my three year old son comes down to hang out with Daddy, he can sit on it while watching. Which usually last about maybe 60 seconds before he’s up and touching things.
Badger
One thing that was nice about tonight’s work was how confident I felt about what I was doing. I’ve been banging around the shop for a while now, but tonight it didn’t feel like I was flounder, I almost felt like I had some of this stuff down. I have a LOT to learn for sure, but it was nice not to feel so lost every time I picked up a tool.I nailed the box together
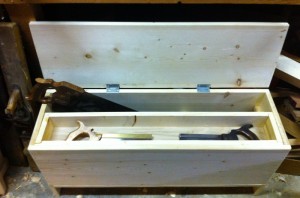
The “Anarchists” Saw Bench Box
Apologies to Mr. Schwarz for tagging onto his book title, but I felt it was appropriate. I’m a good way through a project that I’ve drawn the inspiration from his fun essay on tools as well my own personal research into historical forms.  It’s also very fashionably “on trend” with the use of nails, bonus! For the record, I started this project before Adam’s nail seminar at WIA, so I get credit for being ahead of the curve, right?
The basic concept of this project is Saw bench + Saw Storage + Historical Recreation = Saw Bench Box?
Since moving my tools into my rolling tool box, the only things that didn’t have a real distinct home were the Saws, and the Molding planes. I cast about for different ideas for storage, including possibly a saw till based on some of the designs that were all the rage for a while with the bloggers. (Any one noticed that these projects come and go in waves? Kind of interesting if you ask me.) However, I don’t have a lot of free wall space for hanging anything due to the nature of my shop. I was cruising the Marhamchurch Antiques site for carving inspiration when I was given a jolt of another kind of inspiration. The old style of chest, storage box known as the “Six Board Chest” would actually be a great way to store the saws I have. It could replace my existing rickety saw bench (I rushed the construction, and paid for it in a sloppy piece of work) It could store my saws, and as an added bonus I get to do a recreation of historical forms of boxes, always a plus for me. I studies a lot of pictures, settled on a design, and went for it.
Key elements of this project that I wanted to work on:
- Deliberate and steady pace of work
- Clean cuts, and extra care in getting the fit right
- Only hand tools would be used
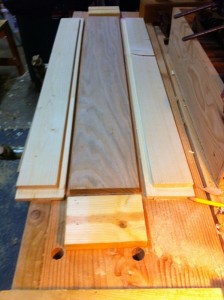
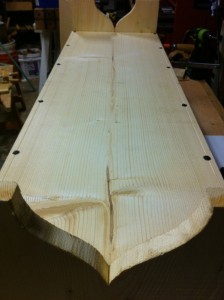
I found a few boards of relatively flat, and somewhat knot-free Spruce in the 1 x 12 size range, and started mapping out my cuts. I had to get 4 boards of 6 foot boards because all the 8 – 10 foot boards I found were simply AWFUL looking.  I’ve seen better boards in the garbage than what I was finding at all the hardware stores in my area. Unfortunately, the lumber yards are all closed on the weekends here, which makes it difficult to get wood sometimes.
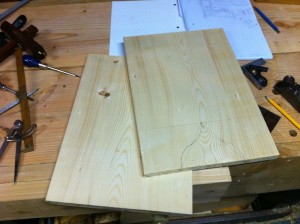
First step was laying out the end boards, as the rest of the boards were simple rectangles. These boards really needed precision to make the rest of the box come together flawlessly. For the height, I measured the height of my current saw bench which fit my knee just about perfectly. The width is the width of the lumber stock for the base + top. There is an inset on the sides that is sized to the side boards width, and height. The cut out is a simple Ogee shape, scribed with compass to be pleasing to the eye.
This was where I made my only major mistake of this project. Somehow I measured (twice) the width of the board for the cut out, and proceeded to make it too long anyway. I had to glue a couple blocks back in to make up the difference, but it came out just fine after that and I haven’t made any serious flub’s since. Luckily I had only cut one end board before testing it, so I was able to fix my measurements for the second end board. Ooops.
The length of the sides of the box are determined by the length of the saws, plus little bit for getting my hand down in there. Also, it helped to pick a length that was pretty close to half the length of the boards I had been able to find in clear(ish) pine.
I spent a lot of time juggling the sides in and out of the clamps, making sure every thing was square and fit perfectly. I could have just slapped it together, but I wanted to spend the extra time to make sure all surfaces co-planer, and smoothly planed even the end grain. I’m glad I did this, as it really made a difference in the fit and finish of the final box.
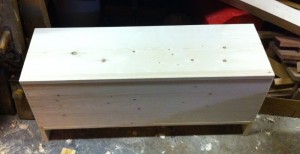
The lid was sized to the box length, and made to fit exactly as I could, so that there was no overhang that I could saw into easily. I wanted to make this as close fitting as I could.
One area that I wish I had maybe done a little different was joining the sides. After I finished the case with doweled glued joints, I had a thought that it would have been much easier to rabbet the side rails for a better fit (it would hold it self square much easier, and the pegs were a pain to put together. I could and should have just nailed the thing together. I really over thought this part, and after I was done, and looking at doing the same with the bottom, I figured it out. Live and learn I guess.
The bottom was much easier to simply nail down, after I had that revelation. Ordinarily I would have used my cordless drill here, but I opted instead to use a reconditioned eggbeater drill with a twist drill bit.  It worked so well, I was able to finally cut the cord (pun intended) on my use of the power tool. A quick hammer job, and voila! Bottom done. I think there is more than enough holding power in the nails to stand up to the test of time. If not, it’s easily replaced.
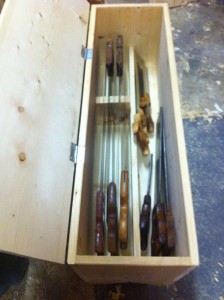
For the inside of the box, I’m making a set of dividers (I had made two last night, but one snapped in half on me at a weak point) to keep the saws in place. I test fit the single one, and it works well enough that I’m thinking of just using one in the middle. I’ll put a couple small risers to keep the bottom from getting chewed up, probably just a couple oak strips tacked in for easy replacement later.
Next step is to put a sliding tool tray in the top for additional storage. And apply a couple coats of Amber Shellac for some protection and color.
A couple questions you might be asking yourself right now…
You said something about molding planes? And perhaps, how is this anything to do with the word “anarchist”?
To the former, I had intended to put the molding planes on edge along the other side of the bottom, like in Chris’s tool chest, but they took up too much space. Also, I had more saws than I thought I had originally. Plus it would have interfered with the tool tray.
As for the “Anarchist” question…Â I looked the the book as a “call to arms’ as it were to think differently, to think past the standard knowledge of today, and apply a different perspective while keeping with some of the ideals of our theoretical craftsman fore bearers.
This box is not a new idea, but it’s a different application of an old idea. It’s a standard design six board chest, but it’s also built to store saws as well as be a saw bench for those saws. It combines several sound ideas into something that fits well in my shop. Is everything that Mr. Schwarz puts forth in his tome to be treated as Gospel? I highly doubt that is what he intended. I feel that he’s trying to get us to think past the dogma (flat backs on chisels anyone?) and apply some reasoning to the things we do. The book is really just his opinion, well reasoned, and well put forth, but from his world view.
— Badger
As a side note, the box makes a very comfortable seat as I sit and ponder the right way to tackle a problem. I had barely built the thing, and I was already sitting on it, holding a tool in my hand and thinking out some problem.
A few thoughts on nails
** EDITED POST – Added link to TFWW Nail Shop **
Recently there have been a few posts around the the blogo-sphere, the best being on the ever fantastic blog Village Carpenter, about the WIA class on nailed furniture. I recently had a similar revelation in my shop while working on my “Anarchist’s Saw Bench Box” (more on this later) about the use of nails.
I had spent an entire evening of my precious time wresting with a series of doweled joints for the side of the box, and was prepping for doing the same thing for the bottom of the box. It struck me then, that all the effort and wrestling and balancing of the boards didn’t seem very efficient. What would have my theoretical counter part have done in my stead?
He would have nailed the damn thing down and have done with it.
I think we tend to over-complicate, and over-analyze the methods of work they used, and focus entirely too much on the show piece joints. The fascination with dovetails leads us to use them in places that are more than is needed. People spend hours and volumes of words debating angles, and tails vs. pins when our craft ancestors would have just done the quickest method and moved on. And don’t even go anywhere near sharpening!
So, some thoughts on nails…
The first project in the The Joiner and Cabinet Maker is a simple nailed box. No dovetails, or fancy joints, just a simple nailed box done with care and pride. Dovetails ARE an appropriate and beautiful joint, and I fully intend to make many a piece with them, but do they belong on every thing? Sometimes a simple rabbet joint, and a few nails is all you need.
I’ve used a couple different kinds of more or less period nails lately and enjoyed the look of them, and the ease of use.
The wrought head nails from Rockler work quite well, and the look of the box after completion was great. I loved the look of them, and have been using them more and more. The shaft is not perfectly smooth, which gives it a bit more grip.
The Tremont Nail Company is still making nails the old way. They are bit more expensive than your ordinary hardware store nails, but they give the work a bit of panache that would be missing with an ordinary nail, as well as the ability to “clinch” a nail through the wood for greater holding power.
There is one small note of caution though on the use of these nails. You can’t simply poke them into the wood and hammer away freely, because you’ll likely end up splitting the wood. The shape of these nails is more of a wedge generally, and can force the wood apart. You need to dig into the past a little to complete the picture. To prevent splitting you’ll need to open up a small hole first all the way through the wood with a tool of some kind.
There are a couple different ways to do this, one of which I’ve been experimenting with lately is the use of a “brad-awl” which looks like a small flat bladed screwdriver and is driven into the wood with a twisting back and forth motion to open up a hole. When done right it doesn’t so much as drill a hole as move the wood fibers to the sides. This allows the fibers to grab the nail as they are driven into the hole. This works best in softwoods like Pine as far as I can tell from my experimentation. In hardwoods like Oak, I’ve found that “birdcage awl” or a gimlet bit works best to make a hole through the wood.
I’ve made my own from regular scratch awl blades I picked up at HF, and cut the two flat facets on the blade on the grinder.  I initially made my angles way to steep and the metal bent and twist at the tip because it was too weak. I’ve been experimenting on a broader angles to good success. To make a “birdcage awl” I ground a four sided pyramid shape into the tip of another scratch awl (I bought a handful of these things for cheap) and it works wonders on Oak with a simple twisting motion. I can get a hole through a 1/2″ board quicker than I could have found my bits and got it chucked up in the cordless drill (which is usually out of juice most of the time anyway). For multiple holes, it can be a pain, but for a few holes it’s super easy and quick.
And finally, I leave you with a link to an article I found on the net titled “Forged and Cut Iron Nails” by Gregory LeFever.
— Badger
P.S. Tools for Working Wood has opened up a new “Nail Salon” on their site, selling Tremont Nails in small lots, which is a good idea to order a few different kinds to experiment with.
Carved Utility Box
We recently got back from a summer family road trip which was refreshing and tons of fun.  While I was on the road I had a lot of time to think, which you might expect when you put 2950 miles on  your brand new (to us) Subaru Outback. Of the thoughts that looped through my head as we ate up the miles on our Big Adventure (that’s how we pitched it to the three year old in the back seat) was about woodworking.  I also had some time to explore some of the Redwood forest and the carvers that ply their wares by the road side.  Needless to say when we got back, I wanted to get back to the shop and work.
Here is what I got done this nice and sunny afternoon.
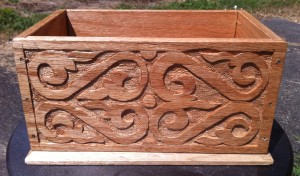
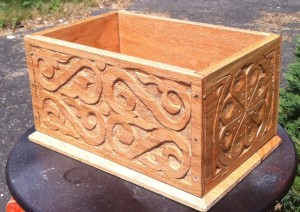
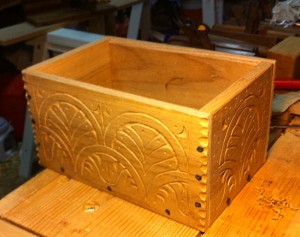
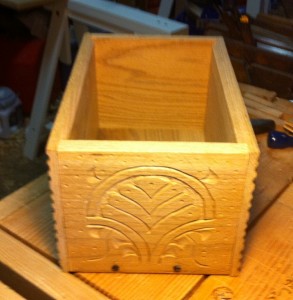
This is made from some really crappy Big Box oak, which I will never buy again unless I need small crap boxes. Â I tried to carve it and it splintered, and chipped, and generally sucked all the fun out of carving. Â However, I decided to make it into something I could use around the shop to hold tools and assorted sundries which my shop desperately needs. Â So I tried some more free hand carving designs on the sides just for fun, and nailed this together. Â It’s sitting outside and drying the coat of spray shellac I just put on it before I snapped these photos.
It doesn’t look half bad in the pictures, but if you got a closer look at it you’d see the quality (or lack thereof) and the terrible job I did nailing it together. For some reason I had some real problems with the nails, and I think I rushed it too much. Â Something I need to stop doing when I work. Â I need to take my time and focus on the task at hand, not the end product. Â It makes me make mistakes, which affect my over all interest in the craft.
But I did learn a lot from this box, and I will continue to grow my skills (on some better wood thank you very much). Â It will serve a purpose in the shop holding chisels, and reminding me to slow down and work thoughtfully.
Plus it felt good to MAKE something. Â I have a very people oriented job, managing a number of teams which makes the physical labor of craft so much more appealing to me.
Now to plan out my next project for this Quartersawn Oak I picked up. Â Maybe another box? Â Maybe a portable tool carrier? I know it will be carved, so I can continue to practice.
Badger
More Scroll work and my new Carving Bench
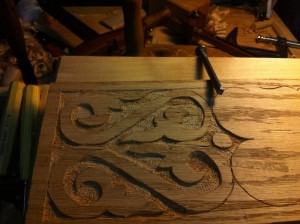
I snuck down to the shop after I got my kiddo to sleep to continue work on the S Scroll box face. I got a second scroll complete, and some of the outline of the other two. I’ve also learned a few things about crappy hardware store wood along the way. The open porous grain of this oak causes some serious issues when carving, and it’s difficult to get a nice clean surface (not flat, just clean) because the would just disintegrates as I try to carve it out. It also is weaker than the solid parts (fairly obvious really) and causes some splintering on the areas where it shouldn’t. I’ll have to fix those later once I’ve gotten this all done, or maybe I can plane it down, not sure.
I did modify the design here and there to accommodate sections of weakness to good effect, but I have a couple spots that are going to be a problem. I see a little more clearly now though why some of the designs I’ve looked at, and PF has discussed as well are not totally symmetrical.
I also am learning a lot about what I need to learn. Sounds awkward, but it means I’ve learning some of the things that I will have to simply practice a lot to get better at. You can feel it when it works right, it just… Makes Sense. In a Zen sort of way, it feels right. And the converse is true. You can really feel it when it’s not at all right. I’m trying to learn to take a deep breath, slow down and think those areas through rather than my natural reaction which is to panic and push harder or move faster. Which usually doesn’t work so well, as you might imagine.
I also snapped a picture of my new “carving bench” or maybe it’s a “bench on a bench” or something. I’ve seen a few blog posts around the woodworking blogs about these, and I decided it was probably the best thing for my aching back after a long session of carving. Night and Day! I just screwed together some pieces of left over construction grade lumber, and clamped it between the bench dogs and vice to hold it down. Nothing fancy either to hold the work. I have visions of using some of those fancy Wonder Dogs, or whatever they call them from Lee Valley, but that was too complicated and I didn’t have them anyway. Clamps work great and the board is not going anywhere.
Off to bed, with visions of S Scrolls dancing in my head.
Badger
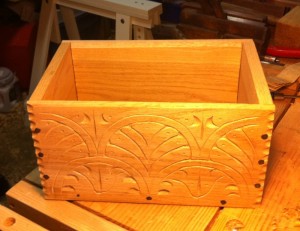
Carved Box finished!
As chronicled in the following posts one, two, three, I’ve been working on a carved box in the style of a 17th century pattern. Inspired by Peter Folansbee, and his blog I’ve gone down a pretty deep rabbit hole, and I’ve been having a blast with it. I’m planning to continue the practice carving starting with my next project, possibly a saw till, and keep at it. While I am happy with what I put together, it only showed me how much I had to learn. I’ve been doing lots of research, and as usual buying books. I still can’t find Chinnery, but I do have it on loan from the library right now, and it’s a gold mine of pictures and information.
Picking up where I last left off with the carved sides and ends, I now had to put together these carved boards into a box of some kind. I started by trimming the boards to their final size, which took some work to figure out as I didn’t have any good wide boards for the bottom or a possible lid. I had to rethink my design quite a bit, and finally settled on a shape. It had been going to be a box with a lid and molding around the bottom edge, but instead I opted to simplify things quite a bit. It’s now going to be for my carving tools which I’ve started gathering a number of.
After I had the sides trimmed, I used my moving fillister plane and a rabbet plane to make some rabbets, a simple procedure I nonetheless made more complicated that it needed to be. My fillister plane needs a bit of adjusting I think, so I had to do a lot of clean up with the rabbet plane. It’s something I need to do a few more of before I feel comfortable doing it. Next I needed to make some holes for my nails. I decided to try something I’d read about, and use a “birdcage” awl. I took a cheap ice pick I’d gotten from Harbor Freight, and using a grinder made the tip a four sided pyramid instead a rounded point.  Using this I twisted it back and forth in one spot, and it made a rather nice hole. It’s a old trick apparently, but it’s not too common from what I’ve around the blog-o-sphere. I also tried out my gimlet bits that I picked up ages ago at a tool show. Those worked well enough, but took a long time to get started, so I finally settled on a combination of awl and gimlet bit which was fairly quick, especially when I did a whole series of holes.
Once all the wholes were bored, I put some finishing touches on the edges with a gouge. I’ve seen this done on quite a number of 17th century boxes, and it was quick and easy to do. So now I had my bottom board cut, sides trimmed, and everything prepped. I nailed it together with some Wrought Head Nails I ordered from Rockler. They gave it a nice touch. I’m not sure if they are accurate, but my box isn’t really going for full period anyway.
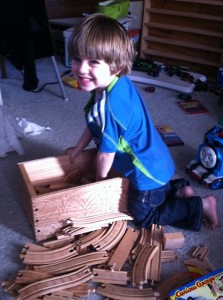
After I finished I brought it up to show the family. My son immediately put it to it’s proper use, putting wooden train tracks into.
Carved box progress
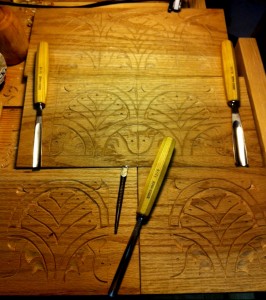
I managed to finish the end panels this afternoon while the kiddo was sleeping. I’m taking my practice panels and making them into a box, because I’m pretty happy with the carving.  I’m going to rabbet the ends, nail it together with some wrought iron head nails I got from Rockler. For the carving on the end panels, I picked one fan tail design for each panel, just to carry the theme around. I even went back to my first panel, and fixed it up to be more in line with the other panels, since I’d improved on my skills a bit in the subsequent panels.
Just some trimming, and nailing to do to make the box sides, now to get some wood for a top and bottom for the box, since I don’t have anything big enough in the shop. Speaking of trimming…
Look what my lovely wife bought for me for my birthday! It was earlier this month, but she knew the Lie Nielson hand tool event was coming to town, so she let me buy something there. I have a dovetail marker coming too, something she’d wanted to get me for my Christmas stocking, but they were out of stock.
It’s a thing of beauty, as all the LN tools are, and it cuts well, and is a comfortable fit in the hand. I’ve got some rip back saws, mostly antique store rusty treasure finds. Just need to get them sharpened, or take another whack at it myself.
Badger


